
User's Manual
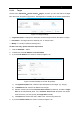
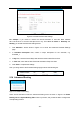
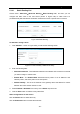
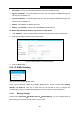
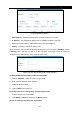
Table Of Contents
- Package Contents
- Chapter 1. Introduction
- Chapter 2. Connecting the router
- Chapter 3. Quick Setup
- Chapter 4. Basic
- Chapter 5. Advanced
- 5.1 Status
- 5.2 Network
- 5.3 Dual Band Selection
- 5.4 Wireless 2.4GHz
- 5.5 Wireless 5GHz
- 5.6 Guest Network
- 5.7 DHCP
- 5.8 USB Settings
- 5.9 NAT Boost
- 5.10 Forwarding
- 5.11 Security
- 5.12 Parental Control
- 5.13 Access Control
- 5.14 Advanced Routing
- 5.15 Bandwidth Control
- 5.16 IP & MAC Binding
- 5.17 Dynamic DNS
- 5.18 IPv6 Support
- 5.19 System Tools
- Appendix A: FAQ
- Appendix B: Configuring the PC
- Appendix C: Specifications
- Appendix D: Glossary

Archer C8
AC1750 Wireless Dual Band Gigabit Router
- 91 -
Figure 5-77 Schedule Settings
Schedule Description - Displays the description of the schedule and this description is
unique.
Day - Displays the day(s) in a week.
Time - Displays the time period in a day.
Modify - Here you can edit or delete an existing schedule.
To add a new schedule, follow the steps below:
1. Click Add New... button shown in Figure 5-77 and the next screen will pop-up as shown in
Figure 5-78.
2. In Schedule Description field, create a unique description for the schedule, e.g. Schedule_1.
3. In Day field, select the day or days you need.
4. In Time field, you can select all day-24 hours or you may enter the Start Time and Stop Time
in the corresponding field.
5. Click Save to complete the settings.
Click the Delete All button to delete all the entries in the table.
Click the Next button to go to the next page, or click the Previous button to return to the previous
page.