
User's Manual
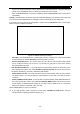
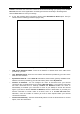


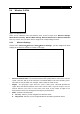
Table Of Contents
- Package Contents
- Chapter 1. Introduction
- Chapter 2. Connecting the router
- Chapter 3. Quick Setup
- Chapter 4. Basic
- Chapter 5. Advanced
- 5.1 Status
- 5.2 Network
- 5.3 Dual Band Selection
- 5.4 Wireless 2.4GHz
- 5.5 Wireless 5GHz
- 5.6 Guest Network
- 5.7 DHCP
- 5.8 USB Settings
- 5.9 NAT Boost
- 5.10 Forwarding
- 5.11 Security
- 5.12 Parental Control
- 5.13 Access Control
- 5.14 Advanced Routing
- 5.15 Bandwidth Control
- 5.16 IP & MAC Binding
- 5.17 Dynamic DNS
- 5.18 IPv6 Support
- 5.19 System Tools
- Appendix A: FAQ
- Appendix B: Configuring the PC
- Appendix C: Specifications
- Appendix D: Glossary

Archer C9 AC1900 Wireless Dual Band Gigabit Router
- 23 -
Figure 5-5 WAN - PPPoE
User Name/Password - Enter the User Name and Password provided by your ISP. These
fields are case-sensitive.
Secondary Connection - It’s available only for PPPoE Connection. If your ISP provides an
extra Connection type such as Dynamic/Static IP to connect to a local area network, then you
can check the radio button of Dynamic/Static IP to activate this secondary connection.
Disabled - The Secondary Connection is disabled by default, so there is PPPoE
connection only. This is recommended.
Dynamic IP - You can check this radio button to use Dynamic IP as the secondary
connection to connect to the local area network provided by ISP.
Static IP - You can check this radio button to use Static IP as the secondary connection
to connect to the local area network provided by ISP.
Connect on Demand - In this mode, the Internet connection can be terminated automatically
after a specified inactivity period (Max Idle Time) and be re-established when you attempt to
access the Internet again. If you want your Internet connection keeps active all the time,
please enter “0” in the Max Idle Time field.
Otherwise, enter the number of minutes you want
to have elapsed before your Internet access disconnects.
Connect Automatically - The connection can be re-established automatically when it was
down.
Time-based Connecting - The connection will only be established in the period from the start
time to the end time (both are in HH:MM format).
Note:
Only when you have configured the system time on “Advanced→System Tools→Time
Settings” page, will the Time-based Connecting function can take effect.
Connect Manually - You can click the Connect/Disconnect button to connect/disconnect
immediately. This mode also supports the Max Idle Time function as Connect on Demand