
User's Manual
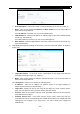
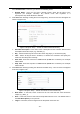
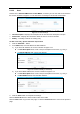
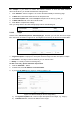
Table Of Contents
- Package Contents
- Chapter 1. Introduction
- Chapter 2. Connecting the router
- Chapter 3. Quick Setup
- Chapter 4. Basic
- Chapter 5. Advanced
- 5.1 Status
- 5.2 Network
- 5.3 Dual Band Selection
- 5.4 Wireless 2.4GHz
- 5.5 Wireless 5GHz
- 5.6 Guest Network
- 5.7 DHCP
- 5.8 USB Settings
- 5.9 NAT Boost
- 5.10 Forwarding
- 5.11 Security
- 5.12 Parental Control
- 5.13 Access Control
- 5.14 Advanced Routing
- 5.15 Bandwidth Control
- 5.16 IP & MAC Binding
- 5.17 Dynamic DNS
- 5.18 IPv6 Support
- 5.19 System Tools
- Appendix A: FAQ
- Appendix B: Configuring the PC
- Appendix C: Specifications
- Appendix D: Glossary

Archer C9 AC1900 Wireless Dual Band Gigabit Router
- 67 -
If the Domain Name is selected, you will see the following items:
Domain Name - Here you can enter 4 domain names, either the full name or the
keywords (for example, TP-LINK). Any domain name with keywords in it
(www.tp-link.com) will be blocked or allowed.
3. Click Next when finishing creating the access target entry, and the next screen will appear as
shown in Figure 5-68.
Figure 5-68 Quick Setup – Create an Advanced Schedule Entry
Schedule Description - In this field, create a description for the schedule. Note that this
description should be unique (e.g. Schedule_1).
Day - Choose Select Days and select the certain day (days), or choose Everyday.
Time - Select "all day-24 hours" checkbox, or deselect the checkbox and specify the
Start Time and Stop Time manually.
Start Time - Enter the start time in HHMM format (HHMM are 4 numbers). For example
0800 is 8:00.
Stop Time - Enter the stop time in HHMM format (HHMM are 4 numbers). For example
2000 is 20:00.
4. Click Next when finishing creating the advanced schedule entry. The next screen will appear
as shown in Figure 5-69.
Figure 5-69 Quick Setup – Create an Internet Access Control Entry
Rule Name - In this field, create a name for the rule. Note that this name should be
unique (e.g. Rule_1).
Host - In this field, select a host from the drop-down list for the rule. The default value is
the Host Description you set just now.
Target - In this filed, select a target from the drop-down list for the rule.