
User's Manual
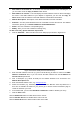
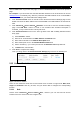
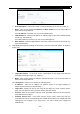
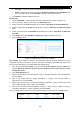
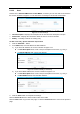
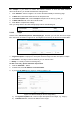
Table Of Contents
- Package Contents
- Chapter 1. Introduction
- Chapter 2. Connecting the router
- Chapter 3. Quick Setup
- Chapter 4. Basic
- Chapter 5. Advanced
- 5.1 Status
- 5.2 Network
- 5.3 Dual Band Selection
- 5.4 Wireless 2.4GHz
- 5.5 Wireless 5GHz
- 5.6 Guest Network
- 5.7 DHCP
- 5.8 USB Settings
- 5.9 NAT Boost
- 5.10 Forwarding
- 5.11 Security
- 5.12 Parental Control
- 5.13 Access Control
- 5.14 Advanced Routing
- 5.15 Bandwidth Control
- 5.16 IP & MAC Binding
- 5.17 Dynamic DNS
- 5.18 IPv6 Support
- 5.19 System Tools
- Appendix A: FAQ
- Appendix B: Configuring the PC
- Appendix C: Specifications
- Appendix D: Glossary

Archer C9 AC1900 Wireless Dual Band Gigabit Router
- 68 -
Schedule - In this field, select a schedule from the drop-down list for the rule.
Status - In this field, there are two options, Enabled or Disabled. Select Enabled so that
the rule will take effect. Select Disabled so that the rule won't take effect.
5. Click Finish to complete adding a new rule.
Method Two:
1. Click the Add New… button and the next screen will pop up as shown in Figure 5-70.
2. Give a name
(e.g. Rule_1) for the rule in the Rule Name field.
3. Select a host from the Host drop-down list or choose “Click Here To Add New Host List”.
4. Select a target from the Target drop-sown list or choose “Click Here To Add New Target
List”.
5. Select a schedule from the Schedule drop-down list or choose “Click Here To Add New
Schedule”.
6. In the Status field, select Enabled or Disabled to enable or disable your entry.
7. Click the Save button.
Figure 5-70 Add Internet Access Control Entry
For example: If you desire to allow the host with MAC address 00-11-22-33-44-AA to access
www.tp-link.com only from 18:00 to 20:00 on Saturday and Sunday, and forbid other hosts in the
LAN to access the Internet, you should follow the settings below:
1. Click the menu Access Control on the left. Select Enable Internet Access Control and
choose "Allow the packets specified by any enabled access control policy to pass
through the router".
2. Click Setup Wizard button.
3. Add a new host with the Host Description is Host_1 and MAC Address is 00-11-22-33-44-AA,
and click Next.
4. Add a new target with the Target Description is Target_1 and Domain Name is
www.tp-link.com, and click Next.
5. Add a new schedule with the Schedule Description is Schedule_1, Day is Sat and Sun, Start
Time is 1800 and Stop Time is 2000, and click Next.
6. Add a new rule with the Rule Description is Rule_1, Host is Host_1, Target is Target_1,
Schedule is Schedule_1, Status is Enabled, and click Finish.
Then you will go back to the Access Control Rule Management page and see the following list.