
User's Manual
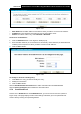
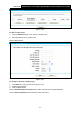
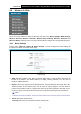
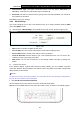
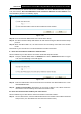
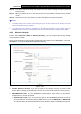
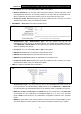
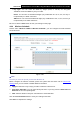

Table Of Contents
- Package Contents
- Chapter 1. Product Overview
- Chapter 2. Connecting the Modem Router
- Chapter 3. Quick Installation Guide
- Chapter 4. Configuring the Modem Router
- 4.1 Login
- 4.2 Status
- 4.3 Quick Setup
- 4.4 Operation Mode
- 4.5 Network
- 4.6 IPTV
- 4.7 DHCP Server
- 4.8 Wireless 2.4GHz
- 4.9 Wireless 5GHz
- 4.10 Guest Network
- 4.11 USB Settings
- 4.12 Route Settings
- 4.13 IPv6 Route Settings
- 4.14 Forwarding
- 4.15 Parental Control
- 4.16 Firewall
- 4.17 IPv6 Firewall
- 4.18 IPv6 Tunnel
- 4.19 Bandwidth Control
- 4.20 IP&MAC Binding
- 4.21 Dynamic DNS
- 4.22 Diagnostic
- 4.23 System Tools
- 4.24 Logout
- Appendix A: Specifications
- Appendix B: Troubleshooting
- Appendix C: Technical Support

Archer D9
AC1900 Wireless Dual Band Gigabit ADSL2+ Modem Router User Guide
Figure 4-27
MAC Addre ss: The MAC address of the PC for which you want to reserve an IP address.
IP Address: The IP address reserved for the PC by the modem router.
Status: The status of this entry, either Enabled or Disabled.
To Reserve an IP address:
1. Click the Add New button. Then Figure 4-28 will pop up.
2. Enter the MAC address (in XX:XX:XX:XX:XX:XX format.) and IP address (in dotted-decimal
notation) of the computer for which you want to reserve an IP address.
3. Click the Save button.
Figure 4-28
To modify or delete an existing entry:
1. Click Edit in the entry you want to modify the entry.
2. Modify the information.
3. Click the Save button.
Click the Enable/Disable Selected button to make selected entries enabled/disabled.
Click the Delete Selected button to delete the selected entries.
4.7.4 Conditional Pool
Choose menu “DHCP Server”“Conditional Pool”, you can see the next screen (shown in
Figure 4-29). This page displays vendor class settings and allows you to set parameters for
vendor class by clicking corresponding buttons.
40