
User's Guide
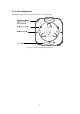


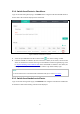


Table Of Contents
- Chapter 1 About This Guide
- Chapter 2 Introduction
- Chapter 3 Typical Topology
- Chapter 4 Getting Started with the EAP
- Chapter 5 Management Mode
- Chapter 6 Cluster Mode
- Chapter 7 Standalone Mode

6
Chapter 4 Getting Started with the EAP
The following content will guide you to quickly set up a wireless network connection with several
EAPs, and login to the management page to configure the EAPs. The management host can be
connected to the EAP wirelessly or with wires. Wireless Login is conveniently recommended.
EAP115 can be managed in three ways: EAP Controller, Cluster and Standalone. In this User
Guide, we introduce Cluster Mode and Standalone Mode.
Option 1: Wireless Login
Figure 4-1 Sample Network Diagram for Wireless Login
Step 1: Power on
Power on the EAPs.
Step 2: Wireless Access
1. Make sure the management host is set to obtain IP address automatically.
2. Join the wireless network using the default SSID TP-LINK_2.4GHz_XXXXXX, where XXXXXX
represents the last 6 characters of the EAP's MAC address. Password is not required.
Step 3: Choose the work mode
1. Open a web browser and type in http://tplinkeap.net to access the EAP's web
management page. The default user name and password are admin (all lowercase).
2. Choose the work mode in the drop-down box the first time you login. With factory default
settings, the EAP works in Standalone mode.
3. Configure the EAP parameters. Please refer to the corresponding chapter according to the
work mode you chose.
Congratulations! Now you can enjoy the wireless network.
If you want to perform more configurations, please connect to the new SSID.