User's Guide
Manuals
Brands
TP-Link Technologies Manuals
Electronics
300Mbps Wireless N Ceiling Mount Acess Point
41
42
43
44
45
46
47
48
49
50
Table Of Contents
Chapter 1 About This Guide
1.1 Intended Readers
1.2 Conventions
Chapter 2 Introduction
2.1 Overview of the EAP
2.2 Appearance Description
2.2.1 Top View
2.2.2 Panel Layout
2.2.3 Mounting Bracket
Chapter 3 Typical Topology
Chapter 4 Getting Started with the EAP
Option 1: Wireless Login
Option 2: Wired Login
Chapter 5 Management Mode
5.1 Mode Identification
5.2 Mode Switching
5.2.1 Choose the Work Mode the First Time You Login
5.2.2 Switch from Cluster to Standalone
5.2.3 Switch from Standalone to Cluster
Chapter 6 Cluster Mode
6.1 Quick Setup
6.2 Cluster
6.2.1 Cluster
6.2.2 AP List
6.3 Wireless
6.3.1 Wireless Settings
6.3.1.1 Wireless Basic Settings
6.3.1.2 SSIDs
6.3.1.3 Wireless Advanced Settings
6.3.1.4 Load Balance
6.3.2 Portal
6.3.2.1 Portal Configuration
6.3.2.2 Free Authentication Policy
6.3.3 MAC Filtering
6.3.4 Scheduler
6.3.5 QoS
6.3.5.1 AP EDCA Parameters
6.3.5.2 Station EDCA Parameters
6.3.6 Rogue AP Detection
6.3.6.1 Settings
6.3.6.2 Detected Rogue AP List
6.3.6.3 Trusted AP List
6.3.6.4 Download/Backup Trusted AP List
6.4 Monitoring
6.4.1 AP
6.4.1.1 AP List
6.4.2 SSID
6.4.2.1 SSID List
6.4.3 Client
6.4.3.1 User List
6.4.3.2 Portal Authenticated Guest
6.5 Management
6.5.1 System Log
6.5.1.1 Log List
6.5.1.2 Log Settings
6.5.2 Web Server
6.5.3 Management Access
6.5.4 LED ON/OFF
6.5.5 SSH
6.5.6 SNMP
6.6 System
6.6.1 User Account
6.6.2 Time Settings
6.6.2.1 Time Settings
6.6.2.2 Daylight Saving
6.6.3 Reboot/Reset
6.6.4 Backup & Restore
6.6.5 Firmware Upgrade
Chapter 7 Standalone Mode
7.1 Network
7.2 Wireless
7.2.1 Wireless Settings
7.2.1.1 Wireless Basic Settings
7.2.1.2 SSIDs
7.2.1.3 Wireless Advanced Settings
7.2.1.4 Load Balance
7.2.2 Portal
7.2.2.1 Portal Configuration
7.2.2.2 Free Authentication Policy
7.2.3 MAC Filtering
7.2.4 Scheduler
7.2.5 QoS
7.2.5.1 AP EDCA Parameters
7.2.5.2 Station EDCA Parameters
7.2.6 Rogue AP Detection
7.2.6.1 Settings
7.2.6.2 Detected Rogue AP List
7.2.6.3 Trusted AP List
7.2.6.4 Download/Backup Trusted AP List
7.3 Monitoring
7.3.1 AP
7.3.1.1 AP List
7.3.2 SSID
7.3.2.1 SSID List
7.3.3 Client
7.3.3.1 User List
7.3.3.2 Portal Authenticated Guest
7.4 Management
7.4.1 System Log
7.4.1.1 Log List
7.4.1.2 Log Settings
7.4.2 Web Server
7.4.3 Management Access
7.4.4 LED ON/OFF
7.4.5 SSH
7.4.6 SNMP
7.5 System
7.5.1 User Account
7.5.2 Time Settings
7.5.2.1 Time Settings
7.5.2.2 Daylight Saving
7.5.3 Reboot/Reset
7.5.4 Backup & Restore
7.5.5 Firmware Upgrade
40
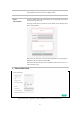
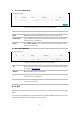
Step 2:
Click
and input a profile name
for th
e rule
.
Figure
6-
34
Add
a Profile
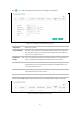
Step 3:
C
lick
a
nd co
nfigur
e the
rec
urring sc
hedule
for t
he rul
e
.
Figure
6-
35
Add a R
u
le
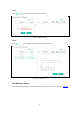
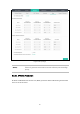
Schedu
ler As
sociat
io
n
Thi
s zone
will
di
sp
lay
dif
fere
nt c
onte
nt
s
bas
ed
on y
our selection
of asso
ciatio
n mo
de
in
Settings
.
1
...
...
46
47
48
49
50
...
...
127