
User's Manual
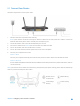
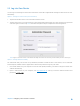

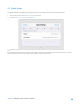
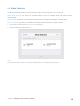

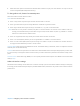
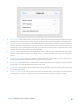
Table Of Contents
- Chapter 1. Get to Know About Your Router
- Chapter 2. Configure your Touch P5 as a Router
- 2.1 Connect Your Router
- 2.2 Log into Your Router
- 2.3 Quick Setup
- 2.4 Mode Selection
- 2.5 Wireless Settings
- 2.6 WPS
- 2.7 Guest Network
- 2.8 Parental Controls
- 2.9 Devices Control
- 2.10 Printer Server
- 2.11 DDNS
- 2.12 LAN
- 2.13 DHCP Server
- 2.14 QoS
- 2.15 Clock
- 2.16 Screen Settings
- 2.17 Reboot & Reset
- 2.18 Administrator Password
- 2.19 About
- 2.20 USB Application
- 2.21 Set Up IPv6 Connection
- 2.22 NAT Forwarding
- 2.23 Update the Firmware
- Troubleshooting Guide & FAQ
- Appendix A: Specifications
- Appendix B: Glossary
- 空白页面

2.1 Connect Your Router
Follow the steps below to connect your router.
1. Install the antennas and position them vertically.
Note: If your Internet connection is through an Ethernet cable from the wall, instead of a modem, connect the
Ethernet cable directly to the router’s Internet port, and skip step 2,3,4.
2. Turn off the modem, and remove the backup battery if it has one.
3. Connect the modem to the Internet port on the router via an Ethernet cable.
4. Turn on the modem, and wait 2 minutes for it to restart.
5. Turn on the router and wait until the system boot on the screen completes.
6. Connect your computer to the router.
Option 1: Wired
Connect your computer’s Ethernet port to the Internet port on the router Touch P5 via the Ethernet cable.
Option 2: Wirelessly
Use the default SSID (Wireless Network Name) and Wireless Password printed on the product label of the router to
connect wirelessly.
Note: If you want to use the router for media sharing, storage sharing and printer sharing, please cable the USB storage
device or printer to the USB port of the router.
Remote Access
via FTP Server
Media Sharing
Local Storage
Sharing
Printer Sharing
Chapter 2 Configure your Touch P5 as a Router 10