
User's Manual
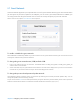
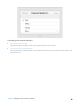

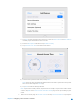


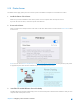


Table Of Contents
- Chapter 1. Get to Know About Your Router
- Chapter 2. Configure your Touch P5 as a Router
- 2.1 Connect Your Router
- 2.2 Log into Your Router
- 2.3 Quick Setup
- 2.4 Mode Selection
- 2.5 Wireless Settings
- 2.6 WPS
- 2.7 Guest Network
- 2.8 Parental Controls
- 2.9 Devices Control
- 2.10 Printer Server
- 2.11 DDNS
- 2.12 LAN
- 2.13 DHCP Server
- 2.14 QoS
- 2.15 Clock
- 2.16 Screen Settings
- 2.17 Reboot & Reset
- 2.18 Administrator Password
- 2.19 About
- 2.20 USB Application
- 2.21 Set Up IPv6 Connection
- 2.22 NAT Forwarding
- 2.23 Update the Firmware
- Troubleshooting Guide & FAQ
- Appendix A: Specifications
- Appendix B: Glossary
- 空白页面

2.10 Printer Server
The Printer Server app guides you how to share a printer with different computers connected to the router.
1. Install the Driver of the Printer
Make sure you have installed the driver of the printer on each computer that needs printer service.
If you do not have the driver, contact the printer manufacturer.
2. Connect the Printer
Cable a printer to the USB port of the router with a USB cable. Wait several seconds until the Printer Name listed
on the screen.
Note: You can check Printer Compatibility List at
http://www.tp-link.com/app/usb/ to verify whether your printer
is supported by the router. Printers unlisted may be incompatible with the router.
3. Install the TP-LINK USB Printer Controller Utility
TP-LINK USB Printer Controller Utility helps you access the shared printer. Download and Install the utility on each
computer that needs printer service.
Chapter 2 Configure your Touch P5 as a Router 27