
User's Manual
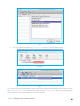
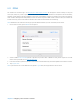


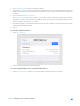
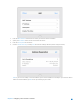

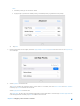

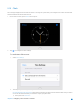
Table Of Contents
- Chapter 1. Get to Know About Your Router
- Chapter 2. Configure your Touch P5 as a Router
- 2.1 Connect Your Router
- 2.2 Log into Your Router
- 2.3 Quick Setup
- 2.4 Mode Selection
- 2.5 Wireless Settings
- 2.6 WPS
- 2.7 Guest Network
- 2.8 Parental Controls
- 2.9 Devices Control
- 2.10 Printer Server
- 2.11 DDNS
- 2.12 LAN
- 2.13 DHCP Server
- 2.14 QoS
- 2.15 Clock
- 2.16 Screen Settings
- 2.17 Reboot & Reset
- 2.18 Administrator Password
- 2.19 About
- 2.20 USB Application
- 2.21 Set Up IPv6 Connection
- 2.22 NAT Forwarding
- 2.23 Update the Firmware
- Troubleshooting Guide & FAQ
- Appendix A: Specifications
- Appendix B: Glossary
- 空白页面

2.11 DDNS
The remote user needs to log in to http://Router’s WAN IP:port number to manage the router remotely or visit your
server (FTP, HTTP, etc.), which requires the remote user to know the router’s WAN IP. The ISP (Internet Service Provider),
however, usually assigns a dynamic WAN IP to the router. If the WAN IP changes, the remote user needs to reconfirm it
when needed. The Dynamic DNS (DDNS) can link the router’s dynamic WAN IP with a domain name, thus allow the
remote user to log in the router with the domain name and save the trouble of reconfirming.
Note: DDNS does not work if the ISP assigns a private WAN IP address (such as 192.168.0.x) to the router.
1. On the menu screen, tap the DDNS icon to open it.
2. Select a DDNS Service Provider (NO-IP or Dyndns). If you don’t have a DDNS account, please register an account
with a service provider such as www.dyndns.com
.
3. Enter the username, password, domain name (such as lisadns.ddns.net), and select update interval of the account.
4. Tap Login & Save.
Note: If you want to use a new DDNS account, please Logout first, then login with the new account.
Chapter 2 Configure your Touch P5 as a Router 31