
User's Manual
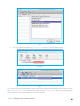
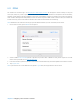


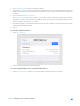
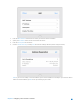

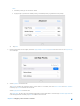

Table Of Contents
- Chapter 1. Get to Know About Your Router
- Chapter 2. Configure your Touch P5 as a Router
- 2.1 Connect Your Router
- 2.2 Log into Your Router
- 2.3 Quick Setup
- 2.4 Mode Selection
- 2.5 Wireless Settings
- 2.6 WPS
- 2.7 Guest Network
- 2.8 Parental Controls
- 2.9 Devices Control
- 2.10 Printer Server
- 2.11 DDNS
- 2.12 LAN
- 2.13 DHCP Server
- 2.14 QoS
- 2.15 Clock
- 2.16 Screen Settings
- 2.17 Reboot & Reset
- 2.18 Administrator Password
- 2.19 About
- 2.20 USB Application
- 2.21 Set Up IPv6 Connection
- 2.22 NAT Forwarding
- 2.23 Update the Firmware
- Troubleshooting Guide & FAQ
- Appendix A: Specifications
- Appendix B: Glossary
- 空白页面

2. The Enable DHCP Server checkbox is enabled by default.
3. Specify the IP Address Pool, the start address and end address must be on the same subnet with LAN IP. The
router will assign addresses within this specified range to its clients. It is from 192.168.0.100 to 192.168.0.199
by default.
4. Enter a value for the Address Lease Time.
The Address Lease Time is the amount of time in which a DHCP client can lease its current dynamic IP address
assigned by the router. After the dynamic IP address expires, the user will be automatically assigned a new
dynamic IP address. The default is 120 minutes.
5. The Default Gateway is automatically filled the same as the LAN IP address of the router. Enter Primary DNS
and Secondary DNS if the ISP offers.
6. Tap Save.
To view the client information:
1. Select DHCP Client List.
2. You can view the information of connected client.
To reserve LAN IP addresses for a specified client device:
1. Select Address Reservation and tap Add to add an address reservation entry for your device.
Chapter 2 Configure your Touch P5 as a Router 34