
User's Manual
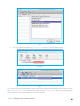


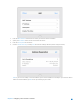

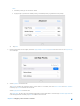

Table Of Contents
- Chapter 1. Get to Know About Your Router
- Chapter 2. Configure your Touch P5 as a Router
- 2.1 Connect Your Router
- 2.2 Log into Your Router
- 2.3 Quick Setup
- 2.4 Mode Selection
- 2.5 Wireless Settings
- 2.6 WPS
- 2.7 Guest Network
- 2.8 Parental Controls
- 2.9 Devices Control
- 2.10 Printer Server
- 2.11 DDNS
- 2.12 LAN
- 2.13 DHCP Server
- 2.14 QoS
- 2.15 Clock
- 2.16 Screen Settings
- 2.17 Reboot & Reset
- 2.18 Administrator Password
- 2.19 About
- 2.20 USB Application
- 2.21 Set Up IPv6 Connection
- 2.22 NAT Forwarding
- 2.23 Update the Firmware
- Troubleshooting Guide & FAQ
- Appendix A: Specifications
- Appendix B: Glossary
- 空白页面

2. Enter the MAC Address of the device for which you want to reserve IP address.
3. Specify the IP Address which will be reserved for the device.
4. Enter the Description for the device.
5. Check to Enable This Entry and tap Save to make the settings effective (shown as figure below).
Note: If you want to modify a reserved address, tap the reserved address to modify it. If you want to add or
delete a reserved address, tap Edit to set up according to your needs.
Chapter 2 Configure your Touch P5 as a Router 35