
User's Manual
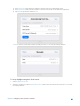
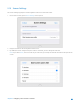
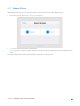
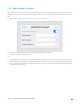
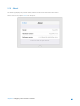

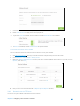
Table Of Contents
- Chapter 1. Get to Know About Your Router
- Chapter 2. Configure your Touch P5 as a Router
- 2.1 Connect Your Router
- 2.2 Log into Your Router
- 2.3 Quick Setup
- 2.4 Mode Selection
- 2.5 Wireless Settings
- 2.6 WPS
- 2.7 Guest Network
- 2.8 Parental Controls
- 2.9 Devices Control
- 2.10 Printer Server
- 2.11 DDNS
- 2.12 LAN
- 2.13 DHCP Server
- 2.14 QoS
- 2.15 Clock
- 2.16 Screen Settings
- 2.17 Reboot & Reset
- 2.18 Administrator Password
- 2.19 About
- 2.20 USB Application
- 2.21 Set Up IPv6 Connection
- 2.22 NAT Forwarding
- 2.23 Update the Firmware
- Troubleshooting Guide & FAQ
- Appendix A: Specifications
- Appendix B: Glossary
- 空白页面

c. Choose to use the default Account (admin) or use a new account and click Save.
d. Enable Authentication to apply the account you just set.
If you leave Share All
enabled, click the button to enable Authentication
for all folders.
If Share All is disabled, enable Authentication
for specific folders.
To Customize the Address of the USB Disk
You can customize the server name and use the name to access your USB disk.
a. Visit http://tplinkwifi.net/
,
then log in with the username and password you set for the router.
b. Go to
Advanced
>
USB Settings
>
Sharing Access
.
c. Make sure Network Neighborhood is ticked, and enter a Network/Media Server Name as you like, such as
MyShare, then click Save
.
d. Now you can access the USB disk with \\MyShare (smb://MyShare
for Mac).
2.20.2 Remote Access via FTP Server
You can access your USB disk outside the local area network.
Chapter 2 Configure your Touch P5 as a Router 49