
User's Manual
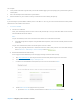
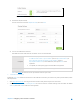
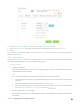
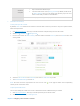


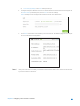


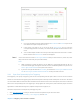
Table Of Contents
- Chapter 1. Get to Know About Your Router
- Chapter 2. Configure your Touch P5 as a Router
- 2.1 Connect Your Router
- 2.2 Log into Your Router
- 2.3 Quick Setup
- 2.4 Mode Selection
- 2.5 Wireless Settings
- 2.6 WPS
- 2.7 Guest Network
- 2.8 Parental Controls
- 2.9 Devices Control
- 2.10 Printer Server
- 2.11 DDNS
- 2.12 LAN
- 2.13 DHCP Server
- 2.14 QoS
- 2.15 Clock
- 2.16 Screen Settings
- 2.17 Reboot & Reset
- 2.18 Administrator Password
- 2.19 About
- 2.20 USB Application
- 2.21 Set Up IPv6 Connection
- 2.22 NAT Forwarding
- 2.23 Update the Firmware
- Troubleshooting Guide & FAQ
- Appendix A: Specifications
- Appendix B: Glossary
- 空白页面

For example:
Share photos and other large files with your friends without logging in to (and paying for) a photo-sharing site or
email system.
Get a safe backup for the materials for a presentation.
Remove the files on your camera’s memory card from time to time during the journey.
Note:
If your ISP assigns a private WAN IP address (such as 192.168.x.x or 10.x.x.x), you cannot use this feature because private
addresses are not routed on the Internet.
1. Access the USB disk
1) Connect Your USB Disk
Insert your USB storage device into the router’s USB port directly or using a USB cable. Wait several seconds
until the USB LED becomes solid on.
Note:
If you use USB hubs, make sure no more than four devices are connected to the router.
If the USB storage device requires using bundled external power, make sure the external power has been
connected.
If you use a USB hard drive, make sure its file system is FAT32 or NTFS.
Before you physically disconnect a USB device from the router, safely remove it to avoid data damage:
Select
Advanced > USB Settings > Device Settings
and click .
2) Enable Authentication for Data Security
It is strongly recommended that you set and apply a sharing account for data security.
a. Visit http://tplinkwifi.net/
, then log in with the username and password you set for the router.
b. Select
Advanced
>
USB Settings
>
Sharing Access
.
c. Choose to use the default Account (admin) or use a new account and click Save.
d. Enable Authentication
to apply the sharing account.
If you leave Share All enabled, click the button to enable Authentication for all folders.
Chapter 2 Configure your Touch P5 as a Router 50