
User's Manual
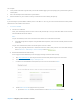
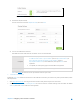
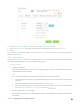


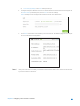


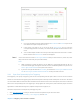
Table Of Contents
- Chapter 1. Get to Know About Your Router
- Chapter 2. Configure your Touch P5 as a Router
- 2.1 Connect Your Router
- 2.2 Log into Your Router
- 2.3 Quick Setup
- 2.4 Mode Selection
- 2.5 Wireless Settings
- 2.6 WPS
- 2.7 Guest Network
- 2.8 Parental Controls
- 2.9 Devices Control
- 2.10 Printer Server
- 2.11 DDNS
- 2.12 LAN
- 2.13 DHCP Server
- 2.14 QoS
- 2.15 Clock
- 2.16 Screen Settings
- 2.17 Reboot & Reset
- 2.18 Administrator Password
- 2.19 About
- 2.20 USB Application
- 2.21 Set Up IPv6 Connection
- 2.22 NAT Forwarding
- 2.23 Update the Firmware
- Troubleshooting Guide & FAQ
- Appendix A: Specifications
- Appendix B: Glossary
- 空白页面

2.21 Set Up IPv6 Connection
If your ISP provides IPv6 connection and has provided some detailed IPv6 parameters, you can configure the router to
permit IPv6 connection.
I want to
Connect to IPv6 network with information provided by my ISP.
For example:
my ISP provides information about one of the following Internet connection types:
PPPoE, Dynamic IP, Static IP, 6to4 tunnel, 6RD, DS-lite and Pass-Through (Bridge).
How can I
do that?
1. Visit http://tplinkwifi.net/, and log in with the username and password you set for the router.
2. Go to
Advanced > IPv6 to enable IPv6 connection.
3. Select the Internet connection type provided by ISP. Fill in information as required by different
connection type.
Note:
If you do not know what your Internet connection type is, contact your ISP or judge
according to already knownthe information provided by your ISP.
1) Static IP: Fill in blanks and click Save.
2) Dynamic IP: Click Advanced to have more configuration if ISP requires. Click Save to save
the settings and then click Renew to finish the configuration.
3) PPPoE: Fill in the Username and Password. Click Advanced
to have more configuration if
ISP requires. Click Save to save the settings and click Connect to finish the configuration.
4) 6to4 Tunnel: An IPv4 Internet connection type is a prerequisite for this connection type.
Click Advanced to have more configuration if ISP requires. Click Save to save the settings
and then click Connect to finish the configuration.
Chapter 2 Configure your Touch P5 as a Router 55