
User's Manual

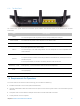
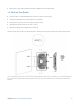

Table Of Contents
- Chapter 1. Get to Know About Your Router
- Chapter 2. Configure your Touch P5 as a Router
- 2.1 Connect Your Router
- 2.2 Log into Your Router
- 2.3 Quick Setup
- 2.4 Mode Selection
- 2.5 Wireless Settings
- 2.6 WPS
- 2.7 Guest Network
- 2.8 Parental Controls
- 2.9 Devices Control
- 2.10 Printer Server
- 2.11 DDNS
- 2.12 LAN
- 2.13 DHCP Server
- 2.14 QoS
- 2.15 Clock
- 2.16 Screen Settings
- 2.17 Reboot & Reset
- 2.18 Administrator Password
- 2.19 About
- 2.20 USB Application
- 2.21 Set Up IPv6 Connection
- 2.22 NAT Forwarding
- 2.23 Update the Firmware
- Troubleshooting Guide & FAQ
- Appendix A: Specifications
- Appendix B: Glossary
- 空白页面

• Web browser, such as Microsoft Internet Explorer, Mozilla Firefox and Apple Safari.
1.5 Position Your Router
• Place the router in a well-ventilated place far from any heater or heating vent
• Avoid direct irradiation of any strong light (such as sunlight)
• Keep at least 2 inches (5 cm) of clear space around the router
• Operating Temperature: 0℃~40℃ (32℉~104℉)
• Operating Humidity: 10%~90%RH, Non-condensing
Generally, Touch P5 is placed on a horizontal surface. The device also can be mounted on the wall as shown below.
Note:
The diameter of the screw, 3.5mm<D<6mm, and the distance of two screws is 163.8mm. The screw that project from
the wall need around 4mm based, and the length of the screw need to be at least 20mm to withstand the weight of the
product.
Chapter 1 Get to Know About Your Router 8