User's Manual
Manuals
Brands
TP-Link Technologies Manuals
Electronics
Wireless ADSL2+ Router
11
12
13
14
15
16
17
18
19
20
Table Of Contents
Chapter 1. About This User Guide
1.1 Purpose
1.2 Conventions
1.3 Overview of this User Guide
Chapter 2. Product Overview
2.1 Overview of the Router
2.2 Main Features
2.3 Supporting Protocol
2.4 Transmit Data-rate
Chapter 3. Hardware Installation Guide
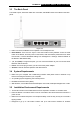
3.1 The Front Panel
3.2 LED Explanation
3.3 The Back Panel
3.4 System Requirements
3.5 Installation Environment Requirements
3.6 Connecting the Router
3.6.1 The Best Location for Wireless Network Connection
3.6.2 Wired network connection
3.6.2.1. Connect ADSL Line
3.6.2.2. Hub or Switch to Router Connection
3.6.2.3. Computer to Router Connection
Chapter 4. Quick Installation Guide
4.1 Configure the Router
4.2 Configure PC
Chapter 5. Basic Router Configuration
5.1 Login
5.2 Device Info
5.3 Quick Setup
5.4 Advanced Setup
5.4.1 WAN
5.4.2 LAN
5.4.3 NAT
5.4.3.1. Virtual Servers
5.4.3.2. Port Triggering
5.4.3.3. DMZ Host
5.4.3.4. ALG
5.4.4 Security
5.4.4.1. IP Filtering
5.4.4.2. MAC Filtering
5.4.4.3. Parental Control
5.4.5 Quality of Service
5.4.6 Routing
5.4.6.1. Default Gateway
5.4.6.2. Static Route
5.4.6.3. RIP
5.4.7 DNS
5.4.7.1. DNS Server
5.4.7.2. Dynamic DNS
5.4.8 DSL
5.4.9 Port Mapping
5.5 Wireless LAN Configuration
5.5.1 Wireless – Basic
5.5.2 Wireless – Security
5.5.2.1. WEP Encryption
5.5.2.2. WPA
5.5.2.3. WPA-PSK
5.5.2.4. WPA2
5.5.2.5. WPA2-PSK
5.5.2.6. Mixed WPA2/WPA
5.5.2.7. Mixed WPA2/WPA-PSK
5.5.3 Wireless -- MAC Filter
5.5.4 Wireless – Advanced
5.5.5 Wireless – Statistics
5.6 Diagnostics
5.7 Management
5.7.1 Settings
5.7.1.1. Backup
5.7.1.2. Update
5.7.1.3. Restore Default
5.7.2 System Log
5.7.3 Internet Time
5.7.4 TR-069 client
5.7.5 Access Control
5.7.5.1. Services
5.7.5.2. IP Addresses
5.7.5.3. Passwords
5.7.6 Update Software
5.7.7 Reboot
Chapter 6. Appendix
Appendix A: Glossary
Appendix B: Specifications
TD-W8900G
54M Wireless ADSL2+ Router User Guide
11
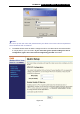
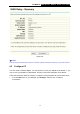
Figure 4-4
5.
Use the default setting of this
screen click “Next” to continue.
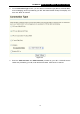
Figure 4-5
6.
Use the default IP Address
192.168.1.1 and Subnet Mask 255.255.255.0. Us
e the default
setting of “
Enable DHCP Server
”, and click “Next” to continue.
1
...
...
16
17
18
19
20
...
...
89