
User's Manual
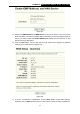
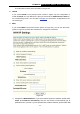

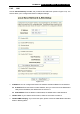
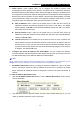
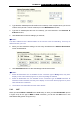
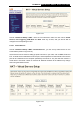
Table Of Contents
- Chapter 1. About This User Guide
- Chapter 2. Product Overview
- Chapter 3. Hardware Installation Guide
- Chapter 4. Quick Installation Guide
- Chapter 5. Basic Router Configuration
- Chapter 6. Appendix

TD-W8900G 54M Wireless ADSL2+ Router User Guide
27
the screen above, or else the service will not take effect.
¾ service name: You can enter the service name in the text box or leave the default name.
)
Note:
If you select the NAT and Security check box on the screen (shown in Figure 5-10), the NAT and
Security menu will be added to the W
eb-based Utility. We will describe the detailed configuration
in 5.4.3 NAT
and 5.4.4 Security.
5) Click the Next button, and you will see the next screen which displays the detailed
settings you’ve made (shown in Figure 5-11). Or else click the Back butt
on to return to
the previous screen to make modifications.
Figure 5-11
6) If you are sure about the configuration, click the Save button to save these settings,
otherwise click the Back button to return to the previous screen to make modifications.
The information of the figure shows above is same as the information in the Figure 5-3.
4. IPoA
If you choose IPoA in th
e previous screen (show
n in Figure 5-5), the configuration is similar
to MER.
5. Bridge
If you choose Bridging in the previous screen (shown in Figure 5-5), a screen will be
displayed as shown below (shown in Figure 5-
12).