
User's Manual
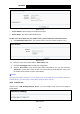

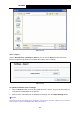

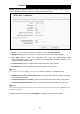
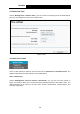
Table Of Contents
- Package Contents
- Chapter 1. Product Overview
- Chapter 2. Connecting the Modem Router
- Chapter 3. Quick Installation Guide
- Chapter 4. Configuring the Modem Router
- 4.1 Login
- 4.2 Device Info
- 4.3 Quick Setup
- 4.4 Operation Mode
- 4.5 Advanced Setup
- 4.6 IPTV
- 4.7 Wireless
- 4.8 Guest Network
- 4.9 USB Settings
- 4.10 Diagnostics
- 4.11 Management
- 4.12 Logout
- Appendix A: Specifications
- Appendix B: Troubleshooting
- Appendix C: Technical Support

TD-W89
68 300Mbps Wireless N USB ADSL2+ Modem Router User Guide
Figure 4-
112
¾
Server Enable: Select this box to enable this function.
¾
Server Nam
e: The name of this Media Server.
To add a new share folder for your media server, please follow the instructions below:
a) Click Add New Folder button, and you will see the screen as shown in Figure 4-113.
Figure 4-
113
b) Enter the name of the share folder in Share Name field.
c) Click the Save/Apply button to apply the configuration.
d) Click the Scan Now to scan all the share folders immediately. You can also select the
Auto-Scan, at same time, select an auto scan interval time by drop-down list. In this case,
the media server will auto scan the share folders.
)
Note:
The max share folders nu
mber is 6. If you want share a new folder when the numbers has been
reached to be 6, you can delete a share folder and then add a new one.
4.9.6 Print Server
Choose men
u “USB Settings”→”Print Server”, you can configure print server on this page as
shown below.
Figure 4-
114
90