
User's Guide
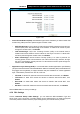
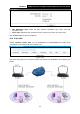
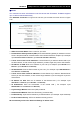
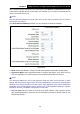
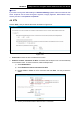
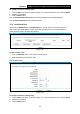
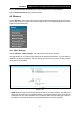
Table Of Contents
- Package Contents
- Chapter 1. Product Overview
- Chapter 2. Connecting the Modem Router
- Chapter 3. Quick Installation Guide
- Chapter 4. Configuring the Modem Router
- 4.1 Login
- 4.2 Status
- 4.3 Quick Setup
- 4.4 Operation Mode
- 4.5 Network
- 4.6 IPTV
- 4.7 DHCP Server
- 4.8 Wireless
- 4.9 Guest Network
- 4.10 USB Settings
- 4.11 Route Settings
- 4.12 IPv6 Route Settings
- 4.13 Forwarding
- 4.14 Parental Control
- 4.15 Firewall
- 4.16 IPv6 Firewall
- 4.17 IPv6 Tunnel
- 4.18 Bandwidth Control
- 4.19 IP&MAC Binding
- 4.20 Dynamic DNS
- 4.21 Diagnostic
- 4.22 System Tools
- 4.23 Logout
- Appendix A: Specifications
- Appendix B: Troubleshooting
- Appendix C: Technical Support

TD-W8970
30
0Mbps Wireless N Gigabit ADSL2+ Modem Router User Guide
Note:
You could also use other VPN Routers to set VPN tunnels with TD-W8970. TD-W8970 supports
up to 10 VPN tunnels simultaneously.
Click Add New Connection in Figure 4-24 and then you will enter the screen shown in Figure
4-25.
Figure 4-25
IPSec Connection Name: Enter a name for your VPN.
Remote IPSec Gateway Address (URL): Enter the destination gateway IP address in the box
which is the public WAN IP or Domain Name of the remote VPN server endpoint. (For example:
Input 219.134.112.247 in Device1, Input 219.134.112.246 in Device 2)
Tunnel access from local IP addresses: Choose Subnet if you want the Whole LAN to join
the VPN network, or else choose Single Address if you want single IP to join the VPN network.
IP Address for VPN: Enter the IP address of your LAN. (For example: Input 192.168.1.1 in
Device1, Input 192.168.2.1 in Device2)
IP Subnetmask: Enter the Subnet mask of your LAN. ( For example: Input 255.255.255.0 in
both Device1 and Device2)
Tunnel access from remote IP addresses: Choose Subnet if you want the Remote Whole
LAN to join the VPN network, or else choose Single Address if you want single IP to join the
VPN network.
IP Address for VPN: Enter the IP address of the Remote LAN. ( For example: Input
192.168.2.1 in Device1,Input 192.168.1.1 in Device2)
IP Subnetmask: Enter the subnetmask of the remote LAN. ( For example: Input
255.255.255.0 in both Device1 and Device2)
Key Exchange Method: Select Auto (IKE) or Manual.
Authentication Method: Select Pre-Shared Key (recommended).
Pre-Shared Key: Input the Pre-Shared key for Authentication. (For example: Input 12345678)
Perfect Forward Secrecy: PFS is an additional security protocol.
We recommend you leave the Advanced Settings as default value.
34