
User's Manual

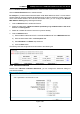

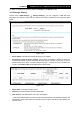
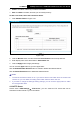
Table Of Contents
- Package Contents
- Chapter 1. Product Overview
- Chapter 2. Connecting the Modem Router
- Chapter 3. Quick Installation Guide
- Chapter 4. Configuring the Modem Router
- 4.1 Login
- 4.2 Status
- 4.3 Quick Setup
- 4.4 Operation Mode
- 4.5 Network
- 4.6 IPTV
- 4.7 DHCP Server
- 4.8 Wireless
- 4.9 Guest Network
- 4.10 USB Settings
- 4.11 Route Settings
- 4.12 IPv6 Route Settings
- 4.13 Forwarding
- 4.14 Parental Control
- 4.15 Firewall
- 4.16 IPv6 Firewall
- 4.17 IPv6 Tunnel
- 4.18 Bandwidth Control
- 4.19 IP & MAC Binding
- 4.20 Dynamic DNS
- 4.21 Diagnostic
- 4.22 System Tools
- 4.23 Logout
- Appendix A: Specifications
- Appendix B: Troubleshooting

TD-W9970
300Mbps Wireless N USB VDSL2 Modem Router User Guide
clicked, Inactive will be displayed in the Status field, which means volume cannot be shared.
Action: When the volume is shared, you can click the Deactivate to stop sharing the volume;
when volume is non-shared, you can click Activate to share the volume.
Click Disconnect to safely remove the USB storage device that is connected to USB port.
Note:
Before removing the USB storage device, you should click “Disconnect” to make sure that all your
data have been saved completely. Removing device directly may cause your USB storage device
crashed.
4.10.2 User Accounts
You can specify the user name and password for Storage Sharing and FTP Server users on this
page. Storage Sharing users can access the folders by entering the following URL into the
address field of your browser or Windows Explorer, such as. \\192.168.1.1. FTP Server users can
log into the FTP Server via FTP Client.
There are five users here, which provide means to control the access to the USB mass storage by
Storage Sharing or FTP. The Super User has the right to read and write to Storage Sharing and
FTP Server.
Figure 4-55
To add a new user account, please follow the steps below:
1. Choose the index from the drop-down list of Choose Index.
2. Self-define a New Username.
3. Enter the password in the New Password field.
4. Re-enter the password in the Confirm password field.
5. Click the Set button, and then a new entry will be added in the table.
69