
User's Manual
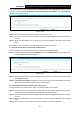
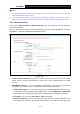
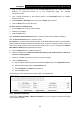
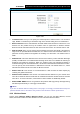

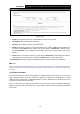
Table Of Contents
- Package Contents
- Chapter 1. Product Overview
- Chapter 2. Connecting the Modem Router
- Chapter 3. Quick Installation Guide
- Chapter 4. Configuring the Modem Router
- 4.1 Login
- 4.2 Status
- 4.3 Quick Setup
- 4.4 Operation Mode
- 4.5 Network
- 4.6 DHCP Server
- 4.7 Dual Band Selection
- 4.8 Wireless 2.4GHz
- 4.9 Wireless 5GHz
- 4.10 Guest Network
- 4.11 USB Settings
- 4.12 Route Settings
- 4.13 Forwarding
- 4.14 Parental Control
- 4.15 IPv4 Firewall
- 4.16 IPv6 Firewall
- 4.17 IPv6 Tunnel
- 4.18 Bandwidth Control
- 4.19 IP&MAC Binding
- 4.20 Dynamic DNS
- 4.21 Diagnostic
- 4.22 System Tools
- 4.23 Logout
- Appendix A: Specifications
- Appendix B: Troubleshooting
- Appendix C: Technical Support

TD-W9980B
N600 Wireless Dual Band Gigabit VDSL2 Modem Router (Annex B) User Guide
You can also keep the default WPS Status as Enabled and click the Add device button in Figure
4-47, then Choose “Press the button of the new device in two minutes” and click Connect.
(Shown in the following figure)
Figure 4-48
Step 2: Press and hold the WPS button of the client device directly.
Step 3: The Wi-Fi Protected Setup LED flashes for two minutes during the Wi-Fi Protected Setup
process.
Step 4: When the WPS LED is on, the client device has successfully connected to the modem
router.
Refer back to your client device or its documentation for further instructions.
II. Enter the client device’s PIN on the modem router
Use this method if your client device has a Wi-Fi Protected Setup PIN number.
Step 1: Keep the default WPS Status as Enabled and click the Add device button in Figure 4-47,
then the following screen will appear.
Figure 4-49
Step 2: Enter the PIN number from the client device in the field on the above WPS screen. Then
click Connect button.
Step 3: “Connect successfully” will appear on the screen of Figure 4-49, which means the client
device has successfully connected to the modem router.
III. Enter the modem router’s PIN on your client device
Use this method if your client device asks for the modem router’s PIN number.
Step 1: On the client device, enter the PIN number listed on the modem router’s Wi-Fi Protected
Setup screen. (It is also labeled on the bottom of the modem router.)
Step 2: The Wi-Fi Protected Setup LED flashes for two minutes during the Wi-Fi Protected Setup
process.
Step 3: When the WPS LED is on, the client device has successfully connected to the modem
router.
Step 4: Refer back to your client device or its documentation for further instructions.
61