
User's Manual
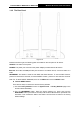
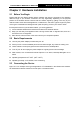

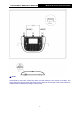
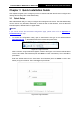
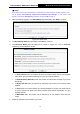
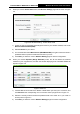
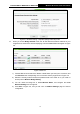
Table Of Contents
- 组合 4.pdf
- 组合 2.pdf
- TL-WA801ND UG.pdf
- Package Contents
- Chapter 1 Introduction
- Chapter 2 Hardware Installation
- Chapter 3 Quick Installation Guide
- Chapter 4 Configure the Device
- Appendix A: Application Example
- Appendix B: Factory Defaults
- Appendix C: Troubleshooting
- Appendix D: Specifications
- Appendix E: Glossary
- RF Exposure Information
- TL-WA801ND UG.pdf
- RF Exposure Information
- 组合 2.pdf
- TL-WA801ND IC UG
- 组合 2
- TL-WA801ND UG.pdf
- Package Contents
- Chapter 1 Introduction
- Chapter 2 Hardware Installation
- Chapter 3 Quick Installation Guide
- Chapter 4 Configure the Device
- Appendix A: Application Example
- Appendix B: Factory Defaults
- Appendix C: Troubleshooting
- Appendix D: Specifications
- Appendix E: Glossary
- RF Exposure Information
- TL-WA801ND UG.pdf
- TL-WA801ND UG.pdf
- Package Contents
- Chapter 1 Introduction
- Chapter 2 Hardware Installation
- Chapter 3 Quick Installation Guide
- Chapter 4 Configure the Device
- Appendix A: Application Example
- Appendix B: Factory Defaults
- Appendix C: Troubleshooting
- Appendix D: Specifications
- Appendix E: Glossary
- 组合 2

TL-WA701ND/TL-WA801ND/TL-WA901ND
Wireless N Access Point User Guide
11
A. When you choose Access Point mode, the Wireless Settings page will be shown in Figure
3-5.
Figure 3-5 Wireless Setting - Access Point mode
1) Create an easy-to-remember and distinguish name for your wireless network, write it into
Wireless Network Name(SSID).
2) Select Channel for your device.
3) It's recommended select Most Secure (WPA/WPA2-PSK) encryption mode and enter a
password below to prevent unauthorized access to your AP.
4) Click Next, you will then come to Network Setting page for furthers configuration.
B. When you choose Repeater (Range Extender) mode, the AP will detect the wireless
networks in your neighborhood, and then the window displaying a list of available SSIDs will
appear in Figure 3-6.
Figure 3-6 AP List
1) Find the SSID of the Access Point / Router or WISP which you want you to connect to, and
click Connect in the corresponding row. You will then see the page shown in Figure 3-7.
2) Select the security mode and enter the password that is the same as on your router or
access point in Figure 3-7.
3) Click Next, you will then come to Network Settings page for furthers configuration.