
User's Guide


7
Chapter 2
$POOFDUUIF)BSEXBSF
2. 1. Position Your Access Point
• The product should not be located where it will be exposed to moisture or excessive
heat.
• Place the access point in a location where it can be connected to various devices as
well as to a power source.
• Make sure the cables and power cord are safely placed out of the way so they do not
create a tripping hazard.
• The access point can be placed on a shelf or desktop.
• Please keep away from the strong electromagnetic radiation and the device of
electromagnetic sensitive.
2. 2. Connect Your Access Point
There are five operation modes supported by this access point: Access Point, Repeater,
Bridge with AP, Client and Multi-SSID. Please determine which operation mode you
need and carry out the corresponding steps.
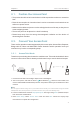
2. 2. 1. Access Point Mode
Transforms your existing wired network to a wireless one. This mode is suitable for dorm
rooms or homes where there’s already a wired router but you need a wireless hotspot.
Wired Router
Internet
TL-WA901ND’s SSID
A
B
C
D
1. Connect the AP device according to steps A to D in the diagram.
2. Turn on the power, wait until the Power (
) and Wireless ( ) LEDs are lit and stable, and
use the default SSID and Password printed on the product label to join the AP device’s Wi-Fi
network.
Note:
You can enjoy the Internet surfing now. For your wireless network security, it is recommended to change the default
SSID (network name) and the password of your Wi-Fi network. To do so, perform the following steps.
3. Launch a web browser and enter http://tplinkap.net. Then log in using admin (all lowercase) for
both Username and Password.
4. Click
Quick Setup, select Access Point mode and click Next. Follow the step-by-step
instructions to complete the configuration.