Contents Overview 1 Hardware Installation 3 CONNECT CODES mas smo nn aes a MOURN ATTAINABLE 0mm Emma xxx we 5 POPPET EIN sna lawman so clansman seas 7 Lightning and ESD Protection 8 Configuration with Pharaohs 9 Log Another PRAMS ttt teem ass solemnness 9 Configure the Base ROSEAU » » vrs rv wma ss ssn ser ss 16 installer Compliance Responsibility « «vv nso vvvnvnn nos 11 Specification 12 FAQ 13
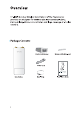
Overview PT-LINK's Outdoor Wireless Base Stations of the Pharaohs series products are designed for outdoor wireless network solutions, aiming at long-distance transmission and large coverage of wireless network.
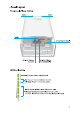
» Panel Layout The panel of Base Station Chain? Chain® Grounding Terminal Shielded Ethernet Port LANE Shielded Ethernet Port LANOLIN IN} LED Explanation The Base Station Is powered The port is connected but not active, . E Flashing: The port is transmitting data. AP/AP Router mode: All four LED remain solid. Client/Bridge/Repeater/AP Client Router mode: The more [it LED indicate the better wireless signal strength.
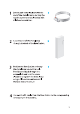
Passive PoE Adapter Power LED: The Power LED indicates the status of the electric current: Green: Red: Remote Reset: Press and hold for 8 seconds to reset the Base Station to its factory defaults. Hardware Installation The Outdoor Wireless Base Stations require external antenna that corresponds fo your network environment. It is recommended to buy and use PT-LINK's matching antennas.
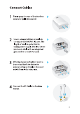
Connect Cables Firmly grasp the rear of the interface cover and pull it downward. 2 Use an adequate Ethernet cable to b connect the LLANO (POE IN) port. The length of cable is up to 60m for steady power supply. Shielded Cater (or above) cable with an integrated ground wire is recommended. 3 Affix the waterproof rubber insert to bp the underside of the device for waterproofing and replace the cover until it firmly locks into place. 4 Connect the RF Cables to the Base 3 Station.
Mount Antenna Mount the Base Station on an antenna with a suitable mounting bracket or on a pole for the antenna without the mounting bracket. + Option: Mounting the Base Station on an Antenna Sector antenna ls used as a demonstration below, 1 Align the mounting tabs on the back of the Base Station with the four slots of the mounting bracket. Push and slide the Base Station downward until it locks into place. 2 Connect the RF cables from the Base p Station to the corresponding connectors on the antenna.
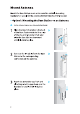
1 Loosen and completely remove the b end of the metal strap by turning the captive screw counterclockwise with a Flathead screwdriver. Lead the end of the metal strap b through the back of the Base Station. 3 Position the Base Station and wrap 3 the metal strap around the pole. Feed the end back through the screw-block and turn the screw clockwise to tighten the metal strap using a Flathead screwdriver until the Base Station is secure.
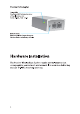
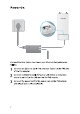
Power On Connect the Base Station to a Power over Ethernet (PoE) adapter as follows: 1 Connect the Ethernet cable from the Base Station to the POE port of the PoE adapter. 2 Connect an Ethernet cable from your LAN device (a computer, router or switch) to the LAN port on the PoE adapter. 3 Connect the power cord to the power port on the PoE adapter and plug it into an electrical outlet.
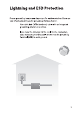
Lightning and ESD Protection Proper grounding is extremely important for outdoor devices. There are two effective techniques for grounding the Base Station. Use a shielded Cater (or above) cable with an integrated grounding wire for connection. if you have the standard Cater cable for the connection, use a separate grounding cable to connect the grounding Terminal (GND) to earth ground.
Configuration with Pharaohs Based on your network needs, this section will guide you through the Base Station configuration using Pharaohs, a web-based management system that allows you to do more specific configurations. Log in to the Pharaohs Before accessing the Pharaohs Web Interface, you need to assign a static IP address 192.168.0.X {X ranges between 2 and 253, eg. 192.168.0.10) to your computer.
Enter admin for both User Name and Password, then select the Language from the drop-down list. Read and agree the terms of use, then click Login. Change the default User Name and Password to protect your Base Station. Let's start configuring the Base Sta ion. For subsequent logins, use the new username and password, Configure the Base Station The typical topology is as follows. A wireless bridge is built between two locations that are far from each other.
Configure the Client 1. Log in to Pharaohs and go to the Quick Setup page. 2. Operation Mode: Select Client and click Next. 3. LAN Settings: Change the IP Address to 192.168.0.X (X ranges between 2 and 253), the same subset with the access point, and click Next. 4. Wireless Client Settings: a. Click Survey and select the SAID of the Access Point in the AP list, then click Connect. b. Select from the Security option, enter the same PSK password and distance value of the Access Point, then click Next. 5.
Specification Dimensions Interface Power Supply ESD Protection ' Lightning Protection’ Operating Temperature Operating Humidity Certification 802.
FAQ Q1. Q2. 13 How to restore the Base Station to its factory default settings? With the Base Station powered on, press and hold the RESET button on the Base Station or the Remote Reset button on the passive PoE adapter for about 8 seconds until the Wireless Signal Strength LED flash. What is Pharaohs Mainstream? Pharaohs Mainstream is a proprietary protocol developed on the basis of Time Division Multiple Access (MADMAN) by PT-LINK.
(3. How can | use Spectrum Analysis to find the appropriate channel for the devices? 1. Login to Pharaohs, click Spectrum Analysis in the tools drop-down list, a window will pop up to remind you that all wireless connections will be lost during spectrum analysis. Click Yes to continue to the Spectrum Analysis page. a a . Survey 2. Click Start, the Pharaohs will begin to analyze the power of frequency. Observe the curves for a period of time, and then click stop.
FCC STATEMENT This equipment has been tested and found to comply with the limits for a Class A digital device, pursuant to part 15 of the FCC Rules These limits are designed to provide reasonable protection against harmful interference when the equipment is operated in a commercial environment. This equipment generates, uses, and can radiate radio frequency energy and, if not installed and used in accordance with the instruction manual, may cause harmful interference to radio communications.
Industry Canada Statement CAN ICES-3 EAL Safety Information «When product has a power button, the power button is one of the way to shut off the product; When there Is no power button, the only way to completely shut off power is to disconnect the product or the power adapter from the power source. Don't disassemble the product, or make repairs yourself You run the risk of electric shock and voiding the limited warranty. If you need service, please contact us. « Avoid water and wet locations. .