
User's Manual
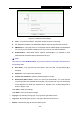
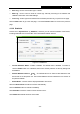
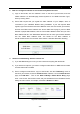

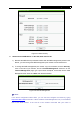

Table Of Contents
- Package Contents
- Chapter 1. Introduction
- Chapter 2. Connecting the Router
- Chapter 3. Quick Installation Guide
- Chapter 4. Configuring the Router
- 4.1 Login
- 4.2 Status
- 4.3 Quick Setup
- 4.4 Network
- 4.5 Dual Band Selection
- 4.6 Wireless 2.4GHz
- 4.7 Wireless 5GHz
- 4.8 DHCP
- 4.9 USB Settings
- 4.10 NAT
- 4.11 Forwarding
- 4.12 Security
- 4.13 Parental Control
- 4.14 Access Control
- 4.15 Advanced Routing
- 4.16 Bandwidth Control
- 4.17 IP & MAC Binding Setting
- 4.18 Dynamic DNS
- 4.19 System Tools
- Appendix A: FAQ
- Appendix B: Configuring the PCs
- Appendix C: Specifications
- Appendix D: Glossary

TL-WDR3600 N600 Wireless Dual Band Gigabit Router
- 112 -
Figure 4-118 Mail Account Settings
z From - Your mail box address. The Router would connect it to send logs.
z To - Recipient’s address. The destination mailbox where the logs would be received.
z SMTP Server - Your smtp server. It corresponds with the mailbox filled in the From field.
You can log on the relevant website for help if you are not clear with the address.
z Authentication - Most SMTP Server requires Authentication. It is required by most
mailboxes that need User Name and Password to log in.
)
Note:
Only when you select Authentication, do you have to enter the User Name and Password in
the following fields.
z User Name - Your mail account name filled in the From field. The part behind @ is
excluded.
z Password - Your mail account password.
z Confirm The Password - Enter the password again to confirm.
z Enable Auto Mail Feature - Select it to mail logs automatically. You could mail the
current logs either at a specified time everyday or by intervals, but only one could be the
current effective rule. Enter the desired time or intervals in the corresponding field as
shown in Figure 4-118.
Click Save to keep your settings.
Click Back to return to the previous page.
¾ Log Type - By selecting the log type, only logs of this type will be shown.
¾ Log Level - By selecting the log level, only logs of this level will be shown.
¾ Refresh - Refresh the page to show the latest log list.