
User's Manual
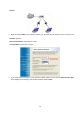
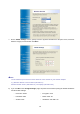
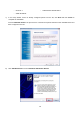


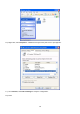
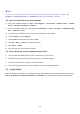
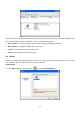
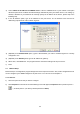
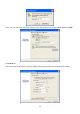
Table Of Contents
- Chapter 1. Introduction
- Chapter 2. Installation
- Chapter 3. Print Server Installation
- Chapter 4. Software Installation
- Chapter 5. Configuration from Embedded Web Server
- Chapter 6. TCP/IP LPR Port Printing Installation
- Chapter 7. Upgrading Print Server
- Chapter 8. Troubleshooting
- Appendix A: Reset Button
- Appendix B: Frequently Asked Questions
- Appendix C: Additional Installation Instructions

22
2) Select “Obtain an IP address from DHCP server”. If there is a DHCP server on your network. This option
allows the print server to obtain IP-related settings automatically from your DHCP server. This setting, by
default, is disabled. If you would like to manually specify an IP address to the device, please skip to the
following step.
3) In the IP Address option, type an IP address for the print server. The IP address must meet the IP
addressing requirements of the network segment.
4) (Optional) In the Subnet Mask option, type the Subnet Mask your LAN or network segment is currently
configured to use.
5) (Optional) In the Gateway field, type the IP address of gateway.
6) When done, click OK button. The program will save the above settings into the print server.
7) Done
4.7 Manual Setup
Manual Setup is a
configuration program designed for more experienced users. Also, all the configurations here
can be configure by the WEB management of print server. You can refer to the Chapter 4.
4.7.1 General:
1)
Select the print server that you wish to configure.
2) Click Properties in the tool bar and the following screen will appear, Properties button just like a picture <
>, as follow picture: (The factory default password is 0000.)