
User's Manual


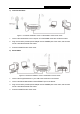
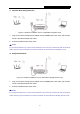
Table Of Contents
- CONTENTS
- Package Contents
- Chapter 1. Introduction
- Chapter 2. Connecting the Router
- Chapter 3. Quick Installation Guide
- Chapter 4. Configuring the Router
- 4.1 Login
- 4.2 Status
- 4.3 Quick Setup
- 4.4 WPS
- 4.5 Operation Mode
- 4.6 Network
- 4.7 Wireless
- 4.8 DHCP
- 4.9 Forwarding
- 4.10 Security
- 4.11 Parental Control
- 4.12 Access Control
- 4.13 Advanced Routing
- 4.14 Bandwidth Control
- 4.15 IP& MAC Bing Setting
- 4.16 Dynamic DNS
- 4.17 System Tools
- Appendix A: FAQ
- Appendix B: Configuring the PC
- Appendix C: Specifications
- Appendix D: Glossary

TL-WR743ND 150Mbps Wireless AP/Client Router
- 10 -
e) Client Mode
Figure 2-5 Hardware Installation of the TL-WR743ND in Client mode
1. Connect the PC to the LAN port of TL-WR743ND router with an Ethernet cable.
2. Plug one end of the provided power adapter into the POWER jack of the router, and the other
end to a standard electrical wall socket.
3. Press the ON/OFF button of the router.