
User's Manual

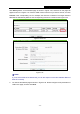
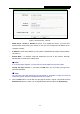
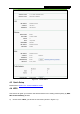

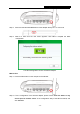
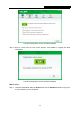
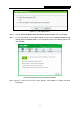
Table Of Contents
- CONTENTS
- Package Contents
- Chapter 1. Introduction
- Chapter 2. Connecting the Router
- Chapter 3. Quick Installation Guide
- Chapter 4. Configuring the Router
- 4.1 Login
- 4.2 Status
- 4.3 Quick Setup
- 4.4 WPS
- 4.5 Operation Mode
- 4.6 Network
- 4.7 Wireless
- 4.8 DHCP
- 4.9 Forwarding
- 4.10 Security
- 4.11 Parental Control
- 4.12 Access Control
- 4.13 Advanced Routing
- 4.14 Bandwidth Control
- 4.15 IP& MAC Bing Setting
- 4.16 Dynamic DNS
- 4.17 System Tools
- Appendix A: FAQ
- Appendix B: Configuring the PC
- Appendix C: Specifications
- Appendix D: Glossary

TL-WR743ND 150Mbps Wireless AP/Client Router
- 39 -
Step 2:
Press and hold the WPS/QSS button of the adapter directly for 2 or 3 seconds.
Step 3: Wait for a while until the next screen appears. Click OK to complete the WPS
configuration.
The WPS Configuration Screen of Wireless Adapter
Method Two:
Step 1: Press the WPS button on the rear panel of the Router.
Step 2: For the configuration of the wireless adapter, please choose “Push the button on my
access point or wireless router” in the configuration utility of the WPS as below, and
click Connect.