
User's Manual


Table Of Contents
- Package Contents
- Chapter 1. Introduction
- Chapter 2. Connecting the Router
- Chapter 3. Quick Installation Guide
- Chapter 4. Configuration for Standard Wireless Router Mode
- Chapter 5. Configuration for Access Point Mode
- Chapter 6. Configuration for Repeater Mode
- Chapter 7. Configuration for Client Mode
- Chapter 8. Configuration for Hotspot Router Mode
- Appendix A: FAQ
- Appendix B: Configuring the PC
- Appendix C: Specifications
- Appendix D: Glossary
TL-WR810N
300Mbps Wireless N Mini Router
- 182 -
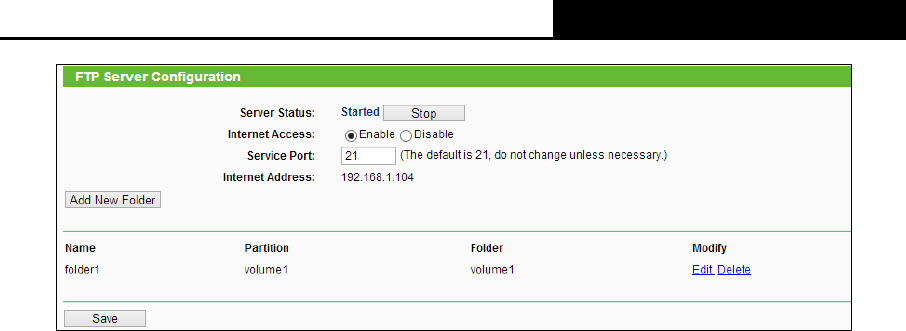
Figure 7-23 FTP Server Configuration
Service Status - Indicates the FTP Server's current status.
Service Port - Enter the FTP Port number to use. The default is 21.
Internet Access - Select enable to allow access of the FTP server from the Internet.
Otherwise, select disable to only allow local network access.
Name - This folder's display name.
Partition - The volume that the folder resides. Volume 1-8 is mapping to USB port1, and
Volume 9-16 is mapping to USB port2.
Folder - The real full path of the specified folder.
To set up your FTP Server, please follow the instructions below:
1. Plug an external USB hard disk drive or USB flash drive into this Router.
2. Click the Enable/Disable radio box to enable/disable Internet access to FTP from Internet
port.
3. Specify a port for the FTP server to use (The default port number is 21).
4. The Internet Address displays the WAN IP address of this router, so that other users can
access FTP via this address.
5. If WAN type is PPPoE/PPTP/L2TP, two connections will be available. Therefore, users can
access FTP server via two connections. Users in a private LAN can access ftp server via
Public Address while Internet users can access ftp server via Internet Address.
6. Click the Start button to start the ftp server.
To add a new folder, follow the instructions below.
1. Click Add New Folder in Figure 7-23.