
User's Manual
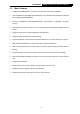
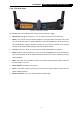
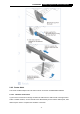
Table Of Contents
- Package Contents
- Chapter 1. Introduction
- Chapter 2. Connecting the Internet
- Chapter 3. Configuration for Router Mode
- 3.1 Login
- 3.2 Quick Setup
- 3.3 Basic
- 3.4 Advanced
- 3.4.1 Status
- 3.4.2 Network
- 3.4.3 Wireless
- 3.4.4 Wireless Statistics
- 3.4.5 Guest Network
- 3.4.6 DHCP
- 3.4.7 Forwarding
- 3.4.8 Security
- 3.4.9 Parental Control
- 3.4.10 Access Control
- 3.4.11 Advanced Routing
- 3.4.12 Bandwidth Control
- 3.4.13 IP & MAC Binding
- 3.4.14 ARP List
- 3.4.15 Dynamic DNS
- 3.4.16 No-IP DDNS
- 3.4.17 IPv6 Support
- 3.4.18 System Tools
- 3.4.19 Diagnostic
- 3.4.20 Firmware Upgrade
- Chapter 4. Range Extender Mode
- Chapter 5. Access Point Mode
- Appendix A: FAQ
- Appendix B: Configuring the PCs
- Appendix C: Specifications
- Appendix D: Glossary

-5-
TL-WR841HP
300Mbps High Power Wireless N Router
1.4.2 The Rear Panel
Figure 1-2 Rear Panel sketch
The following parts are located on the rear panel (View from left to right).
Ethernet (1, 2, 3, 4): These ports (1, 2, 3, 4) connect the router to the local PC(s).
WPS: If your clients, such as wireless adapters, that support Wi-Fi Protected Setup, then
you can press this button to quickly establish a connection between the router and clients
and automatically configure wireless security for your wireless network. The wireless
security will be automatically configured for your wireless network.
Internet: This port is where you will connect the DSL/cable Modem, or Ethernet.
Reset: With the router powered on, press and hold the Reset button until all LEDs turn
back on momentarily. And then release the button and wait the router to reboot to its factory
default settings.
Wi-Fi: The button for the wireless function. Press and hold the wireless button for about 2
seconds to turn it on or off.
Power On/Off: The switch for the power.
Power: The Power socket is where you will connect the power adapter. Please use the
power adapter provided.
Wireless antenna: To receive and transmit the wireless data.