
User's Manual

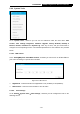
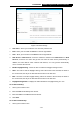
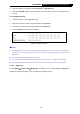
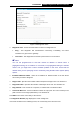

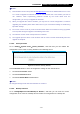

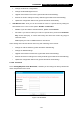
Table Of Contents
- Package Contents
- Chapter 1. Introduction
- Chapter 2. Connecting the Internet
- Chapter 3. Configuration for Router Mode
- 3.1 Login
- 3.2 Quick Setup
- 3.3 Basic
- 3.4 Advanced
- 3.4.1 Status
- 3.4.2 Network
- 3.4.3 Wireless
- 3.4.4 Wireless Statistics
- 3.4.5 Guest Network
- 3.4.6 DHCP
- 3.4.7 Forwarding
- 3.4.8 Security
- 3.4.9 Parental Control
- 3.4.10 Access Control
- 3.4.11 Advanced Routing
- 3.4.12 Bandwidth Control
- 3.4.13 IP & MAC Binding
- 3.4.14 ARP List
- 3.4.15 Dynamic DNS
- 3.4.16 No-IP DDNS
- 3.4.17 IPv6 Support
- 3.4.18 System Tools
- 3.4.19 Diagnostic
- 3.4.20 Firmware Upgrade
- Chapter 4. Range Extender Mode
- Chapter 5. Access Point Mode
- Appendix A: FAQ
- Appendix B: Configuring the PCs
- Appendix C: Specifications
- Appendix D: Glossary

-154-
TL-WR841HP
300Mbps High Power Wireless N Router
2. Enter the address or domain of the NTP Server I or NTP Server II.
3. Click the Get GMT button to get system time from Internet if you have connected to the
Internet.
To set Daylight Saving:
1. Check the box to enable Daylight Saving.
2. Select the start time from the drop-down lists in the Start field.
3. Select the end time from the drop-down lists in the End field.
4. Click the Save button to save the settings.
Figure 5-23 Time settings
Note:
1) This setting will be used for some time-based functions such as firewall. You must specify
your time zone once you login to the router successfully; otherwise, these functions will not
take effect.
2) The time will be lost if the router is turned off.
3) The router will automatically obtain GMT from the Internet if it is configured accordingly.
4) The Daylight Saving will take effect one minute after the configurations are completed.
5.3.6.3. Diagnostic
Go to “Setting→System Tools→Diagnostic”, and then you can transact Ping or Traceroute
function to check connectivity of your network in the following screen.