
User's Manual
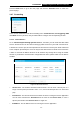

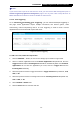
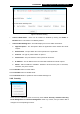
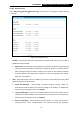
Table Of Contents
- Package Contents
- Chapter 1. Introduction
- Chapter 2. Connecting the Internet
- Chapter 3. Configuration for Router Mode
- 3.1 Login
- 3.2 Quick Setup
- 3.3 Basic
- 3.4 Advanced
- 3.4.1 Status
- 3.4.2 Network
- 3.4.3 Wireless
- 3.4.4 Wireless Statistics
- 3.4.5 Guest Network
- 3.4.6 DHCP
- 3.4.7 Forwarding
- 3.4.8 Security
- 3.4.9 Parental Control
- 3.4.10 Access Control
- 3.4.11 Advanced Routing
- 3.4.12 Bandwidth Control
- 3.4.13 IP & MAC Binding
- 3.4.14 ARP List
- 3.4.15 Dynamic DNS
- 3.4.16 No-IP DDNS
- 3.4.17 IPv6 Support
- 3.4.18 System Tools
- 3.4.19 Diagnostic
- 3.4.20 Firmware Upgrade
- Chapter 4. Range Extender Mode
- Chapter 5. Access Point Mode
- Appendix A: FAQ
- Appendix B: Configuring the PCs
- Appendix C: Specifications
- Appendix D: Glossary

-53-
TL-WR841HP
300Mbps High Power Wireless N Router
Note:
If you set the service port of the virtual server as 80, you must set the Web management port on
Advanced→Security→Remote Management page to be any other value except 80 such as
8080. Otherwise there will be a conflict to disable the virtual server.
3.4.7.2. Port Triggering
Go to “Advanced→Forwarding→Port Triggering”, you can view and add port triggering in
this page. Some applications require multiple connections, like Internet games, video
conferencing, Internet telephoning and so on. Port Triggering is used for some of these
applications that cannot work with a pure NAT router.
Figure 3-37 Port Triggering
To add a new rule, follow the steps below.
1. Click the Add New… button, the next screen will pop-up as shown in Figure 3-38.
2. Select a common application from the Common Applications drop-down list, then the
Trigger Port field and the Incoming Ports field will be automatically filled. If the Common
Applications do not have the application you need, enter the Trigger Port and the
Incoming Ports manually.
3. Select the protocol used for Trigger Port from the Trigger Protocol drop-down list, TCP,
UDP, or All.
4. Select the protocol used for Incoming Ports from the Incoming Protocol drop-down list,
TCP or UDP, or All.
5. Select Enabled in Status field.
6. Click the Save button to save the new rule.