
User's Guide
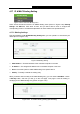
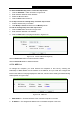


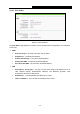
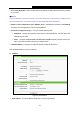
Table Of Contents
- Package Contents
- Chapter 1. Introduction
- Chapter 2. Connecting the Router
- Chapter 3. Quick Installation Guide
- Chapter 4. Configuring the Router
- 4.1 Login
- 4.2 Status
- 4.3 Quick Setup
- 4.4 WPS
- 4.5 Network
- 4.6 Wireless
- 4.7 Guest Network
- 4.8 DHCP
- 4.9 VPN
- 4.10 USB Settings
- 4.11 Forwarding
- 4.12 Security
- 4.13 Parental Control
- 4.14 Access Control
- 4.15 Advanced Routing
- 4.16 Bandwidth Control
- 4.17 IP & MAC Binding Setting
- 4.18 Dynamic DNS
- 4.19 IPv6 Support
- 4.20 System Tools
- 4.21 Logout
- Appendix A: FAQ
- Appendix B: Configuring the PCs
- Appendix C: Specifications
- Appendix D: Glossary

TL-WR842N
300Mbps Multi-Function Wireless N Router User Guide
- 97 -
Figure 4-99 Noip.com DDNS Settings
To set up for DDNS, follow these instructions:
1. Enter the User Name for your DDNS account.
2. Enter the Password for your DDNS account.
3. Enter the Domain Name you received from dynamic DNS service provider.
4. Click the Login button to login to the DDNS service.
Connection Status - The status of the DDNS service connection is displayed here.
Click Logout to log out the DDNS service.
Note:
If you want to login again with another account after a successful login, please click the Logout
button, then input your new username and password and click the Login button.
4.19 IPv6 Support
Figure 4-100 IPv6 Support
There are two submenus under the IPv6 Support menu (shown in Figure 4-100): IPv6 Status and
IPv6 Setup. Click either of them, and you will be able to scan or configure the corresponding
function. The detailed explanations for each submenu are provided below.