
User's Guide

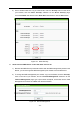
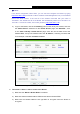

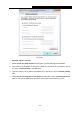
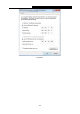
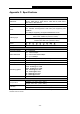

Table Of Contents
- Package Contents
- Chapter 1. Introduction
- Chapter 2. Connecting the Router
- Chapter 3. Quick Installation Guide
- Chapter 4. Configuring the Router
- 4.1 Login
- 4.2 Status
- 4.3 Quick Setup
- 4.4 WPS
- 4.5 Network
- 4.6 Wireless
- 4.7 Guest Network
- 4.8 DHCP
- 4.9 VPN
- 4.10 USB Settings
- 4.11 Forwarding
- 4.12 Security
- 4.13 Parental Control
- 4.14 Access Control
- 4.15 Advanced Routing
- 4.16 Bandwidth Control
- 4.17 IP & MAC Binding Setting
- 4.18 Dynamic DNS
- 4.19 IPv6 Support
- 4.20 System Tools
- 4.21 Logout
- Appendix A: FAQ
- Appendix B: Configuring the PCs
- Appendix C: Specifications
- Appendix D: Glossary

TL-WR842N
300Mbps Multi-Function Wireless N Router User Guide
- 123 -
5) How to enable H323 ALG: Log in to the Router, click the “Security” menu on the left of
your browser, and click “Basic Security” submenu. On the “Basic Security” page,
check the Enable radio button next to H323 ALG. Remember to click the Save button.
Figure A-7 Basic Security
4. I want to build a WEB Server on the LAN, what should I do?
1) Because the WEB Server port 80 will interfere with the WEB management port 80 on the
Router, you must change the WEB management port number to avoid interference.
2) To change the WEB management port number: Log in to the Router, click the “Security”
menu on the left of your browser, and click "Remote Management" submenu. On the
"Remote Management" page, type a port number except 80, such as 88, into the "Web
Management Port" field. Click Save and reboot the Router.
F
igure A-8 Remote Management