
User's Guide

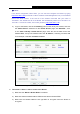
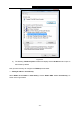
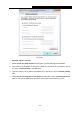

Table Of Contents
- Package Contents
- Chapter 1. Introduction
- Chapter 2. Connecting the Router
- Chapter 3. Quick Installation Guide
- Chapter 4. Configuring the Router
- 4.1 Login
- 4.2 Status
- 4.3 Quick Setup
- 4.4 WPS
- 4.5 Network
- 4.6 Wireless
- 4.7 Guest Network
- 4.8 DHCP
- 4.9 VPN
- 4.10 USB Settings
- 4.11 Forwarding
- 4.12 Security
- 4.13 Parental Control
- 4.14 Access Control
- 4.15 Advanced Routing
- 4.16 Bandwidth Control
- 4.17 IP & MAC Binding Setting
- 4.18 Dynamic DNS
- 4.19 IPv6 Support
- 4.20 System Tools
- 4.21 Logout
- Appendix A: FAQ
- Appendix B: Configuring the PCs
- Appendix C: Specifications
- Appendix D: Glossary

TL-WR842N
300Mbps Multi-Function Wireless N Router User Guide
- 128 -
Figure B-3
Setting IP address manually
1 Select Use the following IP address radio button. And the following items available
2 If the router's LAN IP address is 192.168.0.1, specify the IP address as 192.168.0.x (x is from
2 to 254), and Subnet mask is 255.255.255.0.
3 Type the router’s LAN IP address (the default IP is 192.168.0.1) into the Default gateway
field.
4 Select Use the following DNS server addresses radio button. In the Preferred DNS Server
field you can type the DNS server IP address, which has been provided by your ISP