
User's Guide

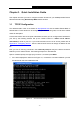
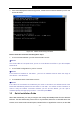
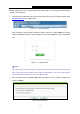
Table Of Contents
- Package Contents
- Chapter 1. Introduction
- Chapter 2. Connecting the Router
- Chapter 3. Quick Installation Guide
- Chapter 4. Configuring the Router
- 4.1 Login
- 4.2 Status
- 4.3 Quick Setup
- 4.4 WPS
- 4.5 Network
- 4.6 Wireless
- 4.7 Guest Network
- 4.8 DHCP
- 4.9 VPN
- 4.10 USB Settings
- 4.11 Forwarding
- 4.12 Security
- 4.13 Parental Control
- 4.14 Access Control
- 4.15 Advanced Routing
- 4.16 Bandwidth Control
- 4.17 IP & MAC Binding Setting
- 4.18 Dynamic DNS
- 4.19 IPv6 Support
- 4.20 System Tools
- 4.21 Logout
- Appendix A: FAQ
- Appendix B: Configuring the PCs
- Appendix C: Specifications
- Appendix D: Glossary

TL-WR842N
300Mbps Multi-Function Wireless N Router User Guide
- 10 -
Settings interface may not be opened with some web browsers, it is strongly recommended that
you use Internet Explorer.
1. To access the configuration utility, open a web-browser and type in the default domain name
http://tplinkwifi.net in the address field.
Figure 3-3 Log in the Router
After a moment, a login window will appear, similar to Figure 3-4. Enter admin for the User
Name and Password, both in lower case letters. Then click the OK button or press the Enter
key.
Figure 3-4 Login Windows
Note:
If the above screen does not pop up, it means that your Web-browser has been set to a proxy.
Go to Tools menu>Internet Options>Connections>LAN Settings, in the screen that appears,
cancel the Using Proxy checkbox, and click OK to finish it.
2. After successful login, the Quick Setup page will appear for you to quickly configure your
router. Click Next.
Figure 3-5 Quick Setup