
User's Guide

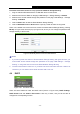


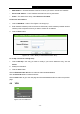
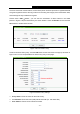
Table Of Contents
- Package Contents
- Chapter 1. Introduction
- Chapter 2. Connecting the Router
- Chapter 3. Quick Installation Guide
- Chapter 4. Configuring the Router
- 4.1 Login
- 4.2 Status
- 4.3 Quick Setup
- 4.4 WPS
- 4.5 Network
- 4.6 Wireless
- 4.7 Guest Network
- 4.8 DHCP
- 4.9 VPN
- 4.10 USB Settings
- 4.11 Forwarding
- 4.12 Security
- 4.13 Parental Control
- 4.14 Access Control
- 4.15 Advanced Routing
- 4.16 Bandwidth Control
- 4.17 IP & MAC Binding Setting
- 4.18 Dynamic DNS
- 4.19 IPv6 Support
- 4.20 System Tools
- 4.21 Logout
- Appendix A: FAQ
- Appendix B: Configuring the PCs
- Appendix C: Specifications
- Appendix D: Glossary

TL-WR842N
300Mbps Multi-Function Wireless N Router User Guide
- 45 -
Follow the instructions below to set up your Guest Network Storage Sharing:
1. Plug an external USB hard disk drive or USB flash drive into this Router.
2. Make sure the Service Status on the page “USB Settings -> Storage Sharing” is Started.
3. Make sure the Access shared storage with password on the page “USB Settings -> Storage
Sharing” is Enabled.
4. Click the Start button to start the Guest Network Storage Sharing.
5. Click the Add New Folder to Share button to specify a folder to share for the guests.
There is one default user account that can access the Guest Network Storage Sharing. Clicking
Modify on Figure 4-28, there will pop up Figure 4-29, where you can change the password and
storage authority of the account.
Figure 4-29 Modify User Account of Guest Network
Note:
1. If you want guests visit folders of Guest Network Storage Sharing with guest account, you
must enable Access shared storage with password on the page “USB Settings -> Storage
Sharing”, or the guests can't access to the Guest Network Storage Sharing.
2. The max share folders number is 6. If you want to share a new folder when the number has
reached 6, you can delete a share folder and then add a new one.
4.8 DHCP
Figure 4-30 The DHCP menu
There are three submenus under the DHCP menu (shown in Figure 4-30), DHCP Settings,
DHCP Clients List and Address Reservation. Click any of them, and you will be able to
configure the corresponding function.