
User's Guide
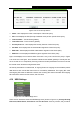
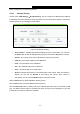

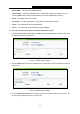
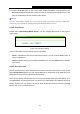
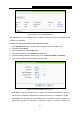
Table Of Contents
- Package Contents
- Chapter 1. Introduction
- Chapter 2. Connecting the Router
- Chapter 3. Quick Installation Guide
- Chapter 4. Configuring the Router
- 4.1 Login
- 4.2 Status
- 4.3 Quick Setup
- 4.4 WPS
- 4.5 Network
- 4.6 Wireless
- 4.7 Guest Network
- 4.8 DHCP
- 4.9 VPN
- 4.10 USB Settings
- 4.11 Forwarding
- 4.12 Security
- 4.13 Parental Control
- 4.14 Access Control
- 4.15 Advanced Routing
- 4.16 Bandwidth Control
- 4.17 IP & MAC Binding Setting
- 4.18 Dynamic DNS
- 4.19 IPv6 Support
- 4.20 System Tools
- 4.21 Logout
- Appendix A: FAQ
- Appendix B: Configuring the PCs
- Appendix C: Specifications
- Appendix D: Glossary

TL-WR842N
300Mbps Multi-Function Wireless N Router User Guide
- 59 -
Figure 4-49 Add New Folder
Display Name - You can enter a display name for the share folder.
Share entire partition - You can select this option and then the folders contained in
this partition will all be shared.
Folder Location- Displays the location of this folder.
Select - You can select this option to share the specified folder.
Folder - Name of folders that is in current path.
upper - You can click the upper button to get into the upper folder.
Save - You can click the Save button to save your settings and the page will be
redirected to the media server configuration page.
Back - You can click the Back button to discard the settings and just go to the media
server configuration page.
To add a new share folder for your media server, please follow the instructions below:
a) Select the Share entire partition or a specified folder option.
b) Enter the display name of the share folder in Display Name edit box.
c) Click the Save button to save the configuration and the page will be redirected to the
media server configuration page as shown in Figure 4-50.
Figure 4-50 Media Server Setting