
User's Guide

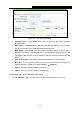

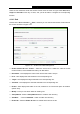
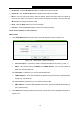
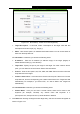


Table Of Contents
- Package Contents
- Chapter 1. Introduction
- Chapter 2. Connecting the Router
- Chapter 3. Quick Installation Guide
- Chapter 4. Configuring the Router
- 4.1 Login
- 4.2 Status
- 4.3 Quick Setup
- 4.4 WPS
- 4.5 Network
- 4.6 Wireless
- 4.7 Guest Network
- 4.8 DHCP
- 4.9 VPN
- 4.10 USB Settings
- 4.11 Forwarding
- 4.12 Security
- 4.13 Parental Control
- 4.14 Access Control
- 4.15 Advanced Routing
- 4.16 Bandwidth Control
- 4.17 IP & MAC Binding Setting
- 4.18 Dynamic DNS
- 4.19 IPv6 Support
- 4.20 System Tools
- 4.21 Logout
- Appendix A: FAQ
- Appendix B: Configuring the PCs
- Appendix C: Specifications
- Appendix D: Glossary

TL-WR842N
300Mbps Multi-Function Wireless N Router User Guide
- 77 -
There are four submenus under the Access Control menu as shown in Figure 4-69: Rule, Host,
Target and Schedule. Click any of them, and you will be able to configure the corresponding
function.
4.14.1 Rule
Choose menu “Access Control
→
Rule”, and then you can view and set Access Control rules in
the screen as shown in Figure 4-70.
Figure 4-70 Access Control Rule Management
Enable Internet Access Control - Select the check box to enable the Internet Access
Control function, so the Default Filter Policy can take effect.
Rule Name - Here displays the name of the rule and this name is unique.
Host - Here displays the host selected in the corresponding rule.
Target - Here displays the target selected in the corresponding rule.
Schedule - Here displays the schedule selected in the corresponding rule.
Enable - Here displays the status of the rule, enabled or not. Check this option to enable a
specific entry.
Modify - Here you can edit or delete an existing rule.
Setup Wizard - Click the Setup Wizard button to create a new rule entry.
Add New... - Click the Add New... button to add a new rule entry.
Enable All - Click the Enable All button to enable all the rules in the list.