
User's Guide
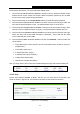

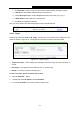
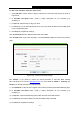

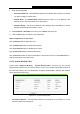
Table Of Contents
- Package Contents
- Chapter 1. Introduction
- Chapter 2. Connecting the Router
- Chapter 3. Quick Installation Guide
- Chapter 4. Configuring the Router
- 4.1 Login
- 4.2 Status
- 4.3 Quick Setup
- 4.4 WPS
- 4.5 Network
- 4.6 Wireless
- 4.7 Guest Network
- 4.8 DHCP
- 4.9 VPN
- 4.10 USB Settings
- 4.11 Forwarding
- 4.12 Security
- 4.13 Parental Control
- 4.14 Access Control
- 4.15 Advanced Routing
- 4.16 Bandwidth Control
- 4.17 IP & MAC Binding Setting
- 4.18 Dynamic DNS
- 4.19 IPv6 Support
- 4.20 System Tools
- 4.21 Logout
- Appendix A: FAQ
- Appendix B: Configuring the PCs
- Appendix C: Specifications
- Appendix D: Glossary

TL-WR842N
300Mbps Multi-Function Wireless N Router User Guide
- 85 -
Figure 4-80 Add or Modify an Access Target Entry
1) In Target Description field, create a unique description for the target (e.g. Target_1).
2) In IP Address field, enter the IP address of the target.
3) Select a common service from Common Service Port drop-down list, so that the
Target Port will be automatically filled. If the Common Service Port drop-down list
doesn’t have the service you want, specify the Target Port manually.
4) In Protocol field, select TCP, UDP, ICMP or ALL from the drop-down list.
4. If you select Domain Name, the screen shown is Figure 4-81.
Figure 4-81 Add or Modify an Access Target Entry
1) In Target Description field, create a unique description for the target (e.g. Target_1).
2) In Domain Name field, enter the domain name, either the full name or the keywords (for
example, TP-LINK) in the blank. Any domain name with keywords in it (www.tp-link.com,
www.tp-link.com.cn) will be blocked or allowed. You can enter 4 domain names.
5. Click the Save button.