Chapter 5 • MAC Address - The physical address of the LAN ports. The value can not be changed. • Type - Either select Smart IP(DHCP) to get IP address from DHCP server, or Static IP to configure IP address manually. • IP Address - Enter the IP address in dotted-decimal notation if your select Static IP (factory default - 192.168.0.254). • Subnet Mask - An address code that determines the size of the network. Normally 255.255.255.0 is used as the subnet mask.
Chapter 5 • Wireless Network Name - Enter a string of up to 32 characters. The default SSID is TP-LINK_XXXX (XXXX indicates the last unique four numbers of each router’s MAC address). It is strongly recommended that you change your network name (SSID). This value is case-sensitive. For example, TEST is NOT the same as test. • Channel - This field determines which operating frequency will be used. The default channel is set to Auto.
Chapter 5 • Disable Security - The wireless security function can be enabled or disabled. If disabled, wireless clients can connect to the router without a password. It’s strongly recommended to choose one of the following modes to enable security. • WPA-PSK/WPA2-Personal - It’s the WPA/WPA2 authentication type based on preshared passphrase. • Version - Select Automatic, WPA-PSK or WPA2-PSK. • Wireless Password - Enter ASCII or Hexadecimal characters.
Chapter 5 • Group Key Update Period - Specify the group key update interval in seconds. The value should be 30 or above. Enter 0 to disable the update. • WEP - It is based on the IEEE 802.11 standard. • • • • • • • Type - The default setting is Automatic, which can select Shared Key or Open System authentication type automatically based on the wireless client’s capability and request. WEP Key Format - Hexadecimal and ASCII formats are provided here.
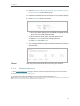
Chapter 5 4. Select Allow the stations specified by any enabled entries in the list to access as the filtering rule. 5. Delete all or disable all entries if there are any entries already. 6. Click Add New and fill in the blank. 1 ) Enter the MAC address 00-0A-EB-B0-00-0B/00-0A-EB00-07-5F in the MAC Address field. 2 ) Enter wireless client A/B in the Description field. 3 ) Select Enabled in the Status drop-down list. 4 ) Click Save and click Back. 7.
Chapter 5 • Transmit Power - Select High, Middle or Low which you would like to specify for the router. High is the default setting and recommended. • Beacon Interval - Enter a value between 40-1000 milliseconds for Beacon Interval here. Beacon Interval value determines the time interval of the beacons. The beacons are the packets sent by the router to synchronize a wireless network. The default value is 100. • RTS Threshold - Here you can specify the RTS (Request to Send) Threshold.
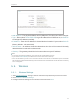
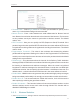
Chapter 5 2. Go to Wireless > Wireless Statistics to check the data packets sent and received by each client device connected to the router. • MAC Address - The MAC address of the connected wireless client. • Current Status - The running status of the connected wireless client. • Received Packets - Packets received by the wireless client. • Sent Packets - Packets sent by the wireless client. • Configure - The button is used for loading the item to the Wireless MAC Filtering list. • • 5. 5. 6.
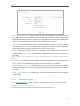
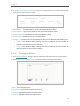
Chapter 5 Click Start/Stop to start or stop wireless throughput monitor. 5. 6. DHCP 5. 6. 1. DHCP Settings By default, the DHCP (Dynamic Host Configuration Protocol) Server is enabled and the router acts as a DHCP server; it dynamically assigns TCP/IP parameters to client devices from the IP Address Pool. You can change the settings of DHCP Server if necessary, and you can reserve LAN IP addresses for specified client devices. 1. Visit http://tplinkwifi.
Chapter 5 • Secondary DNS (Optional) - Input the IP address of another DNS server if your ISP provides two DNS servers. Note: • To use the DHCP server function of the router, you must configure all computers on the LAN as Obtain an IP Address automatically. • When you choose Smart IP (DHCP) in Network > LAN, the DHCP Server function will be disabled. You will see the page as below. 5. 6. 2. DHCP Client List 1. Visit http://tplinkwifi.
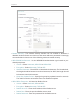
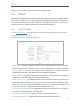
Chapter 5 5. 6. 3. Address Reservation You can reserve an IP address for a specific client. When you specify a reserved IP address for a PC on the LAN, this PC will always receive the same IP address each time when it accesses the DHCP server. 1. Visit http://tplinkwifi.net, and log in with the username and password you set for the router. 2. Go to DHCP > Address Reservation. 3. Click Add New and fill in the blank. 1 ) Enter the MAC address (in XX-XX-XX-XX-XX-XX format.
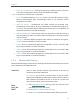
Chapter 5 • Diagnostic Tool - Select one diagnostic tool. • • Ping - This diagnostic tool troubleshoots connectivity, reachability, and name resolution to a given host or gateway. Tracerouter - This diagnostic tool tests the performance of a connection. Note: You can use ping/traceroute to test both numeric IP address or domain name. If pinging/tracerouting the IP address is successful, but pinging/tracerouting the domain name is not, you might have a name resolution problem.
Chapter 5 Note: Only one user can use this tool at one time. Options “Number of Pings”, “Ping Size” and “Ping Timeout” are used for the Ping function. Option “Tracert Hops” is used for the Tracert function. 5. 7. 2. Ping Watch Dog The Ping Watch Dog is dedicated for continuous monitoring of the particular connection to remote host using the Ping tool. It makes the router continuously ping a user defined IP address (it can be the Internet gateway for example).
Chapter 5 5. 7. 3. Firmware Upgrade TP-LINK is dedicated to improving and richening the product features, giving users a better network experience. We will release the latest firmware at TP-LINK official website. You can download the latest firmware file from the Support page of our website www.tp-link.com and upgrade the firmware to the latest version. 1. Download the latest firmware file for the router from our website www.tp-link.com. 2. Visit http://tplinkwifi.
Chapter 5 • To backup configuration settings: Click Backup to save a copy of the current settings in your local computer. A “.bin“ file of the current settings will be stored in your computer. • To restore configuration settings: 1. Click Choose File to locate the backup configuration file stored in your computer, and click Restore. 2. Wait a few minutes for the restoring and rebooting. Note: During the restoring process, do not power off or reset the router. 5. 7. 6. Reboot 1.
Chapter 5 It is strongly recommended that you change the default username and password of the router, for all users that try to access the router’s web-based utility or Quick Setup will be prompted for the router’s username and password. Note: The new username and password must not exceed 15 characters and not include any spacing. 3. Click Save. 5. 7. 8. System Log 1. Visit http://tplinkwifi.net, and log in with the username and password you set for the router. 2.
Chapter 5 • From - Your mail box address. The router will connect it to send logs. • SMTP Server - Your smtp server. It corresponds with the mailbox filled in the From field. You can log on the relevant website for help if you are not clear with the address. • • To - Recipient’s mail address. The destination mailbox which will receive logs. Authentication - Most SMTP Server requires Authentication. It is required by most mailboxes that need user name and password to log in.
Chapter 5 • Mail Log - Click to send an email of current logs manually according to the address and validation information set in Mail Settings. • Clear Log - All the logs will be deleted from the router permanently, not just from the page. Click Next to go to the next page, or click Previous to return to the previous page. 5. 8. Log Out Click Logout at the bottom of the main menu, and you will log out of the web page and return to the login window.
Chapter 6 Configure the Router in Repeater Mode This chapter presents how to configure the various features of the router working as a Repeater.
Chapter 6 6. 1. Status 1. Visit http://tplinkwifi.net, and log in with the username and password you set for the router. 2. Go to Status. You can view the current status information of the router in Repeater Mode. • Firmware Version - The version information of the router’s firmware. • Hardware Version - The version information of the router’s hardware. • Wired - This field displays the current settings of the LAN, and you can configure them on the Network > LAN page.
Chapter 6 • Channel - The current wireless channel in use. • Channel Width - The current wireless channel width in use. • • Mode - The current wireless working mode in use. MAC Address - The physical address of the router. • Traffic Statistics - The router’s traffic statistics. • Received (Bytes) - Traffic in bytes received from the WAN port. • Sent (Bytes) - Traffic in bytes sent out from the WAN port. • • Received (Packets) - Traffic in packets received from the WAN port.
Chapter 6 • MAC Address - The physical address of the LAN ports. The value can not be changed. • Type - Either select Smart IP(DHCP) to get IP address from DHCP server, or Static IP to configure IP address manually. • IP Address - Enter the IP address in dotted-decimal notation if your select Static IP (factory default - 192.168.0.254). • Subnet Mask - An address code that determines the size of the network. Normally 255.255.255.0 is used as the subnet mask.
Chapter 6 • Wireless Name of Root AP - The SSID of AP that you want to connect to. • MAC Address of Root AP - The MAC address of AP that you want to connect to. • Mode - Select the desired mode. It is strongly recommended that you keep the default setting 11bgn mixed, so that all 802.11b/g/n wireless devices can connect to the router. Note: If 11bg mixed mode is selected, the Channel Width field will turn grey and the value will become 20M, and cannot be changed.
Chapter 6 6. 4. 2. Wireless Security 1. Visit http://tplinkwifi.net, and log in with the username and password you set for the router. 2. Go to Wireless > Wireless Security. 3. Configure the security settings of your wireless network and click Save. • Disable Security - The wireless security function can be enabled or disabled. If disabled, wireless clients can connect to the router without a password. It’s strongly recommended to choose one of the following modes to enable security.
Chapter 6 • Encryption - Select Automatic, TKIP or AES. • Radius Port - Enter the port that Radius server used. • • • Radius Server IP - Enter the IP address of the Radius server. Radius Password - Enter the password for the Radius server. Group Key Update Period - Specify the group key update interval in seconds. The value should be 30 or above. Enter 0 to disable the update. • WEP - It is based on the IEEE 802.11 standard.
Chapter 6 2. Go to Wireless > Wireless MAC Filtering. 3. Click Enable to enable the Wireless MAC Filtering function. 4. Select Allow the stations specified by any enabled entries in the list to access as the filtering rule. 5. Delete all or disable all entries if there are any entries already. 6. Click Add New and fill in the blank. 1 ) Enter the MAC address 00-0A-EB-B0-00-0B/00-0A-EB00-07-5F in the MAC Address field. 2 ) Enter wireless client A/B in the Description field.
Chapter 6 • Transmit Power - Select High, Middle or Low which you would like to specify for the router. High is the default setting and recommended. • Beacon Interval - Enter a value between 40-1000 milliseconds for Beacon Interval here. Beacon Interval value determines the time interval of the beacons. The beacons are the packets sent by the Router to synchronize a wireless network. The default value is 100. • RTS Threshold - Here you can specify the RTS (Request to Send) Threshold.
Chapter 6 6. 4. 5. Wireless Statistics 1. Visit http://tplinkwifi.net, and log in with the username and password you set for the router. 2. Go to Wireless > Wireless Statistics to check the data packets sent and received by each client device connected to the router. • MAC Address - The MAC address of the connected wireless client. • Current Status - The running status of the connected wireless client. • Received Packets - Packets received by the wireless client.
Chapter 6 • Transmit - Wireless transmit rate information. • Receive - Wireless receive rate information. Click Start/Stop to start or stop wireless throughput monitor. 6. 5. DHCP 6. 5. 1. DHCP Settings By default, the DHCP (Dynamic Host Configuration Protocol) Server is enabled and the router acts as a DHCP server; it dynamically assigns TCP/IP parameters to client devices from the IP Address Pool.
Chapter 6 • Default Gateway (Optional) - It is suggested to input the IP address of the LAN port of the router. The default value is 192.168.0.254. • Default Domain (Optional) - Input the domain name of your network. • Primary DNS (Optional) - Input the DNS IP address provided by your ISP. • Secondary DNS (Optional) - Input the IP address of another DNS server if your ISP provides two DNS servers.
Chapter 6 1 ) Enter the MAC address (in XX-XX-XX-XX-XX-XX format.) of the client for which you want to reserve an IP address. 2 ) Enter the IP address (in dotted-decimal notation) which you want to reserve for the client. 3 ) Leave the status as Enabled. 4 ) Click Save. 6. 6. System Tools 6. 6. 1. Diagnostic Diagnostic is used to test the connectivity between the router and the host or other network devices. 1. Visit http://tplinkwifi.
Chapter 6 • • Ping - This diagnostic tool troubleshoots connectivity, reachability, and name resolution to a given host or gateway. Tracerouter - This diagnostic tool tests the performance of a connection. Note: You can use ping/traceroute to test both numeric IP address or domain name. If pinging/tracerouting the IP address is successful, but pinging/tracerouting the domain name is not, you might have a name resolution problem.
Chapter 6 • Enable - Turn on/off Ping Watch Dog. • IP Address - The IP address of the target host where the Ping Watch Dog Utility is sending ping packets. • Interval - Time interval between two ping packets which are sent out continuously. • Delay - Time delay before first ping packet is sent out when the router is restarted. • Fail Count - Upper limit of the ping packets the router can drop continuously. If this value is overrun, the router will restart automatically. 6. 6. 3.
Chapter 6 • The default Username: admin • The default IP Address: 192.168.0.254 • • 6. 6. 5. The default Password: admin The default Subnet Mask: 255.255.255.0 Backup & Restore The configuration settings are stored as a configuration file in the router. You can backup the configuration file in your computer for future use and restore the router to the previous settings from the backup file when needed. 1. Visit http://tplinkwifi.
Chapter 6 Some settings of the router will take effect only after rebooting, including: • Change the LAN IP Address (system will reboot automatically). • Change the DHCP Settings. • Change the Working Modes. • Change the Web Management Port. • Upgrade the firmware of the router (system will reboot automatically). • Restore the router to its factory defaults (system will reboot automatically). • Update the configuration with the file (system will reboot automatically). 6. 6. 7. Password 1.
Chapter 6 • Auto Mail Feature - Indicates whether the auto mail feature is enabled or not. • Mail Settings - Set the receiving and sending mailbox address, server address, validation information as well as the timetable for Auto Mail Feature. • From - Your mail box address. The router will connect it to send logs. • SMTP Server - Your smtp server. It corresponds with the mailbox filled in the From field. You can log on the relevant website for help if you are not clear with the address.
Chapter 6 • • • • User Name - Your mail account name filled in the From field. The part behind @ is included. Password - Your mail account password. Confirm The Password - Enter the password again to confirm. Enable Auto Mail Feature - Select it to mail logs automatically. You could mail the current logs either at a specified time everyday or by intervals, but only one could be the current effective rule. Enter the desired time or intervals in the corresponding field.
Chapter 7 Configure the Router in Client Mode This chapter presents how to configure the various features of the router working as a client.
Chapter 7 7. 1. Configure the Router in Client Mode Status 1. Visit http://tplinkwifi.net, and log in with the username and password you set for the router. 2. Go to Status. You can view the current status information of the router in Client Mode. • Firmware Version - The version information of the router’s firmware. • Hardware Version - The version information of the router’s hardware.
Chapter 7 Configure the Router in Client Mode • Received (Bytes) - Traffic in bytes received from the WAN port. • Sent (Bytes) - Traffic in bytes sent out from the WAN port. • • Received (Packets) - Traffic in packets received from the WAN port. Sent (Packets) - Traffic in packets sent out from the WAN port. • System Up Time - The length of the time since the router was last powered on or reset. Click Refresh to get the latest status and settings of the router. 7. 2. Working Mode 1.
Chapter 7 Configure the Router in Client Mode • MAC Address - The physical address of the LAN ports. The value can not be changed. • Type - Either select Smart IP(DHCP) to get IP address from DHCP server, or Static IP to configure IP address manually. • IP Address - Enter the IP address in dotted-decimal notation if your select Static IP (factory default - 192.168.0.254). • Subnet Mask - An address code that determines the size of the network. Normally 255.255.255.0 is used as the subnet mask.
Chapter 7 Configure the Router in Client Mode • Enable WDS - If your host AP supports WDS well, please enable this option. If WDS is enabled, all traffic from wired networks will be forwarded in the format of WDS frames consisting of four address fields. If WDS is disabled, three address frames are used. • Wireless Name of Root AP - Enter the SSID of the AP that you want to access. • MAC Address of Root AP - Enter the MAC address of the AP that you want to access.
Chapter 7 Configure the Router in Client Mode • Disable Security - The wireless security function can be enabled or disabled. If disabled, wireless clients can connect to the router without a password. It’s strongly recommended to choose one of the following modes to enable security. • WPA-PSK/WPA2-Personal - It’s the WPA/WPA2 authentication type based on preshared passphrase. • Version - Select Automatic, WPA-PSK or WPA2-PSK. • Wireless Password - Enter ASCII or Hexadecimal characters.
Chapter 7 Configure the Router in Client Mode • WEP - It is based on the IEEE 802.11 standard. • • • • • • • Type - The default setting is Automatic, which can select Shared Key or Open System authentication type automatically based on the wireless client’s capability and request. WEP Key Format - Hexadecimal and ASCII formats are provided here. Hexadecimal format stands for any combination of hexadecimal digits (0-9, a-f, A-F) in the specified length.
Chapter 7 Configure the Router in Client Mode 6. Click Add New and fill in the blank. 1 ) Enter the MAC address 00-0A-EB-B0-00-0B/00-0A-EB00-07-5F in the MAC Address field. 2 ) Enter wireless client A/B in the Description field. 3 ) Select Enabled in the Status drop-down list. 4 ) Click Save and click Back. 7. The configured filtering rules should be listed as the picture shows below. Done! 7. 4. 4. Now only client A and client B can access your network. Wireless Advanced 1. Visit http://tplinkwifi.
Chapter 7 Configure the Router in Client Mode • Transmit Power - Select High, Middle or Low which you would like to specify for the router. High is the default setting and recommended. • Beacon Interval - Enter a value between 40-1000 milliseconds for Beacon Interval here. Beacon Interval value determines the time interval of the beacons. The beacons are the packets sent by the router to synchronize a wireless network. The default value is 100.
Chapter 7 Configure the Router in Client Mode • MAC Address - The MAC address of the connected wireless client . • Current Status - The running status of the connected wireless client . • Received Packets - Packets received by the wireless client. • Sent Packets - Packets sent by the wireless client. • Configure - The button is used for loading the item to the Wireless MAC Filtering list. • • 7. 4. 6.
Chapter 7 7. 5. 1. Configure the Router in Client Mode DHCP Settings 1. Visit http://tplinkwifi.net, and log in with the username and password you set for the router. 2. Go to DHCP > DHCP Settings. 3. Specify DHCP server settings and click Save. • DHCP Server - Enable or disable the DHCP server. If disabled, you must have another DHCP server within your network or else you must configure the computer manually.
Chapter 7 7. 5. 2. Configure the Router in Client Mode DHCP Client List 1. Visit http://tplinkwifi.net, and log in with the username and password you set for the router. 2. Go to DHCP > DHCP Client List to view the information of the clients connected to the router. • Client Name - The name of the DHCP client. • MAC Address - The MAC address of the DHCP client. • Assigned IP - The IP address that the router has allocated to the DHCP client. • Lease Time - The time of the DHCP client leased.
Chapter 7 Configure the Router in Client Mode 3. Click Add New and fill in the blank. 1 ) Enter the MAC address (in XX-XX-XX-XX-XX-XX format.) of the client for which you want to reserve an IP address. 2 ) Enter the IP address (in dotted-decimal notation) which you want to reserve for the client. 3 ) Leave the Status as Enabled. 4 ) Click Save. 7. 6. System Tools 7. 6. 1. Diagnostic Diagnostic is used to test the connectivity between the router and the host or other network devices. 1.
Chapter 7 Configure the Router in Client Mode • Diagnostic Tool - Select one diagnostic tool. • • Ping - This diagnostic tool troubleshoots connectivity, reachability, and name resolution to a given host or gateway. Tracerouter - This diagnostic tool tests the performance of a connection. Note: You can use ping/traceroute to test both numeric IP address or domain name.
Chapter 7 Configure the Router in Client Mode • Enable - Turn on/off Ping Watch Dog. • IP Address - The IP address of the target host where the Ping Watch Dog Utility is sending ping packets. • Interval - Time interval between two ping packets which are sent out continuously. • Delay - Time delay before first ping packet is sent out when the router is restarted. • Fail Count - Upper limit of the ping packets the router can drop continuously.
Chapter 7 Configure the Router in Client Mode 2. Go to System Tools > Factory Defaults. Click Restore to reset all settings to the default values. • The default Username: admin • The default IP Address: 192.168.0.254 • • 7. 6. 5. The default Password: admin The default Subnet Mask: 255.255.255.0 Backup & Restore The configuration settings are stored as a configuration file in the router.
Chapter 7 Configure the Router in Client Mode Some settings of the router will take effect only after rebooting, including: • Change the LAN IP Address (system will reboot automatically). • Change the DHCP Settings. • Change the Working Modes. • Change the Web Management Port. • Upgrade the firmware of the router (system will reboot automatically). • Restore the router to its factory defaults (system will reboot automatically).
Chapter 7 Configure the Router in Client Mode • Auto Mail Feature - Indicates whether the auto mail feature is enabled or not. • Mail Settings - Set the receiving and sending mailbox address, server address, validation information as well as the timetable for Auto Mail Feature. • From - Your mail box address. The router will connect it to send logs. • SMTP Server - Your smtp server. It corresponds with the mailbox filled in the From field.
Chapter 7 • • • • Configure the Router in Client Mode User Name - Your mail account name filled in the From field. The part behind @ is included. Password - Your mail account password. Confirm The Password - Enter the password again to confirm. Enable Auto Mail Feature - Select it to mail logs automatically. You could mail the current logs either at a specified time everyday or by intervals, but only one could be the current effective rule.
Chapter 8 Configure the Router in Hotspot Router Mode This chapter presents how to configure the various features of the router working as a Hotspot Router.
Chapter 8 8. 1. Configure the Router in Hotspot Router Mode Status 1. Visit http://tplinkwifi.net, and log in with the username and password you set for the router. 2. Go to Status. You can view the current status information of the router in Hotspot Router Mode. • Firmware Version - The version information of the router’s firmware. • Hardware Version - The version information of the router’s hardware.
Chapter 8 • • Configure the Router in Hotspot Router Mode MAC Address - The physical address of the router. Client Status - The status of client. Init: Connection is down; Scan: Try to find the AP; Auth: Try to authenticate; ASSOC: Try to associate; Run: Associated successfully. • WAN - This field displays the current settings of the WAN, and you can configure them on the Network > WAN page. • MAC Address - The physical address of the WAN port.
Chapter 8 Configure the Router in Hotspot Router Mode 2. Select Press the button of the new device in two minutes and click Connect. 3. Within two minutes, press the WPS button on your client device. 4. A success message will appear on the WPS page if the client device has been successfully added to the router’s network. Method TWO: Enter the Client’s PIN 1. Keep the WPS Status as Enabled and click Add Device. 2.
Chapter 8 Configure the Router in Hotspot Router Mode 3. A success message will appear on the WPS page if the client device has been successfully added to the router’s network. Method Three: Enter the Router’s PIN 1. Keep the WPS Status as Enabled and get the Current PIN of the router. 2. Enter the router’s current PIN on your client device to join the router’s Wi-Fi network. 8. 3. Working Mode 1. Visit http://tplinkwifi.net, and log in with the username and password you set for the router. 2.
Chapter 8 Configure the Router in Hotspot Router Mode Click Renew to renew the IP parameters from your ISP. Click Release to release the IP parameters. • MTU Size - The normal MTU (Maximum Transmission Unit) value for most Ethernet networks is 1500 Bytes. It is not recommended that you change the default MTU Size unless required by your ISP. • Use These DNS Servers - If your ISP providess you one or two DNS addresses, select Use These DNS Servers and enter the primary and secondary addresses.
Chapter 8 Configure the Router in Hotspot Router Mode • IP Address - Enter the IP address in dotted-decimal notation provided by your ISP. • Subnet Mask - Enter the subnet mask in dotted-decimal notation provided by your ISP. Normally 255.255.255.0 is used as the subnet mask.. • Default Gateway - Enter the gateway IP address in dotted-decimal notation provided by your ISP. • MTU Size - The normal MTU (Maximum Transmission Unit) value for most Ethernet networks is 1500 Bytes.
Chapter 8 • • • Note: Configure the Router in Hotspot Router Mode Connect Automatically - The connection can be re-established automatically when it is down. Time-based Connecting - The connection will only be established in the period from the start time to the end time (both are in HH:MM format). Connect Manually - You can click Connect/Disconnect to connect/disconnect immediately. This mode also supports the Max Idle Time function as Connect on Demand mode.
Chapter 8 Configure the Router in Hotspot Router Mode • Primary DNS/Secondary DNS - If your ISP does not automatically assign DNS addresses to the router, please select Use the following DNS servers and enter the IP address in dotted-decimal notation of your ISP’s primary DNS server. If a secondary DNS server address is available, enter it as well. BigPond Cable If your ISP provides BigPond cable connection, please select BigPond Cable.
Chapter 8 • Configure the Router in Hotspot Router Mode Connect Manually - You can click Connect/Disconnect to connect/disconnect immediately. This mode also supports the Max Idle Time function as Connect on Demand mode. The Internet connection can be disconnected automatically after a specified inactivity period (Max Idle Time) and not be able to re-establish when you attempt to access the Internet again.
Chapter 8 Configure the Router in Hotspot Router Mode • Internet IP Address/ Internet DNS - The Internet IP address and DNS server address assigned by L2TP server. • Connection Mode • • • Connect on Demand - In this mode, the Internet connection can be terminated automatically after a specified inactivity period (Max Idle Time) and be reestablished when you attempt to access the Internet again. If you want to keep your Internet connection active all the time, please enter 0 in the Max Idle Time field.
Chapter 8 Configure the Router in Hotspot Router Mode • User Name/Password - Enter the user name and password provided by your ISP. These fields are case-sensitive. • Confirm Password - Enter the Password provided by your ISP again to ensure the password you entered is correct. • Connect/Disconnect - Click this button to connect or disconnect immediately. • Dynamic IP/ Static IP - Select either as required by your ISP.
Chapter 8 • • Configure the Router in Hotspot Router Mode Connect Automatically - The connection can be re-established automatically when it is down. Connect Manually - You can click Connect/Disconnect to connect/disconnect immediately. This mode also supports the Max Idle Time function as Connect on Demand mode. The Internet connection can be disconnected automatically after a specified inactivity period (Max Idle Time) and not be able to re-establish when you attempt to access the Internet again.
Chapter 8 Configure the Router in Hotspot Router Mode • MAC Address - The physical address of the LAN ports. The value can not be changed. • IP Address - Enter the IP address in dotted-decimal notation of your router (factory default - 192.168.0.254). • Subnet Mask - An address code that determines the size of the network. Normally 255.255.255.0 is used as the subnet mask. • IGMP Proxy - The Internet Group Management Protocol (IGMP) feature allow you to watch TV on IPTV-supported devices in the LAN .
Chapter 8 Configure the Router in Hotspot Router Mode • Client Settings - The settings of the public Wi-Fi your router is going to connect to. • SSID - The SSID of the public Wi-Fi your router is going to connect to as a client. • • • • • • BSSID - The MAC address of the public Wi-Fi your router is going to connect to as a client. Survey - Click this button to search the public Wi-Fi. Key type - Select the key type according to the public Wi-Fi’s security configuration.
Chapter 8 • • 8. 5. 2. Configure the Router in Hotspot Router Mode Enable SSID Broadcast - If enabled, the router will broadcast the wireless network name (SSID). Disable Local Wireless Access - If you select this option, the wireless clients will not be able to connect to the router. Wireless Security 1. Visit http://tplinkwifi.net, and log in with the username and password you set for the router. 2. Go to Wireless > Wireless Security. 3.
Chapter 8 • • Configure the Router in Hotspot Router Mode Wireless Password - Enter ASCII or Hexadecimal characters. For Hexadecimal, the length should be between 8 and 64 characters; for ASCII, the length should be between 8 and 63 characters. Group Key Update Period - Specify the group key update interval in seconds. The value can be 0 or at least 30. Enter 0 to disable the update. • WPA /WPA2-Enterprise - It’s based on Radius Server. • Version - Select Automatic, WPA or WPA2.
Chapter 8 Configure the Router in Hotspot Router Mode network by their MAC addresses. How can I do that? For example, you want the wireless client A with the MAC address 00-0A-EB-B0-00-0B and the wireless client B with the MAC address 00-0A-EB-00-07-5F to access the router, but other wireless clients cannot access the router 1. Visit http://tplinkwifi.net, and log in with the username and password you set for the router. 2. Go to Wireless > Wireless MAC Filtering. 3.
Chapter 8 Configure the Router in Hotspot Router Mode 3. Configure the advanced settings of your wireless network and click Save. Note: If you are not familiar with the setting items on this page, it’s strongly recommended to keep the provided default values; otherwise it may result in lower wireless network performance. • Transmit Power - Select High, Middle or Low which you would like to specify for the router. High is the default setting and recommended.
Chapter 8 Configure the Router in Hotspot Router Mode • Enable AP Isolation - This function isolates all connected wireless stations so that wireless stations cannot access each other through WLAN. This function will be disabled if WDS/Bridge is enabled. 8. 5. 5. Wireless Statistics 1. Visit http://tplinkwifi.net, and log in with the username and password you set for the router. 2.
Chapter 8 Configure the Router in Hotspot Router Mode • DHCP Server - Enable or disable the DHCP server. If disabled, you must have another DHCP server within your network or else you must configure the computer manually. • Start IP Address - Specify an IP address for the DHCP Server to start with when assigning IP addresses. 192.168.0.100 is the default start address. • End IP Address - Specify an IP address for the DHCP Server to end with when assigning IP addresses. 192.168.0.
Chapter 8 Configure the Router in Hotspot Router Mode • Client Name - The name of the DHCP client. • MAC Address - The MAC address of the DHCP client. • Assigned IP - The IP address that the router has allocated to the DHCP client. • Lease Time - The time of the DHCP client leased. After the dynamic IP address has expired, a new dynamic IP address will be automatically assigned to the user. You cannot change any of the values on this page.
Chapter 8 Configure the Router in Hotspot Router Mode TP-LINK router includes four forwarding rules. If two or more rules are set, the priority of implementation from high to low is Virtual Servers, Port Triggering, UPNP and DMZ. 8. 7. 1. Virtual Servers When you build up a server in the local network and want to share it on the Internet, Virtual Servers can realize the service and provide it to Internet users.
Chapter 8 Configure the Router in Hotspot Router Mode 5. Leave the status as Enabled and click Save. Done! Note: • It is recommended to keep the default settings of Internal Port and Protocol if you are not clear about which port and protocol to use. • If the service you want to use is not in the Common Service Port list, you can enter the corresponding parameters manually. You should verify the port number that the service needs.
Chapter 8 Configure the Router in Hotspot Router Mode 4. Leave the status as Enabled and click Save. Note: • You can add multiple port triggering rules according to your network need. • The triggering ports can not be overlapped. • If the application you need is not listed in the Common Applications list, please enter the parameters manually. You should verify the incoming ports the application uses first and enter them in Incoming Ports field. You can input at most 5 groups of ports (or port sections).
Chapter 8 Configure the Router in Hotspot Router Mode 3. Go to Forwarding > DMZ. 4. Select Enable and enter the IP address 192.168.0.100 in the DMZ Host IP Address filed. 5. Click Save. Done! 8. 7. 4. You’ve set your PC to a DMZ host and now you can make a team to game with other players. UPnP UPnP (Universal Plug and Play) protocol allows the applications or host devices to automatically find the front-end NAT device and send request to it to open the corresponding ports.
Chapter 8 Configure the Router in Hotspot Router Mode 8. 8. Security 8. 8. 1. Basic Security This function allows you to protect your home network from cyber attacks and unauthorized users by implementing these network security functions. 1. Visit http://tplinkwifi.net, and log in with the username and password you set for the router. 2. Go to Security > Basic Security, and you can enable or disable the security functions. • Firewall - A firewall protects your network from Internet attacks.
Chapter 8 Configure the Router in Hotspot Router Mode validates that the traffic passing through the session conforms to the protocol. SPI Firewall is enabled by default. • VPN - VPN Passthrough must be enabled if you want to allow VPN tunnels using IPSec, PPTP or L2TP protocols to pass through the router’s firewall. • • • PPTP Passthrough - Point-to-Point Tunneling Protocol (PPTP) allows the Pointto-Point Protocol (PPP) to be tunneled through an IP network.
Chapter 8 Configure the Router in Hotspot Router Mode • Packets Statistics Interval (5~60) - The default value is 10. Select a value between 5 and 60 seconds from the drop-down list. The Packets Statistics Interval value indicates the time section of the packets statistics. The result of the statistics is used for analysis by SYN Flood, UDP Flood and ICMP-Flood. • DoS Protection - Denial of Service protection. Select Enable or Disable to enable or disable the DoS protection function.
Chapter 8 Configure the Router in Hotspot Router Mode • TCP-SYN-FLOOD Packets Threshold (5~3600) - The default value is 50. Enter a value between 5 ~ 3600. When the number of the current TCP-SYN-FLOOD packets is beyond the set value, the router will startup the blocking function immediately. • Ignore Ping Packet From WAN Port - The default setting is disabled. If enabled, the ping packet from the Internet cannot access the router. • Forbid Ping Packet From LAN Port - The default setting is disabled.
Chapter 8 Configure the Router in Hotspot Router Mode 4 ) Click Save. Note: If your PC is blocked but you want to access the router again, press and hold the Reset button to reset the router to the factory defaults. 8. 8. 4. Remote Management 1. Visit http://tplinkwifi.net, and log in with the username and password you set for the router. 2. Go to Security > Remote Management, and you can manage your router from a remote device via the Internet.
Chapter 8 Configure the Router in Hotspot Router Mode 2. Go to Access Control > Schedule. 3. Click Add New to create a new schedule entry with Schedule Description as Schedule_1, Day as Sat and Time as all day-24 hours, and then click Save. 4. Go to Parental Control. 5. Select Enable and enter the MAC address 00-11-22-33-44-BB in the MAC Address of Parental PC field. 6. Click Add New. 7. Enter appropriate parameters in corresponding fields.
Chapter 8 • Configure the Router in Hotspot Router Mode In the Status field, select Enable. 8. Click Save. Then you can go back to the Parental Control Settings page to check the following list. 8. 10. Access Control Access Control is used to deny or allow specific client devices to access your network with access time and content restrictions. I want to: How can I do that? Deny or allow specific client devices to access my network with access tiem and content restrictions.
Chapter 8 Configure the Router in Hotspot Router Mode full name or the keywords (for example TP-LINK) in the Domain Name field. Note: Any domain name with keywords in it (e.g. www.tp-link.com) will be blocked or allowed. 3 ) Click Save. 4. Go to Access Control > Schedule and configure the schedule settings: 1 ) Click Add New. 2 ) Create a unique description (e.g. schedule_1) for the schedule in the Schedule Description field and set the day(s) and time period. 3 ) Click Save. 5.
Chapter 8 Configure the Router in Hotspot Router Mode 3 ) Leave the status as Enabled as click Save. 6. Select Enable Internet Access Control to enable Access Control function. 7. Select Allow the packets specified by any enabled access control policy to pass through the Router as the default filter policy and click Save. Done! Now only the specific host(s) can visit the target(s) within the scheduled time period. 8. 11.
Chapter 8 Configure the Router in Hotspot Router Mode 2. Enter the following information. • • • Destination Network - The Destination Network is the address of the network or host that you want to assign to a static route. Subnet Mask - The Subnet Mask determines which portion of an IP address is the network portion, and which portion is the host portion. Default Gateway - This is the IP address of the default gateway device that allows the contact between the router and the network or host. 3.
Chapter 8 Configure the Router in Hotspot Router Mode The values you configure for the Egress Bandwidth and Ingress Bandwidth should be less than 100,000Kbps. For optimal control of the bandwidth, please select the right Line Type and consult your ISP for the total egress and ingress bandwidth. • Enable Bandwidth Control - Check this box so that the Bandwidth Control settings can take effect. • Line Type - Select the right type for you network connection. If you are not sure, please consult your ISP.
Chapter 8 Configure the Router in Hotspot Router Mode 3. Click Save. 8. 13. IP&MAC Binding IP & MAC Binding, namely, ARP (Address Resolution Protocol) Binding, is used to bind a network device’s IP address to its MAC address. This will prevent ARP spoofing and other ARP attacks by denying network access to a device with a matching IP address in the ARP list, but with an unrecognized MAC address. 8. 13. 1. Binding Settings 1. Visit http://tplinkwifi.
Chapter 8 Configure the Router in Hotspot Router Mode 4. Click Save. ¾¾ To modify or delete an existing entry: 1. Find the desired entry in the table. 2. Click Modify or Delete in the Modify column. ¾¾ To find an existing entry: 1. Click Find. 2. Enter the MAC address or IP address in the corresponding field. 3. Click Find on this page as shown below. 8. 13. 2.
Chapter 8 Configure the Router in Hotspot Router Mode 8. 14. Dynamic DNS The router offers the DDNS (Dynamic Domain Name System) feature, which allows the hosting of a website, FTP server, or e-mail server with a fixed domain name (named by yourself) and a dynamic IP address. Thus your friends can connect to your server by entering your domain name no matter what your IP address is. Before using this feature, you need to sign up for DDNS service providers such as www.comexe.cn, www.dyndns.org, or www.
Chapter 8 Configure the Router in Hotspot Router Mode Dyndns DDNS If the dynamic DNS Service Provider you select is www.dyn.com, the following page will appear. To set up for DDNS, follow these instructions: 1. Enter the User Name for your DDNS account. 2. Enter the Password for your DDNS account. 3. Enter the Domain Name you received from dynamic DNS service provider here. 4. Click Login. 5. Click Save. • Connection Status - The status of the DDNS service connection is displayed here.
Chapter 8 Configure the Router in Hotspot Router Mode 1. Enter the User Name for your DDNS account. 2. Enter the Password for your DDNS account. 3. Enter the Domain Name you received from dynamic DNS service provider. 4. Click Login. 5. Click Save. • Connection Status - The status of the DDNS service connection is displayed here. • Logout - Click Logout to log out of the DDNS service. 8. 15. System Tools 8. 15. 1. Time Settings 1. Visit http://tplinkwifi.
Chapter 8 Configure the Router in Hotspot Router Mode 1. Select Enable DaylightSaving. 2. Select the start time from the drop-down list in the Start field. 3. Select the end time from the drop-down list in the End field. 4. Click Save. Note: This setting will be used for some time-based functions such as firewall. You must specify your time zone once you log in to the router successfully; otherwise, time-based functions will not take effect. 8. 15. 2.
Chapter 8 Configure the Router in Hotspot Router Mode • Ping Packet Size - The size of Ping packet. • Ping Timeout - Set the waiting time for the reply of each Ping packet. If there is no reply in the specified time, the connection is overtime. • Traceroute Max TTL - The max number of hops for a Traceroute connection. 3. Click Start to check the connectivity of the Internet. 4. The Diagnostic Results page displays the diagnosis result.
Chapter 8 • The default Username: admin • The default IP Address: 192.168.0.1 • • Configure the Router in Hotspot Router Mode The default Password: admin The default Subnet Mask: 255.255.255.0 8. 15. 5. Backup & Restore The configuration settings are stored as a configuration file in the router. You can backup the configuration file in your computer for future use and restore the router to the previous settings from the backup file when needed. 1. Visit http://tplinkwifi.
Chapter 8 Configure the Router in Hotspot Router Mode • Change the LAN IP Address (system will reboot automatically). • Change the DHCP Settings. • Change the Web Management Port. • Upgrade the firmware of the router (system will reboot automatically). • Restore the router to its factory defaults (system will reboot automatically). • Update the configuration with the file (system will reboot automatically). 8. 15. 7. Password 1. Visit http://tplinkwifi.
Chapter 8 Configure the Router in Hotspot Router Mode • Auto Mail Feature - Indicates whether the auto mail feature is enabled or not. • Mail Settings - Set the receiving and sending mailbox address, server address, validation information as well as the timetable for Auto Mail Feature. • From - Your mail box address. The router will connect it to send logs. • SMTP Server - Your smtp server. It corresponds with the mailbox filled in the From field.
Chapter 8 • • • • Configure the Router in Hotspot Router Mode User Name - Your mail account name filled in the From field. The part behind @ is included. Password - Your mail account password. Confirm The Password - Enter the password again to confirm. Enable Auto Mail Feature - Select it to mail logs automatically. You could mail the current logs either at a specified time everyday or by intervals, but only one could be the current effective rule.
Chapter 8 Configure the Router in Hotspot Router Mode • Packets Statistics Interval (5-60) - The default value is 10. Select a value between 5 and 60 in the drop-down list. The Packets Statistic Interval indicates the time section of the packets statistic. • Sorted Rules – Choose how displayed statistics are sorted. • Select Auto-refresh to refresh automatically. Click Refresh to refresh immediately. • Click Reset All to reset the values of all the entries to zero.
FAQ Q1. What should I do if I cannot access the internet? • If using a cable modem, unplug the Ethernet cable and reboot the modem. Wait until its Online LED is on and stable, then reconnect the Ethernet cable to the modem. • If you’re in a hotel room or on a trade show, the internet may be limited and requires that you authenticate for the service or purchase the Internet access. • If your internet access is still not available, contact TP-Link Technical Support. Q2.
Now you can enjoy your net meeting normally. Q6. What should I do if my wireless signal is unstable or weak? It may be caused by too much interference. • Set your wireless channel to a different one. • Choose a location with less obstacles that may block the signal between the router and the host AP. An open corridor or a spacious location is ideal. • Move the router to a new location away from Bluetooth devices and other household electronics, such as cordless phone, microwave, and baby monitor, etc.
COPYRIGHT & TRADEMARKS Specifications are subject to change without notice. is a registered trademark of TP-Link Technologies Co., Ltd. Other brands and product names are trademarks or registered trademarks of their respective holders. No part of the specifications may be reproduced in any form or by any means or used to make any derivative such as translation, transformation, or adaptation without permission from TP-Link Technologies Co., Ltd. Copyright © 2017 TP-Link Technologies Co., Ltd.
FCC STATEMENT This equipment has been tested and found to comply with the limits for a Class B digital device, pursuant to part 15 of the FCC Rules. These limits are designed to provide reasonable protection against harmful interference in a residential installation. This equipment generates, uses and can radiate radio frequency energy and, if not installed and used in accordance with the instructions, may cause harmful interference to radio communications.
CE Mark Warning This is a class B product. In a domestic environment, this product may cause radio interference, in which case the user may be required to take adequate measures. OPERATING FREQUENCY(the maximum transmitted power) 2412MHz—2472MHz(20dBm) 5180MHz—5240MHz(23dBm) RF Exposure Information This device meets the EU requirements (2014/53/EU Article 3.1a) on the limitation of exposure of the general public to electromagnetic fields by way of health protection.
Déclaration d’exposition aux radiations: Cet équipement est conforme aux limites d’exposition aux rayonnements IC établies pour un environnement non contrôlé. Cet équipement doit être installé et utilisé avec un minimum de 20 cm de distance entre la source de rayonnement et votre corps. Industry Canada Statement CAN ICES-3 (B)/NMB-3(B) Korea Warning Statements: 당해 무선설비는 운용중 전파혼신 가능성이 있음.
Safety Information • When product has power button, the power button is one of the way to shut off the product; when there is no power button, the only way to completely shut off power is to disconnect the product or the power adapter from the power source. • Don’t disassemble the product, or make repairs yourself. You run the risk of electric shock and voiding the limited warranty. If you need service, please contact us. • Avoid water and wet locations.