
User's Manual Part 2

129
Chapter 8
Configure the Router in Hotspot Router Mode
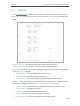
• MAC Address - The physical address of the router.
• Client Status - The status of client. Init: Connection is down; Scan: Try to find
the AP; Auth: Try to authenticate; ASSOC: Try to associate; Run: Associated
successfully.
• WAN - This field displays the current settings of the WAN, and you can configure them
on the Network > WAN page.
• MAC Address - The physical address of the WAN port.
• IP Address - The current WAN (Internet) IP Address. This field will be blank
or 0.0.0.0 if the IP Address is assigned dynamically and there is no Internet
connection.
• Subnet Mask - The subnet mask associated with the WAN IP Address.
• Default Gateway - The Gateway currently used is shown here. When you use
Dynamic IP as the Internet connection type, click Renew or Release here to
obtain new IP parameters dynamically from the ISP or release them.
• DNS Server - The IP addresses of DNS (Domain Name System) server.
• Traffic Statistics - The router’s traffic statistics.
• Received (Bytes) - Traffic in bytes received from the WAN port.
• Received (Packets) - Traffic in packets received from the WAN port.
• Sent (Bytes) - Traffic in bytes sent out from the WAN port.
• Sent (Packets) - Traffic in packets sent out from the WAN port.
• System Up Time - The length of the time since the router was last powered on or
reset.
Click Refresh to get the latest status and settings of the router.
8. 2. WPS
WPS (Wi-Fi Protected Setup) can help you to quickly and securely connect to a network.
This section will guide you to add a new wireless device to your router’s network quickly
via WPS.
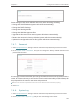
Note: The WPS function cannot be configured if the wireless function of the router is disabled. Please make sure the
wireless function is enabled before configuration.
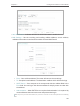
1. Visit http://tplinkwifi.net, and log in with the username and password you set for the router.
2. Go to WPS.
3. Follow one of the following three methods to connect your client device to the router’s Wi-Fi
network.
Method ONE: Press the WPS Button on Your Client Device
1. Keep the WPS Status as Enabled and click Add Device.