910100117 REV1.0.
Contents About this guide . . . . . . . . . . . . . . . . . . . . . . . . . . . . . . . . . . . . . . . . . . . . . . . . . . . i Chapter 1. Get started . . . . . . . . . . . . . . . . . . . . . . . . . . . . . . . . . . . . . . . . . . . . . 1 1. 1 1. 2 1. 3 Overview . . . . . . . . . . . . . . . . . . . . . . . . . . . . . . . . . . . . . . . . . . . . . . . . . . . . . . . . . . . . . . . . . . . 1 Put in the cards . . . . . . . . . . . . . . . . . . . . . . . . . . . . . . . . . . . . . . . . . . . .
Chapter 11. Browser . . . . . . . . . . . . . . . . . . . . . . . . . . . . . . . . . . . . . . . . . . . . . . .18 Chapter 12. File Manager . . . . . . . . . . . . . . . . . . . . . . . . . . . . . . . . . . . . . . . . . .19 Chapter 13. Weather . . . . . . . . . . . . . . . . . . . . . . . . . . . . . . . . . . . . . . . . . . . . . . .20 Chapter 14. Music . . . . . . . . . . . . . . . . . . . . . . . . . . . . . . . . . . . . . . . . . . . . . . . . .21 Chapter 15. Notes . . . . . . . . . . . . . . . . .
19. 13 Date and time . . . . . . . . . . . . . . . . . . . . . . . . . . . . . . . . . . . . . . . . . . . . . . . . . . . . . . . . . . . . .31 19. 14 Accessibility . . . . . . . . . . . . . . . . . . . . . . . . . . . . . . . . . . . . . . . . . . . . . . . . . . . . . . . . . . . . . . .31 19. 15 About phone . . . . . . . . . . . . . . . . . . . . . . . . . . . . . . . . . . . . . . . . . . . . . . . . . . . . . . . . . . . . . .31 Appendix A: Specifications. . . . . . . . . . . . . . . . . . . . . . .
About this guide This guide provides details of each function and shows how to configure the smart phone appropriate to your needs. Conventions In this guide, the following conventions are used: Convention Description Smart phone/phone Stands for Y50 without any explanation. Parameters provided in the screenshots are just references for configuring the smart phone, which may be different from the actual situation. You can set the parameters according to your demand.
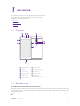
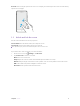
1 Get started This chapter introduces the smart phone’s hardware information and guides you how to assemble your phone when you get started on using your new phone. • Overview • Put in the cards • Power on 1. 1 Overview 1 2 3 9 4 5 6 10 11 7 8 1.
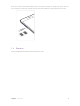
Please exercise caution when using the SIM ejector pin to avoid hurting your fingers or damaging your phone. Store your pin in a safe place out of the reach of children to prevent them from swallowing it or injuring themselves by accident. 1. 3 Power on Press and hold the Power button to turn your phone on or off. Chapter 1 .
2 Basics This chapter introduces the smart phone’s basic feature. • Touchscreen gestures • Unlock and lock the screen • Home screen • Quick settings panel • Notification panel • Enter a text 2. 1 Touchscreen gestures Touch: Simply tap an item to select or launch it. Touch and hold: Touch and leave your finger on the screen for 2 seconds or more to activate onscreen items. For example, touch and hold a widget on the Home screen to move it. Chapter 2 .
Swipe: Place your finger on the screen, and drag your finger to the direction you want. For example, you can swipe to scroll through the Home screen or a menu. Drag: To drag, touch and hold an item and then move it to a new position. For example, you can rearrange a widget on the home screen. Zoom out: Pinch two fingers together on the screen. For example, pinch two fingers together to zoom out while viewing a picture or a web page. Chapter 2 .
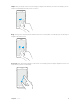
Zoom in: Pinch two fingers apart on the screen. For example, pinch two fingers out to zoom in while viewing a picture or a web page. 2. 2 Unlock and lock the screen Use the screen lock features to secure your phone. Screen unlock: Press the Power button, then swipe the screen. Screen lock: Press the Power button to turn the screen off. Note: By default, your phone locks automatically when the screen times out. If you want to set a more secure lock, you can do as follows: Settings -> Lock screen. 1.
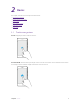
2. 3 Home screen Status bar Widget APP screen indicator APP shortcuts Status bar: Status and notification icons are displayed in the status bar. Widget: Self-contained applications that run on the Home screen (not shortcuts). APP screen indicator: Indicates which screen is being displayed. APP shortcuts: Shortcuts to your favorite applications. 2. 4 Quick settings panel Swipe down from the top of any screen twice to open the quick settings panel.
Notification panel Swipe down from the top of any screen to open the notification panel. 1. Tap an item to view the details. 2. Swipe the notification left or right to remove it from the list. 2. 5 Enter a text Switch input method 1. On the Home screen, tap 2. Tap Language & input. 3. Then select an input method. Settings. Use Android keyboard Tap a text field to use the onscreen keyboard. Chapter 2 .
7 1 2 3 1. 6 4 5 Tap to switch between lowercase and uppercase letters. Tap and hold or quickly tap twice to enable caps lock. 2. Tap to switch to numbers and symbols. 3. Tap to enter a comma. Tap and hold to open the input options menu. 4. Tap to enter a space. 5. Tap to enter a period. Tap and hold to enter a symbol. 6. Tap to delete the characters to the left of the cursor. Tap and hold to delete multiple characters to the left of the cursor. Chapter 2 .
3 Connection This chapter contains the following sections. • Connect to WLAN • Connect to computer • Bluetooth • Tethering & portable hotspot 3. 1 Connect to WLAN Option One 1. Swipe down from the top of any screen (except for the Lock screen) twice to open the quick settings panel. 2. Tap and hold 3. Tap the switch to turn it on. 4. Tap an available WLAN to connect. Then enter the password if needed. WLAN to enter the WLAN settings. Option Two Settings -> WLAN. 1.
Rename your phone Settings -> Bluetooth. 1. On the Home screen, tap 2. Tap the switch to turn it on. 3. Tap 4. Edit the device name and tap Rename to complete the settings. 3. 4 -> Rename this device. Tethering & portable hotspot Use USB tethering You can use a USB cable to share your phone’s mobile data with a computer. 1. Connect your phone to a computer using a USB cable. 2. On the Home screen, tap 3. Tap the USB tethering switch to turn it on.
4 Calls On the Home screen, tap Chapter 4 . Calls Phone -> . Enter a number and tap to make a call.
5 Messenger On the Home screen, tap Chapter 5 . Messenger Messages -> to type a message.
6 Gallery On the Home screen, tap Chapter 6 . Gallery Gallery.
7 Theme On the Home screen, tap Chapter 7 . Phone Manager Themes.
8 Camera Use Camera to capture your precious moments. Tap Camera to launch the app, then use multiple features of your phone to take a beautiful photo. Chapter 8 .
9 Calendar Use Calendar to manage your event and tasks. Chapter 9 .
10 Clock Use Clock app to customize the time zone settings of your Neffos device, set alarms, and use your Neffos device as a stop watch. On the Home screen, tap stopwatch. Chapter 10 .
11 Browser Use ChromeTM to browse the Internet and bring your open tabs, bookmarks and address bar data from your computer to your device. On the Home screen, tap you want to visit. Chapter 11 .
12 File Manager Access files stored on your device (including AUDIO, VIDEO IMAGE, DOCUMENT, COMPRESS and APP). Chapter 12 .
13 Weather Use Weather to get current temperature for one or more cities around the world. Weather uses Location Services to get the forecast for your current location. Chapter 13.
14 Music Find and enjoy the music here. Chapter 14 .
15 Notes Use Notes to record important information to save and view at a later time. Chapter 15.
16 Goolge PlayTM Store Use the Play Store to browse, purchase and download apps to your Neffos device. Chapter 16 .
17 GoogleTM Enjoy the applications from Google. Google Google indexes billions of web pages so that you can search for the information you desire through the use of keywords and operators. GmailTM Gmail, a free webmail service provided by Google. Google MapsTM Google Maps helps you find your current location, get directions, and other location-based information. To use Maps, you should enable location services first. YouTubeTM Use YouTube to share and view videos.
Watch movies and TV shows purchased from Google Play. You can stream them instantly, or download them for viewing when you’re not connected to the Internet. You can also view videos in local storage. HangoutsTM Use Hangouts to meet friends and family, share photos and host video calls. The conversation logs would be saved automatically in your Gmail account. Google PhotosTM Use Google Photos to back up your photos and videos in the Google cloud.
18 Tools Use Tools to enjoy more features of your phone. 18. 1 Sound Recorder On the Home screen, tap Tools -> Sound Recorder. 18. 2 FM Radio 1. Connect a headset to the phone. 2. On the Home screen, tap Tools -> FM Radio. 18. 3 Calculator 1. On the Home screen, tap Tools -> 2. Tap numbers and use the arithmetic feature to complete an operation. Calculator. 18. 4 Downloads On the Home screen, tap Tools -> Downloads to view the download information. 18.
18. 6 Feedback 1. On the Home screen, tap Tools -> 2. Enter your feedback. 3. Attach the snapshot. 4. Tap Submit. Then the technical support will help you solve your issue. Feedback. 18. 7 SIM Toolkit On the Home screen, tap Tools -> SIM Toolkit to congifure the SIM card settings. 18. 8 Compass On the Home screen, tap Tools -> Chapter 18 . Tools .
19 Settings This chapter contains the following sections. • SIM cards • Airplane mode • Display • Sound and notification • Storage • Battery • Apps • Location • Security • Accounts • Language and input • Backup and reset • Date and time • Accessibility • About phone 19. 1 SIM cards 1. On the Home screen, tap 2. Tap SIM cards. 3. Choose the preferred SIM for cellular data, calls or SMS messages. Settings. 19. 2 Airplane mode When you turn on airplane mode, you could not make calls.
Brightness level: Tap to adjust screen brightness. Adaptive brightness: Tap to enable optimizing brightness level for available light. Sleep: Tap to set the time when the screen turns off. Daydream: This option can control what the screen displays when the phone is locked or sleeping. Ambient display: Turn it on to wake screen when you pick up device or receive notifications. Font size: Tap to set the font size. When device is rotated: Tap to rotate the contents of the screen or stay in current orientation.
2. Tap Security. 3. You can manage the security settings to secure your phone and protect your data. 19. 10 Accounts When you use your phone for the first time, you can set up a connection with your existing account or create a new account. Add an account 1. On the Home screen, tap 2. Tap Accounts. 3. Tap Add account. 4. Select an account type. 5. Follow the pop-up prompts to set up the account. settings. Synchronize accounts 1. On the Home screen, tap 2. Tap Accounts. 3. Tap settings.
1. On the Home screen, tap 2. Tap Backup & reset -> Factory data reset -> RESET PHONE. Settings. 19. 13 Date and time 1. On the Home screen, tap 2. Tap Date and time. 3. You can set the following options: Settings. Automatic date & time: Tap the checkbox to use network-provied time. Automatic time zone: Tap the checkbox to use the network-provided time zone. Set date: Tap to set the date manually when Automatic date & time option is disabled.
Appendix A: Specifications Specifications Size and Weight Color Display CPU Memory Memory Slot Height:142mm Width:71mm Depth:7.95mm Cloudy Grey/Sunrise Gold 5 inches, HD 1280 x 720 293.7PPI Helio P10 Octa-core Processor MT6755M 4*Cortex-A53 1.8GHz + 4*Cortex-A53 1.
Specifications Operation System Battery In the box Android 6.
Appendix B: Technical Support Contact our technical support if you have any questions related to this product. Countries/Regions Tel: +86 755 26504400 (English Service) Fee: Depending on rate of different carriers, IDD. E-mail: support@neffos.com(English Service) Service Time: 24 hours a day, 7 days a week. Global Europe Middle East& Africa Support Germany Tel: +86 755/ 26504400 (englischsprachig) Fee: abhängig vom jeweiligen Telefonanbieter E-mail: support@neffos.
Countries/Regions Support India Toll Free:1800 2094 168 E-mail:support.in@neffos.com Service Time:10:00AM to 6:00PM, Monday to Saturday. Indonesia Local No.: (+62) 021 63861936 E-mail: support.id@neffos.com Service Time: 09:00AM to 12:00AM & 01:00PM to 06:00PM, Monday to Friday. Malaysia Tel: + 60 (3) 2141 4358 (Mon-Sun, 10.30am-8.00pm) E-mail: support.my@neffos.com Service Time: 24 hours a day, 7 days a week Singapore Local No.: +65 62840493 E-mail: support.sg@neffos.
COPYRIGHT & TRADEMARKS Specifications are subject to change without notice. is a registered trademark of TP-LINK TECHNOLOGIES CO., LTD. is a registered trademark of Neffos Limited. Other brands and product names are trademarks or registered trademarks of their respective holders. No part of the specifications may be reproduced in any form or by any means or used to make any derivative such as translation, transformation, or adaptation without permission from TP-LINK TECHNOLOGIES CO., LTD.
Продукт сертифіковано згідно с правилами системи УкрСЕПРО на відповідність вимогам нормативних документів та вимогам, що передбачені чинними законодавчими актами України. Personal information and data security The use of some functions or third-party applications on your device could result in your personal information and data being lost or becoming accessible to others. Several measures are recommended to help you protect personal and confidential information.
Third-party software and applications services may be interrupted or terminated at any time, and Neffos does not guarantee the availability of any content or service. Third-party service providers provide content and services through network or transmission tools outside of the control of Neffos.
• If you use medical equipment, contact the equipment manufacturer before using your device to determine whether or not the equipment will be affected by radio frequencies emitted by the device. • Do not use your device near devices or apparatuses that emit radio frequencies, such as sound systems or radio towers Radio frequencies may cause your device to malfunction. • Do not use your device near devices or apparatuses that emit radio frequencies, such as sound systems or radio towers.
• Prevent the multipurpose jack and the small end of the charger from contact with conductive materials, such as liquids, dust, metal powders, and pencil leads. Conductive materials may cause a short circuit or corrosion of the terminals, which may result in an explosion or fire. • Stop using your device or applications for a while if the device is overheated.
Battery safety • Do not connect battery poles with conductors, such as keys, jewelry, or other metal materials. Doing so may short-circuit the battery and cause injuries or burns. • Keep the battery away from excessive heat and direct sunlight. Do not place it on or in heating devices, such as microwave ovens, stoves, or radiators. Batteries may explode if overheated. • Do not attempt to modify or remanufacture the battery, insert foreign objects into it, or immerse or expose it to water or other liquids.
Emergency calls The availability of emergency calls is subject to your cellular network quality, service provider policy, and local laws and regulations. Never rely solely on your device for critical communications like medical emergencies. Environmental protection • The device and its accessories (if included), such as the power adapter, headset, and battery should not be disposed of with household garbage. • Disposal of the device and its accessories is subject to local regulations.
This device may be operated in all member states of the EU. Observe national and local regulations where the device is used. This device may be restricted for use, depending on the local network.