910100115 REV1.0.
Contents About this guide . . . . . . . . . . . . . . . . . . . . . . . . . . . . . . . . . . . . . . . . . . . . . . . . . . . i Chapter 1. Get started . . . . . . . . . . . . . . . . . . . . . . . . . . . . . . . . . . . . . . . . . . . . . 1 1. 1 1. 2 1. 3 1. 4 Overview . . . . . . . . . . . . . . . . . . . . . . . . . . . . . . . . . . . . . . . . . . . . . . . . . . . . . . . . . . . . . . . . . . . 1 Buttons . . . . . . . . . . . . . . . . . . . . . . . . . . . . . . . . . . . . . . . . . . . . . .
Chapter 6. Contacts. . . . . . . . . . . . . . . . . . . . . . . . . . . . . . . . . . . . . . . . . . . . . . .19 6. 1 6. 2 6. 3 Manage contacts . . . . . . . . . . . . . . . . . . . . . . . . . . . . . . . . . . . . . . . . . . . . . . . . . . . . . . . . . .19 Import/export contacts . . . . . . . . . . . . . . . . . . . . . . . . . . . . . . . . . . . . . . . . . . . . . . . . . . . .19 Contacts settings . . . . . . . . . . . . . . . . . . . . . . . . . . . . . . . . . . . . . . . . . . . . . . . . .
Chapter 13. Weather . . . . . . . . . . . . . . . . . . . . . . . . . . . . . . . . . . . . . . . . . . . . . . .31 13. 1 13. 2 13. 3 13. 4 Add a city . . . . . . . . . . . . . . . . . . . . . . . . . . . . . . . . . . . . . . . . . . . . . . . . . . . . . . . . . . . . . . . . . 31 Check the weather . . . . . . . . . . . . . . . . . . . . . . . . . . . . . . . . . . . . . . . . . . . . . . . . . . . . . . . . .31 Remove a city. . . . . . . . . . . . . . . . . . . . . . . . . . . . . . . . . . . . . . . .
18. 9 18. 10 18. 11 18. 12 18. 13 18. 14 18. 15 18. 16 Location . . . . . . . . . . . . . . . . . . . . . . . . . . . . . . . . . . . . . . . . . . . . . . . . . . . . . . . . . . . . . . . . . . .41 Security . . . . . . . . . . . . . . . . . . . . . . . . . . . . . . . . . . . . . . . . . . . . . . . . . . . . . . . . . . . . . . . . . . .41 Accounts . . . . . . . . . . . . . . . . . . . . . . . . . . . . . . . . . . . . . . . . . . . . . . . . . . . . . . . . . . . . . . . . . .41 Language and input . .
About this guide This guide provides details of each function and shows how to configure the smart phone appropriate to your needs. Conventions In this guide, the following conventions are used: Convention Description Smart phone/phone Stands for Y50 without any explanation. Parameters provided in the screenshots are just references for configuring the smart phone, which may be different from the actual situation. You can set the parameters according to your demand.
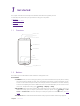
1 Get started This chapter introduces the smart phone’s hardware information and guides you how to assemble your phone when you get started on using your new phone. • Overview • Assemble your device • Power on • Charge your device 1. 1 Overview Headset Jack Earpiece Front Camera Volume Button Power Button Back Home Recent Apps Charge/Data Port 1. 2 Buttons The buttons you use with Neffos include virtual ones and physical ones.
• Turn Neffos off: Press and hold the Power button until a pop-up window appears and then tap Power off. Volume button You can adjust the audio volume on the right side when you’re on the phone or listening to songs, movies, or other media. You can also use Volume button to take a picture or record a video. See Take a photo and Record a video. Home button The Home button takes you to the Home screen and provides other convenient shortcuts.
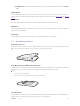
Replace the back cover Align the cover and press all the way around the cover’s edges, making sure it snaps into place. 1. 4 Charge your device Connect the device to a power outlet using the included USB cable and power adapter. 1. Connect the USB cable into the port. 2. Connect the USB cable to the power adapter, then plug the power adapter into a power outlet. 3. When the battery is full, unplug the power adapter from the power outlet and remove the USB cable from your phone. Chapter 1 .
2 Basics This chapter introduces the smart phone’s basic feature. • Touchscreen gestures • Unlock and lock the screen • Home screen • Quick settings panel • Notification panel • Type text 2. 1 Touchscreen gestures Touch: Simply tap an item to select or launch it. Touch and hold: Touch and leave your finger on the screen for 2 seconds or more to activate onscreen items. For example, touch and hold a widget on the Home screen to move it. Chapter 2 .
Swipe: Place your finger on the screen, and drag your finger to the direction you want. For example, you can swipe to scroll through the Home screen or a list. Drag: To drag, touch and hold an item and then move it to a new position. For example, you can rearrange a widget on the home screen. Zoom out: Pinch two fingers together on the screen. For example, pinch two fingers together to zoom out while viewing a picture or a web page. Chapter 2 .
Zoom in: Pinch two fingers apart on the screen. For example, pinch two fingers out to zoom in while viewing a picture or a web page. 2. 2 Home screen Status bar Widget Multi-touch display APP icons Status bar: Status and notification icons are displayed in the status bar. Widget: Self-contained applications that run on the Home screen (not shortcuts). Multi-touch display: A display where you do various operations of your phone.
G 3G 4G E H H 2.
10 9 1 8 2 7 4 3 6 5 Touch the shortcut switches on the Quick Settings Panel to turn the functions on or off. 1. WLAN: Tap to enable WLAN. 2. No SIM card: Tap to view the data usage. 3. Flashlight: Tap to enable flashlight. 4. Airplane mode: Tap to enable airplane mode. 5. Location: Tap to enable location services. 6. Screenshot: Tap to make a screenshot. 7. Auto-rotate: Tap to enable auto-rotate. 8. Bluetooth: Tap to enable Bluetooth. 9.
2. 5 Type text The onscreen keyboard enables you to enter text when needed. Enter text 7 1 2 3 7 , 4 6 5 1. Tap Shift to type uppercase, or touch and hold the key to slide to the uppercase. Double-tap Shift for caps lock. 2. To enter numbers, punctuations, or symbols, tap 3. Tap to enter a comma, or tap and hold the key to open the input options. Chapter 2 . Basics .
4. If you have several keyboards, you can tap hold it to choose the keyboard you need. to switch to the last one you used. You can also touch and 5. Tap to enter a space, or you can double-tap the space bar quickly to end a sentence with a period or space. 6. Tap to enter a period. 7. Tap to delete the characters to the left of the cursor. Tap and hold to delete multiple characters to the left of the cursor. Edit text • Revise text: Tap the text to position the insertion point and start revising.
3 Connection Learn how to connect to WLAN, computer and how to use Bluetooth and hotspot helps you a lot. This chapter contains the following sections. • Connect to WLAN • Connect to computer • Bluetooth • Tethering & portable hotspot 3. 1 Connect to WLAN If appears at the top of the screen, you are connected to a Wi-Fi network. Neffos reconnects anytime you return to the same location. 1. Swipe down from the top of any screen (except for the Lock screen) twice to open the Quick Settings Panel. 2.
2. Tap and hold 3. Tap the switch to turn it on and find the device you want to connect, then follow the pop-up prompts to complete the connection. (You can also turn Bluetooth on in Settings -> Bluetooth.) Bluetooth to enter the Bluetooth settings. Rename your phone Settings -> Bluetooth. 1. On the Home screen, tap 2. Tap the switch to turn it on. 3. Tap 4. Edit the device name and tap Rename to complete the settings. 3. 5 -> Rename this device.
4 Calls This chapter contains the following sections. • Make a call • Answer & end a call • Options during a call • Call log • Call settings 4. 1 Make a call Dial directly by entering numbers 1. On the Home screen, tap 2. Enter a number and tap Phone -> . to make a call. Dial a recent number from the call log All incoming , outgoing and missed call are in the call log. Phone -> Recents, a list of recent calls will be displayed. 1. On the Home screen, tap 2. Tap a number to call.
Make a conference call The conference calling enables multiple persons to talk simultaneously. 1. Call the first participant. 2. After connected, tap 3. When the second call is connected, the first participant will be placed on hold. 4. 2 and enter another phone number. Answer & end a call On the incoming call screen: Answer a call: Drag Reject a call: Drag right. left. Quick response message: Drag caller.
4. 4 Call log All incoming, outgoing and missed calls are recorded in the call log. Save a recent call to your contact list Phone -> Recents -> Creat new contact. 1. Go to 2. Configure the contact information and save. Delete a call from the call log Phone -> 1. Go to 2. Tap the contact you want to delete and tap Call details. 3. Tap Recents. to delete. 4. 5 Call settings Go to Phone -> -> Settings to configure the call settings.
5 Messenger Use Messenger to keep in touch with your friends through SMS or MMS messages. This chapter contains the following sections. • Type of messages • Send & receive messages • Message Management 5. 1 Type of messages Text Messages (SMS) The Short Messages Service (SMS) lets you send and receive text messages to and from other mobile phones.
Delete a conversation 1. On the Home screen, tap 2. In the message list, tap and hold the conversation you want to delete all its conversation and tap DELETE. Messenger. -> Share a message 1. On the Home screen, tap 2. Tap and hold the message you want to share and tap Messenger. . Forward a message 1. On the Home screen, tap 2. Tap and hold the message you want forward and tap Messenger. . Archive a message 1. 2. On the Home screen, tap Messenger.
Outgoing message sounds: Turn the switch on to turn on the outgoing message sounds. Notifications: Turn the switch on to enable notifications when you receive messages. Sound: Tap to choose the ringtone when new message comes. Vibrate: Turn the switch on to make the phone vibrate when new message comes. Advanced: Tap to configure some advanced settings. Chapter 5 .
6 Contacts Organize your contacts and easily stay in touch with them via calls, SMS messages, emails, or other social networks. This chapter contains the following sections. • Manage contacts • Import/export contacts • Contacts settings 6. 1 Manage contacts Add a contact Contacts -> 1. On the Home screen, tap 2. Enter the contact’s information. 3. Tap to add a new contact. to save the new contact. Edit a contact 1. On the Home screen, tap 2. Tap the contact you want to edit and then tap 3.
6. 3 Contacts settings 1. On the Home screen, tap 2. Set the contacts order. Contacts -> -> Settings. • Sort by: You can make the contacts sort by first name or last name. • Name format: You can choose the name format (fisrt name first/ last name first). Chapter 6 .
7 Phone Manager Use Phone Manager to better manage and protect your phone. This chapter contains the following sections. • Phone accelerator • Power saving • Permission manager • Harassment filter 7. 1 Phone accelerator Clean up the unnecessary to accelerate your phone’s operation. 1. On the Home screen, tap 2. Tap Finish. 7. 2 Phone manager -> Phone accelerator -> Clean to free up the memories. Power saving Different power plans lead to different duration of your phone power.
8 Camera Use Camera to capture your precious moments. This chapter contains the following sections. • Get to know Camera • Take a photo • Record a video 8. 1 Get to know Camera Launch the camera app • On the Home screen: Tap Camera. • On the Lock screen: Press the Power button. Then swipe left until the camera app is launched. Camera home screem 1 5 2 6 3 7 4 8 9 1. Swipe to show or hide the setting menu. For more information, see Camera settings. 2. Tap to switch to the flash mode. 3.