AP200 User Guide AC750 Wireless Gigabit Access Point REV1.0.
Contents Chapter 1. About This Guide . . . . . . . . . . . . . . . . . . . . . . . . . . . . . . . . . . . . . . . 1 Chapter 2. Get to Know About Your AP Device . . . . . . . . . . . . . . . . . . . . . . 2 2. 1. 2. 2. 2. 3. Product Overview . . . . . . . . . . . . . . . . . . . . . . . . . . . . . . . . . . . . . . . . . . . . . . . . . . . . . . . . . . 3 Main Features . . . . . . . . . . . . . . . . . . . . . . . . . . . . . . . . . . . . . . . . . . . . . . . . . . . . . . . . . . . . . .
7. 4. 7. 5. 7. 6. 7. 7. 7. 8. 7. 9. 7. 10. 7. 11. Backup and Restore Configuration Settings . . . . . . . . . . . . . . . . . . . . . . . . . . . . . . . . .35 Change the Management Account . . . . . . . . . . . . . . . . . . . . . . . . . . . . . . . . . . . . . . . . .36 Throughput Monitor . . . . . . . . . . . . . . . . . . . . . . . . . . . . . . . . . . . . . . . . . . . . . . . . . . . . . . .37 Statistics . . . . . . . . . . . . . . . . . . . . . . . . . . . . . . . . . . . . . . . . . . . . . . . .
About This Guide This guide provides details of each function and shows how to configure the AP device appropriate to your needs. In addition to this guide, a Quick Installation Guide is also released with each TP-LINK AP device, you are suggested to configure your AP device for quick Internet setup by following the published Quick Installation Guide before you get started with a further configuration.
Chapter 2 Get to Know About Your AP Device This chapter introduces what the AP device can do and shows its main features and appearance.
Chapter 2 2. 1. Product Overview What This Product Does The TP-LINK Wireless AC Access Point is designed to establish or expand a scalable highspeed wireless AC network or to connect multiple Ethernet enabled devices such as game consoles, digital media adapters, printers, or network attached storage devices to a wireless network. The AP supports a host of different functions that make your wireless networking experience more flexible than ever before.
Chapter 2 • Support simultaneous 2.
Chapter 2 LED Explanation Name Status On (Power) Indication System initialization completes. Blinking System initialization or firmware upgrade is in process. Do not disconnect or power off the AP device. Off Power is off. Please ensure that the power adapter is connected correctly. On The wireless 2.4GHz band is working properly (in AP/Multi-SSID/ Repeater/Bridge mode). (Wireless 2.4GHz) Off The wireless 2.4GHz band is disabled (in AP/Multi-SSID/Repeater/ Bridge mode).
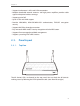
Chapter 2 2. 3. 2. The Back Panel The AP device’s back panel shows the connection ports, buttons and antennas. Refer to the following for detailed instructions (view from left to right). Item Description Ethernet One LAN 10/100/1000Mbps Auto-Negotiation RJ45 Port connects to a network device and supports passive PoE. Reset The switch for the reset function.
Chapter 2 Note: The diameter of the screw, 4mm
Chapter 3 Operation Modes The AP device supports four modes to satisfy user’s diversified network requirements including Access Point mode, Repeater/Bridge mode, Client mode and multi-SSID mode. This chapter introduces typical usage scenarios of each mode. You can choose the desired scenario according to your needs, and refer to this part for hardware connection instruction.
Chapter 3 3. 1. Determine the Mode Use the following scenarios to determine an appropriate operating mode for your network needs. Modes Scenarios Access Point mode (Default mode) You want to be able to access the Internet wirelessly, but this place only has an Ethernet port (wired network) available. you need to transform the existing wired network to a wireless network. Repeater/Bridge mode You are in a Wi-Fi dead-zone or a place with weak wireless signal.
Chapter 3 • Repeater/Bridge mode Internet Host AP’s SSID AP200’s SSID Host AP • Client mode Internet Other Device Host AP’s SSID or TV or Host AP AP200 • Multi-SSID mode VLAN1 VLAN2 VLAN3 VLAN4 Group A SSID1 VLAN1 Router SSID2 VLAN2 Switch SSID3 VLAN3 AP200 SSID4 VLAN4 Group B Group C Group D 10
Chapter 4 Log into Your AP Device
Chapter 4 With the Web-based management page, it is easy to configure and manage the AP device. The Web-based utility can be used on any Windows, Macintosh or UNIX OS with a Web browser, such as Microsoft Internet Explorer, Mozilla Firefox or Apple Safari. Follow the steps below to log into your AP device. 1. Set up the TCP/IP Protocol in Obtain an IP address automatically mode on your computer. 2. Launch your Web browser. Enter http://tplinkap.
Chapter 4 5. For subsequent logins, you only need to enter the username and password that you have set to log in. Note: If the login window does not appear, please refer to FAQ > Q3.
Chapter 5 Set Up Wireless Connections This chapter introduces how to connect your AP device to the wireless network. The AP device is equipped with a web-based Quick Setup wizard. You can also set up the wireless connection by the WPS feature. In addintion, you can specify your wireless settings for some advanced features.
Chapter 5 5. 1. Quick Setup Quick Setup wizard allows you to quickly configure your AP device step by step. Choose the suitable operation mode according to your network environment and follow the step-by-step instructions. 1. Visit http://tplinkap.net, and log in with the username and password you set for the AP device. 2. Go to Quick Setup on the top of the page, and follow the on-screen instrustions to configure your AP device.
Chapter 5 2. Press the WPS button of the device you want to connect to in 2 minutes. Note: The order to press the WPS button of the AP device and the device to be connected can be in reverse. 3. If the AP device’s WPS LED is solid on, it shows the WPS connection is successful. If the AP device’s WPS LED blinks quickly, it shows the WPS connection is failed. Please perform the steps again. Note: 1. If the WPS connection is successful, after about 5 minutes, the WPS LED will turn off. 2.
Chapter 5 1. Visit http://tplinkap.net, then log in with the username and password you set for the AP device. 2. Go to Settings > Wireless > WPS. There are also two ways to use WPS PIN method: using the AP device’s PIN and using the wireless client’s PIN. ¾¾ Using the AP‘s PIN 1 ) Toggle On Enable AP’s PIN to allow wireless clients to connect to the device using the AP’s PIN. 2 ) Click Generate to generate a new PIN randomly or click Default to restore the current PIN to the factory default PIN.
Chapter 5 1. Visit http://tplinkap.net, then log in with the username and password you set for the AP device. 2. Go to Settings > Wireless. And the following page decided by the mode of the AP device will appear. ¾¾ Access Point Mode If Access Point mode is selected, please take the following steps: 1 ) Select the wireless network 2.4GHz or 5GHz. Here we take 2.4GHz for demostration. 2 ) The wireless radio is enabled by default. Customize the Network Name (SSID) and Security settings.
Chapter 5 ¾¾ Repeater/Bridge Mode If Repeater/Bridge mode is selected, please take the following steps: 1 ) Select the wireless network 2.4GHz or 5GHz to connect. Here we take 2.4GHz for demostration. 2 ) Enter the exact same wireless settings of the Host network that you want to connect to. Or click Wireless Scanner and choose a Host network from the list.
Chapter 5 4 ) Select the wireless network 2.4GHz or 5GHz to configure the extended wireless settings. Here we take 2.4GHz for demostration. 5 ) The wireless radio is enabled by default. Customize the Wireless Network Name (SSID) and Security settings. The AP device provides four security options, None, WPA/WPA2 - Personal, WPA/WPA2 - Enterprise and WEP. The default WPA/WPA2 - Personal is recommended. Enter a Password below to prevent unauthorized access to your AP device. Note: 1.
Chapter 5 ¾¾ Multi-SSID Mode If Multi-SSID mode is selected, please take the following steps: 1 ) The list will show the information of the Multi-SSID. The icon means this SSID is enabled, and you can click it to disable. While the icon means this SSID is disabled, and you can click it to enable. 2 ) Click the icon to modify the SSID, VLAN ID, wireless security and other settings of the corresponding network.
Chapter 5 Note: Tick Hide SSID if you want to hide this wireless network name. 3 ) Click OK to save the settings. 5. 4. Check the connection status After finishing the configuration, please go to Advanced > Status to check the connection status. Here we take Access Point mode as a demonstration. The status page of other modes are different. Click each element of the topology, its status will show below.
Chapter 6 Customize Your Network and Security Settings This chapter guides you on how to configure advanced network and security settings that are available for this AP device.
Chapter 6 6. 1. Change the LAN Settings The AP device is preset to Obtain an IP address automatically, which allows the device to dynamically obtain an IP address and gateway from the main router/AP. You just need to enter http://tplinkap.net into the address bar to log into the web-based management page. It is recommended to keep the default LAN settings to avoid IP conflict with the main router/AP or other device on your local network.
Chapter 6 ¾¾ DHCP Settings 1. Visit http://tplinkap.net, and log in with the username and password you set for the AP device. 2. Go to Settings > Network > DHCP Settings. 3. Switch On the DHCP server. 4. Enter the starting and ending IP address in the IP Address Pool. 5. Enter other parameters if the ISP offers, the Default Gateway is automatically filled which is the same as the LAN IP address of the AP device. 6. Click Save. ¾¾ Check the DHCP Clients 1. Visit http://tplinkap.
Chapter 6 4. Enter the MAC address of the client device. 5. Enter the IP address to set to the client device. 6. Enter the Description of the client device. 7. Select the Enable This Entry checkbox. 8. Click OK. The IP address reservation is configured successfully, and you can see the rule shown as below. 6. 3. Access Control Access Control is used to allow or block specific client devices from accessing your network.
Chapter 6 2. Go to Settings > Wireless > Access Control and toggle on the Access Control function. 3. Select the filtering rule: Blacklist or Whitelist. ¾¾ To add a device to a blacklist or whitelist 1 ) Click Add. 2 ) Enter the MAC address of the device to choose the device that you want to add in the blacklist or whitelist from the Access Devices List.
Chapter 6 3 ) Enter the Device Name of the device. 4 ) Click OK. ¾¾ To modify or delete a device from the Blacklist or Whitelist In the Blacklist or Whitelist, click the modify icon or the delete corresponds to the device that you wish to modify or delete. icon that ¾¾ To delete multiple devices from the Blacklist or Whitelist In the Blacklist or Whitelist, select the corresponding checkboxes of the devices to be deleted and click Delete above the table. 6. 4.
Chapter 6 3. Choose the 2.4Ghz or 5GHz of the wireless network. • Beacon Interval - Enter a time interval between 40 and 1000 in milliseconds to determine the duration between beacon packets that are transmitted periodically by the device to synchronize the wireless network. The default is 100 milliseconds. • RTS Threshold - Enter a value between 1 and 2346 to determine the packet size of data transmitted through the network. By default, the RTS (Request to Send) Threshold size is 2346.
Chapter 7 Manage Your AP Device This chapter will show you how to configure and manage your AP device.
Chapter 7 7. 1. System Log The System Log page displays a list of the most recent activities (events) of the network. You can define the type of logs and/or the level of logs you want to view. You can also export the log files to a computer. When the AP device does not work properly, you can save the system log and send it to the technical support for troubleshooting. ¾¾ To Save the System Log in Local: 1. Visit http://tplinkap.net, and log in with the username and password you set for the AP device.
Chapter 7 1. Visit http://tplinkwifi.net, and log in with the username and password you set for the AP device. 2. Go to Settings > System Tools > Diagnostics. ¾¾ To diagnose using Ping 1 ) Choose Ping as the diagnostic tool to test the connectivity. 2 ) Enter the target IP Address/Domain Name of the tested host. 3 ) CLick Advanced and specify the Ping Count, Ping Packet Size and Ping Timeout. (Optional) 4 ) Click Start.
Chapter 7 ¾¾ To diagnose using Traceroute 1 ) Choose Traceroute as the diagnostic tool to test the connectivity. 2 ) Enter the target IP Address/Domain Name of the tested host. 3 ) Click Advanced and specify the number of hops (to be reached) in the Traceroute Max TTL (Time to Live) field. The default is 20. (Optional) 4 ) Click Start. The figure below indicates the proper connection between the AP device and the IP address 192.168.0.123 tested through Traceroute. 7. 3.
Chapter 7 We will release the latest firmware at TP-LINK official website, you can download the latest firmware file from the Support page of our website www.tp-link.com and upgrade the firmware to the latest version. If you have connected to the Internet, you can click Check for upgrade or check if there are the upgrading tips on the top of the page. Note: 1. Make sure the latest firmware file matches with the hardware version (as shown in the webpage). 2.
Chapter 7 3. Focus on the Online Upgrade section, and click Upgrade. 4. Wait a few moments for the upgrading and rebooting. 7. 4. Backup and Restore Configuration Settings The configuration settings are stored as a configuration file in the AP device. You can backup the configuration file to your computer for future use and restore the AP device to a previous settings from the backup file when needed.
Chapter 7 1 ) Click Browse to locate the backup configuration file stored on your computer, and click Restore. 2 ) Wait a few moments for the restoring and rebooting. Note: During the restoring process, do not turn off or reset the AP device. ¾¾ To reset the AP device to factory default settings: 1 ) Click Factory Restore to reset the router. 2 ) Wait a few moments for the reset and reboot. Note: 1. During the resetting process, do not turn off the AP device. 2.
Chapter 7 7. 6. Throughput Monitor The throughput chart displays the current data traffic of the network. The curves in different colors represent the received (RX) and transmitted (TX) rates of the 2.4GHz and 5GHz frequencies respectively. You can choose to view individual or multiple data rates by selecting the corresponding checkbox. 1. Visit http://tplinkap.net, and log in with the username and password you set for the AP device. 2. Go to Settings > Wireless > Throughput Monitor. 3.
Chapter 7 3. Monitor the traffic statistics in Wireless Stations Online section. 7. 8. SNMP Management SNMP (Simple Network Management Protocol) is a popular network monitoring and management protocol. 1. Visit http://tplinkap.net, and log in with the username and password you set for the AP device. 2. Go to Settings > System Tools > SNMP and complete the settings according to your needs. 3. Select the SNMP Agent checkbox to enable (or deselect to disable) the SNMP feature. 4.
Chapter 7 7. Enter the community name in Set Community field that allows read/write access to the device’s SNMP information. The community name can be considered as a group password. The default setting is private. 8. Enter the IP address or subnet in Set Source field that management systems can read and write to this ‘set’ community. 9. Click Save. Note: A restricted source can be a specific IP address (e.g. 10.10.10.1), or a subnet - represented as IP/BITS (e.g. 10.10.10.0/24). If 0.0.0.
Chapter 7 7. 10. LEDs Control The LEDs indicate AP device’s activities and behavior. You can turn on or turn off the AP device’s LEDs from the web-based management page. 1. Visit http://tplinkap.net, and log in with the username and password you set for the AP device. 2. Click the LED On or LED Off icon on the top right corner of the page. The icon displays that the LEDs is on and you can click it to turn off the LEDs. The icon displays that the LEDs is off and you can click it to turn on the LEDs. 7.
FAQ Q1. What can I do if I forgot my wireless password? The default password is labeled at the back of the AP device. If the password has been altered, please connect the AP device to the computer using a cable and follow the steps below: 1. Visit http://tplinkap.net, and log in with the username and password you set for the AP device. 2. Go to Settings > Wireless > Wireless setings. Locate the password on the page and mark it down for future use. Q2.
4 ) Click LAN settings, deselect the following three options and click OK; 5 ) Go to Advanced > Restore advanced settings, click OK to save the settings.
5. Change a web browser or computer and log in again. 6. Reset the AP device to factory default settings: use a pin to press and hold the Reset button for five seconds until the Power LED starts blinking, then release the button. Note: Upon resetting, all previous configurations will be cleared, and the AP device will reset to the default AP Mode. Open a web browser and log in again. If login still fails, please contact the technical support. Q4.
Q5. What can I do if my wireless is not stable? It may be caused by too much interference, you can try the following methods: • Set your wireless channel to a different channel. • Move the AP device to a new location away from Bluetooth devices and other household electronics, such as cordless phone, microwave, and baby monitor, etc., to minimize signal interference. Q6.
Specifications Hardware Ethernet Port Button External Power Supply Antenna one 10/100/1000Mbps LAN port Reset Button, WPS Button, LED On/Off Button, Power On/Off Button 12V/1A Two Dual Band Detachable Antennas, supporting passive 1000Mbps PoE Wireless Wireless Standards IEEE 802.11b/g/n 2.4GHz, IEEE 802.11ac/n/a 5GHz Frequency 2.4GHz, 5GHz Signal Rate 433Mbps at 5GHz, 300Mbps at 2.4GHz Transmit Power CE: <20dBm(2.
COPYRIGHT & TRADEMARKS Specifications are subject to change without notice. is a registered trademark of TP-LINK TECHNOLOGIES CO., LTD. Other brands and product names are trademarks or registered trademarks of their respective holders. No part of the specifications may be reproduced in any form or by any means or used to make any derivative such as translation, transformation, or adaptation without permission from TP-LINK TECHNOLOGIES CO., LTD. Copyright © 2016 TP-LINK TECHNOLOGIES CO., LTD.
FCC STATEMENT This equipment has been tested and found to comply with the limits for a Class B digital device, pursuant to part 15 of the FCC Rules. These limits are designed to provide reasonable protection against harmful interference in a residential installation. This equipment generates, uses and can radiate radio frequency energy and, if not installed and used in accordance with the instructions, may cause harmful interference to radio communications.
CE Mark Warning This is a class B product. In a domestic environment, this product may cause radio interference, in which case the user may be required to take adequate measures. RF Exposure Information This device meets the EU requirements (1999/5/EC Article 3.1a) on the limitation of exposure of the general public to electromagnetic fields by way of health protection. The device complies with RF specifications when the device used at 20 cm from your body. Restricted to indoor use.
2 ) For devices with detachable antenna(s), the maximum antenna gain permitted for devices in the band 5725-5850 MHz shall be such that the equipment still complies with the e.i.r.p. limits specified for point-to-point and non-point-to-point operation as appropriate; and The high-power radars are allocated as primary users (i.e. priority users) of the bands 5250-5350 MHz and 5650-5850 MHz and that these radars could cause interference and/or damage to LE-LAN devices.
第十二條 經型式認證合格之低功率射頻電機,非經許可,公司、商號或使用者均 不得擅自變更頻率、加大功率或變更原設計之特性或功能。 第十四條 低功率射頻電機之使用不得影響飛航安全及干擾合法通行;經發現有干 擾現象時,應立即停用,並改善至無干擾時方得繼續使用。前項合法通信,指依 電信規定作業之無線電信。低功率射頻電機需忍受合法通信或工業、科學以及醫 療用電波輻射性電機設備之干擾。 減少電磁波影響,請妥適使用。 BSMI Notice 安全諮詢及注意事項 • 請使用原裝電源供應器或只能按照本產品注明的電源類型使用本產品。 • 清潔本產品之前請先拔掉電源線。請勿使用液體、噴霧清潔劑或濕布進行清 潔。 • 注意防潮,請勿將水或其他液體潑灑到本產品上。 • 插槽與開口供通風使用,以確保本產品的操作可靠並防止過熱,請勿堵塞或覆 蓋開口。 • 請勿將本產品置放於靠近熱源的地方。除非有正常的通風,否則不可放在密閉 位置中。 • 請不要私自打開機殼,不要嘗試自行維修本產品,請由授權的專業人士進行此 項工作。 Продукт сертифіковано згідно с правилами системи УкрСЕПРО на
• Adapter shall be installed near the equipment and shall be easily accessible. • The plug considered as disconnect device of adapter. • Use only power supplies which are provided by manufacturer and in the original packing of this product. If you have any questions, please don’t hesitate to contact us.