
User's Manual
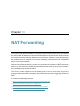

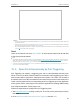
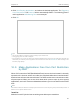

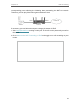
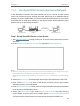
Table Of Contents
- About This Guide
- Get to Know About Your Router
- Connect the Hardware
- Log In to Your Router
- Set Up Internet Connection
- TP-Link Cloud Service
- Guest Network
- USB Settings
- HomeCare – Parental Controls, QoS, Anti-Virus
- Network Security
- NAT Forwarding
- VPN Server
- Customize Your Network Settings
- 12. 1. Change the LAN Settings
- 12. 2. Set Up Link Aggregation
- 12. 3. Configure to Support IPTV Service
- 12. 4. Specify DHCP Server Settings
- 12. 5. Set Up a Dynamic DNS Service Account
- 12. 6. Create Static Routes
- 12. 7. Specify Wireless Settings
- 12. 8. Use WPS for Wireless Connection
- 12. 9. Schedule Your Wireless Function
- Manage the Router
- 13. 1. Set Up System Time
- 13. 2. Control LEDs
- 13. 3. Test the Network Connectivity
- 13. 4. Upgrade the Firmware
- 13. 5. Backup and Restore Configuration Settings
- 13. 6. Set the Router to Reboot Regularly
- 13. 7. Change the Administrator Account
- 13. 8. Password Recovery
- 13. 9. Local Management
- 13. 10. Remote Management
- 13. 11. System Log
- 13. 12. Monitor the Internet Traffic Statistics
- 13. 13. System Parameters
- 13. 14. Log Out
- Work with Alexa
- FAQ

52
Chapter 10
NAT Forwarding
For example, due to some port restriction, when playing the online games, you can login
normally but cannot join a team with other players. To solve this problem, set your PC as
a DMZ host with all ports open.
How can I do that?
1. Assign a static IP address to your PC, for example 192.168.0.100.
2. Visit http://tplinkwifi.net, and log in with your TP-Link ID or the password you set for
the router.
3. Go to Advanced > NAT Forwarding > DMZ and select Enable DMZ.
4. Enter the IP address 192.168.0.100 in the DMZ Host IP Address filed.
5. Click Save.
Done!
The configuration is completed. You’ve set your PC to a DMZ host and now you can
make a team to game with other players.
10. 4. Make Xbox Online Games Run Smoothly by
UPnP
The UPnP (Universal Plug and Play) protocol allows applications or host devices
to automatically find the front-end NAT device and send request to it to open the
corresponding ports. With UPnP enabled, the applications or host devices on the
local network and the internet can freely communicate with each other thus realizing
the seamless connection of the network. You may need to enable the UPnP if you
want to use applications for multiplayer gaming, peer-to-peer connections, real-time
communication (such as VoIP or telephone conference) or remote assistance, etc.
Tips:
• UPnP is enabled by default in this router.
• Only the application supporting UPnP protocol can use this feature.
• UPnP feature needs the support of operating system (e.g. Windows Vista/ Windows 7/ Windows 8, etc. Some of
operating system need to install the UPnP components).
For example, when you connect your Xbox to the router which has connected to
the internet to play online games, UPnP will send request to the router to open the