
User's Manual


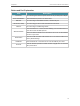
Table Of Contents
- About This Guide
- Get to Know About Your Router
- Connect the Hardware
- Log In to Your Router
- Set Up Internet Connection
- TP-Link Cloud Service
- Guest Network
- USB Settings
- HomeCare – Parental Controls, QoS, Anti-Virus
- Network Security
- NAT Forwarding
- VPN Server
- Customize Your Network Settings
- 12. 1. Change the LAN Settings
- 12. 2. Set Up Link Aggregation
- 12. 3. Configure to Support IPTV Service
- 12. 4. Specify DHCP Server Settings
- 12. 5. Set Up a Dynamic DNS Service Account
- 12. 6. Create Static Routes
- 12. 7. Specify Wireless Settings
- 12. 8. Use WPS for Wireless Connection
- 12. 9. Schedule Your Wireless Function
- Manage the Router
- 13. 1. Set Up System Time
- 13. 2. Control LEDs
- 13. 3. Test the Network Connectivity
- 13. 4. Upgrade the Firmware
- 13. 5. Backup and Restore Configuration Settings
- 13. 6. Set the Router to Reboot Regularly
- 13. 7. Change the Administrator Account
- 13. 8. Password Recovery
- 13. 9. Local Management
- 13. 10. Remote Management
- 13. 11. System Log
- 13. 12. Monitor the Internet Traffic Statistics
- 13. 13. System Parameters
- 13. 14. Log Out
- Work with Alexa
- FAQ

4
Chapter 1
Get to Know About Your Router
1. 1. Product Overview
TP-Link AX router, with next-generation 802.11ax Wi-Fi Technology, achieves Wi-
Fi performance at its ultimate level. The revolutionary combination of OFDMA and
1024QAM improve throughput by 4 times and dramatically increase the whole network
capacity and efficiency. It’s also backwards compatible with 802.11a/b/g/n/ac.
Moreover, it is simple and convenient to set up and use the TP-Link router due to its
intuitive web interface and the powerful Tether app.
1. 2. Appearance
1. 2. 1. Top Panel
The router’s LEDs (view from left to right) are located on the front. You can check the
router’s working status by following the LED Explanation table.