Chapter 12 NAT Forwarding corresponding ports allowing the following data penetrating the NAT to transmit. Therefore, you can play Xbox online games without a hitch. INTERNET If necessary, you can follow the steps to change the status of UPnP. 1. Visit http://tplinkwifi.net, and log in with your TP-Link ID or the password you set for the router. 2. Go to Advanced > NAT Forwarding > UPnP and toggle on or off according to your needs.
Chapter 13 VPN Server&Client The router offers several ways to set up VPN connections: VPN Server allows remote devices to access your home network in a secured way through the internet. The router supports three types of VPN Server: OpenVPN is somewhat complex but with higher security and more stability, suitable for restricted environments such as campus network and company intranet.
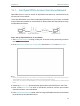
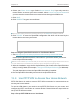
Chapter 13 VPN Server&Client 13. 1. Use OpenVPN to Access Your Home Network OpenVPN Server is used to create an OpenVPN connection for remote devices to access your home network. To use the VPN feature, you need to enable OpenVPN Server on your router, and install and run VPN client software on remote devices. Please follow the steps below to set up an OpenVPN connection. INTERNET Home Network Router (VPN Server) Remote Devices Step1. Set up OpenVPN Server on Your Router 1.
Chapter 13 VPN Server&Client 6. Select your Client Access type. Select Home Network Only if you only want the remote device to access your home network; select Internet and Home Network if you also want the remote device to access internet through the VPN Server. 7. Click SAVE. 8. Click GENERATE to get a new certificate. Note: If you have already generated one, please skip this step, or click GENERATE to update the certificate. 9.
Chapter 13 VPN Server&Client 1. Visit http://tplinkwifi.net, and log in with your TP-Link ID or the password you set for the router. 2. Go to Advanced > VPN Server > PPTP, and tick the Enable box of PPTP. Note: Before you enable VPN Server, we recommend you configure Dynamic DNS Service (recommended) or assign a static IP address for router’s WAN port and synchronize your System Time with internet. 3.
Chapter 13 VPN Server&Client 3 ) Click ADD. Step 2. Configure PPTP VPN Connection on Your Remote Device The remote device can use the Windows built-in PPTP software or a third-party PPTP software to connect to PPTP Server. Here we use the Windows built-in PPTP software as an example. 1. Go to Start > Control Panel > Network and Internet > Network and Sharing Center. 2. Select Set up a new connection or network. 3. Select Connect to a workplace and click Next.
Chapter 13 VPN Server&Client 4. Select Use my Internet connection (VPN). 5. Enter the internet IP address of the router (for example: 218.18.1.73) in the Internet address field. Click Next.
Chapter 13 VPN Server&Client 6. Enter the User name and Password you have set for the PPTP VPN server on your router, and click Connect. 7. Click Connect Now when the VPN connection is ready to use.
Chapter 13 VPN Server&Client 13. 3. Use L2TP/IPSec VPN to Access Your Home Network L2TP/IPSec VPN Server is used to create a L2TP/IPSec VPN connection for remote devices to access your home network. To use the VPN feature, you need to set up L2TP/IPSec VPN Server on your router, and configure the L2TP/IPSec connection on remote devices. Please follow the steps below to set up the L2TP/IPSec VPN connection. INTERNET Home Network Router (VPN Server) Remote Devices Step 1.
Chapter 13 VPN Server&Client 3. In the Client IP Address field, enter the range of IP addresses (up to 10) that can be leased to the devices by the L2TP/IPSec VPN server. 4. Keep IPSec Encryption as Encrypted and create an IPSec Pre-Shared Key. 5. Click SAVE. 6. Configure the L2TP/IPSec VPN connection account for the remote device. You can create up to 16 accounts. 4 ) Click Add. 5 ) Enter the Username and Password to authenticate devices to the L2TP/IPSec VPN Server. 6 ) Click ADD. Step 2.
Chapter 13 VPN Server&Client The remote device can use the Windows or Mac OS built-in L2TP/IPSec software or a third-party L2TP/IPSec software to connect to L2TP/IPSec Server. Here we use the Windows built-in L2TP/IPSec software as an example. 1. Go to Start > Control Panel > Network and Internet > Network and Sharing Center. 2. Select Set up a new connection or network. 3. Select Connect to a workplace and click Next.
Chapter 13 VPN Server&Client 4. Select Use my Internet connection (VPN). 5. Enter the internet IP address of the router (for example: 218.18.1.73) in the Internet address field, and select the checkbox Don’t connect now; just set it up so I can connect later. Click Next. 6. Enter the User name and Password you have set for the L2TP/IPSec VPN server on your router, and click Connect.
Chapter 13 VPN Server&Client 7. Click Close when the VPN connection is ready to use 8. Go to Network and Sharing Center and click Change adapter settings.
Chapter 13 VPN Server&Client 9. Find the VPN connection you created, then double-click it. 10. Enter the User name and Password you have set for the L2TP/IPSec VPN server on your router, and click Properties.
Chapter 13 VPN Server&Client 11. Switch to the Security tab, select Layer 2 Tunneling Protocol with IPsec (L2TP/ IPSec) and click Advanced settings. 12. Select Use preshared key for authentication and enter the IPSec Pre-Shared Key you have set for the L2TP/IPSec VPN server on your router. Then click OK. Done! Click Connect to start VPN connection.
Chapter 13 VPN Server&Client 13. 4. Use VPN Client to Access a Remote VPN Server VPN Client is used to create VPN connections for devices in your home network to access a remote VPN server. To use the VPN feature, simply configure a VPN connection and choose your desired devices on your router, then these devices can access the remote VPN server. Please follow the steps below: INTERNET Home Devices Router (VPN Client) VPN Servers 1. Visit http://tplinkwifi.
Chapter 13 VPN Server&Client 3 ) Enter the VPN information provided by your VPN provider. • OpenVPN: Enter the VPN username and password if required by your VPN provider, otherwise simply leave them empty. Then import the configuration file provided by your VPN provider. • PPTP: Enter the VPN server address (for example: 218.18.1.73) and the VPN username and password provided by your VPN provider.
Chapter 13 • VPN Server&Client L2TP/IPSec VPN: Enter the VPN server address (for example: 218.18.1.73), VPN username and password, and IPSec pre-shared key provided by your VPN provider. 4 ) Save the settings. 5 ) In the server list, enable the one you need.
Chapter 13 VPN Server&Client 5. Add and manage the devices that will use the VPN function. 1 ) In the Device List section, click Add. 2 ) Choose and add the devices that will access the VPN server you have configured. 6. Save the settings.
Chapter 13 VPN Server&Client Done! Now the devices you specified can access the VPN server you enabled.
Chapter 14 Customize Your Network Settings This chapter guides you on how to configure advanced network features.
Chapter 14 Customize Your Network Settings 14. 1. Change the LAN Settings The router is preset with a default LAN IP 192.168.0.1, which you can use to log in to its web management page. The LAN IP address together with the Subnet Mask also defines the subnet that the connected devices are on. If the IP address conflicts with another device on your local network or your network requires a specific IP subnet, you can change it. 1. Visit http://tplinkwifi.
Chapter 14 Customize Your Network Settings 2 ) Click SAVE. 3 ) After configuring IGMP proxy, IPTV can work behind your router now. You can connect your set-top box to any of the router’s Ethernet port. If IGMP is not the technology your ISP applies to provide IPTV service: 1 ) Tick Enable IPTV/VLAN. 2 ) Select the appropriate Mode according to your ISP. • Select Bridge if your ISP is not listed and no other parameters are required.
Chapter 14 Customize Your Network Settings 14. 3. Specify DHCP Server Settings By default, the DHCP (Dynamic Host Configuration Protocol) Server is enabled and the router acts as a DHCP server; it dynamically assigns TCP/IP parameters to client devices from the IP Address Pool. You can change the settings of the DHCP Server if necessary, and you can reserve LAN IP addresses for specified client devices. 1. Visit http://tplinkwifi.
Chapter 14 Customize Your Network Settings 2. Click VIEW CONNECTED DEVICES and select the you device you want to reserve an IP for. Then the MAC Address will be automatically filled in. Or enter the MAC address of the client device manually. 3. Enter the IP address to reserve for the client device. 4. Click SAVE. 14. 4. Set Up a Dynamic DNS Service Account Most ISPs assign a dynamic IP address to the router and you can use this IP address to access your router remotely.
Chapter 14 Customize Your Network Settings If you have selected NO-IP or DynDNS, enter the username, password and domain name of your account. 5. Click LOGIN AND SAVE. Tips: If you want to use a new DDNS account, please click Logout first, and then log in with a new account. 14. 5. Create Static Routes Static routing is a form of routing that is configured manually by a network administrator or a user by adding entries into a routing table.
Chapter 14 Customize Your Network Settings I want to: Visit multiple networks and servers at the same time. For example, in a small office, my PC can surf the internet through Router A, but I also want to visit my company’s network. Now I have a switch and Router B. I connect the devices as shown in the following figure so that the physical connection between my PC and my company’s server is established.
Chapter 14 Customize Your Network Settings Network Destination: The destination IP address that you want to assign to a static route. This IP address cannot be on the same subnet with the WAN IP or LAN IP of Router A. In the example, the IP address of the company network is the destination IP address, so here enter 172.30.30.1. Subnet Mask: Determines the destination network with the destination IP address. If the destination is a single IP address, enter 255.255.255.
Chapter 15 Manage the Router This chapter will show you the configuration for managing and maintaining your router.
Chapter 15 Manage the Router 15. 1. Upgrade the Firmware TP-Link aims at providing better network experience for users. We will inform you through the web management page if there’s any update firmware available for your router. Also, the latest firmware will be released at the TP-Link official website www.tp-link.com, and you can download it from the Support page for free. • • Note: Backup your router configuration before firmware upgrade. Do NOT turn off the router during the firmware upgrade. 15.
Chapter 15 Manage the Router 3. Focus on the Online Upgrade section, and click UPGRADE if there is new firmware. 4. Wait a few minutes for the upgrade and reboot to complete. Tips: If there’s a new and important firmware update for your router, you will see the prompt notification on your computer as long as a web browser is opened. Click UPGRADE, and log in to the web management page with the username and password you set for the router. You will see the Firmware Upgrade page. 15. 1. 3.
Chapter 15 Manage the Router 5. Wait a few minutes for the upgrade and reboot to complete. Note: If you fail to upgrade the firmware for the router, please contact our Technical Support. 15. 2. Backup and Restore Configuration Settings The configuration settings are stored as a configuration file in the router. You can backup the configuration file to your computer for future use and restore the router to a previous settings from the backup file when needed.
Chapter 15 Manage the Router 2. Wait a few minutes for the resetting and rebooting. Note: • During the resetting process, do not turn off the router. • After reset, you can still use the current login password or the TP-Link ID to log in to the web management page. • To reset the router to factory default settings: 1. Click FACTORY RESTORE to reset the router. 2. Wait a few minutes for the resetting and rebooting. Note: • During the resetting process, do not turn off or reset the router.
Chapter 15 Manage the Router 4. Use the new password for future logins. 15. 4. Password Recovery This feature allows you to recover the login password you set for you router in case you forget it. Note: If you are using a TP-Link ID to log in to the web management page, the Password Recovery feature will be disabled. To manage the TP-Link ID, go to Advanced > TP-Link ID. 1. Visit http://tplinkwifi.net, and log in with the password you set for the router. 2.
Chapter 15 Manage the Router 15. 5. Local Management This feature allows you to limit the number of client devices on your LAN from accessing the router by using the MAC address-based authentication. 1. Visit http://tplinkwifi.net, and log in with your TP-Link ID or the password you set for the router. 2. Go to Advanced > System > Administration and complete the settings In Local Management section as needed.
Chapter 15 Manage the Router 2. Click Add Device. 3. Click VIEW CONNECTED DEVICES and select the device to manage the router from the Connected Devices list, or enter the MAC address of the device manually. 4. Specify a Description for this entry. 5. Click SAVE. 15. 6. Remote Management This feature allows you to control remote devices’ authority to manage the router. 1. Visit http://tplinkwifi.net, and log in with your TP-Link ID or the password you set for the router. 2.
Chapter 15 • Manage the Router Allow all devices to manage the router remotely: 1. Tick the Enable checkbox of Remote Management. 2. Keep the HTTPS and HTTP port as default settings (recommended) or enter a value between 1024 and 65535. 3. Select All Devices for Remote Managers. 4. Click SAVE. Devices on the internet can log in to http://Router’s WAN IP address:port number (such as http://113.116.60.229:1024) to manage the router.
Chapter 15 Manage the Router 1. Tick the Enable checkbox of Remote Management. 2. Keep the HTTPS and HTTP port as default settings (recommended) or enter a value between 1024 and 65535. 3. Select Specified Device for Remote Managers. 4. In the Only this IP Address field, enter the IP address of the remote device to manage the router. 5. Click SAVE. Devices using this WAN IP can manage the router by logging in to http://Router’s WAN IP:port number (such as http://113.116.60.229:1024).
Chapter 15 Manage the Router 4. In the Save Log section, click SAVE TO LOCAL to save the system logs to a local disk. • To send the system log to a mailbox at a fixed time: For example, I want to check my router’s working status at a fixed time every day, however, it’s too troublesome to log in to the web management page every time I want to go checking. It would be great if the system logs could be sent to my mailbox at 8 a.m. every day. 1. Visit http://tplinkwifi.
Chapter 15 Manage the Router 1 ) Email From: Enter the email address used for sending the system log. 2 ) Select Require Password. Tips: Generally, Require Password should be selected if the login of the mailbox requires username and password. 3 ) Username: Enter the email address used for sending the system log. 4 ) Email Password: Enter the password to login the sender’s email address. 5 ) SMTP Server: Enter the SMTP server address. Tips: SMTP server is available for users in most webmail systems.
Chapter 15 Manage the Router 1. Visit http://tplinkwifi.net, and log in with your TP-Link ID or the password you set for the router. 2. Go to Advanced > System > Diagnostics. 3. Enter the information: 1 ) Choose Ping or Traceroute as the diagnostic tool to test the connectivity; • • Ping is used to test the connectivity between the router and the tested host, and measure the round-trip time.
Chapter 15 Manage the Router The figure below indicates the proper connection between the router and the Yahoo server (www.Yahoo.com) tested through Traceroute. 15. 9. Set Up System Time System time is the time displayed while the router is running. The system time you configure here will be used for other time-based functions like Parental Controls. You can choose the way to obtain the system time as needed. 1. Visit http://tplinkwifi.
Chapter 15 Manage the Router 5. (Optional) In the NTP Server II field, enter the IP address or domain name of the second NTP Server. 6. Click SAVE. • To get time from your computer: 1. In the Set Time field, select Get from Managing Device. 2. The time of your computer will then be displayed and click SAVE. • To manually set the date and time: 1. In the Set Time field, select Manually. 2. Set the current Date (In MM/DD/YYYY format). 3. Set the current Time (In HH/MM/SS format). 4. Click SAVE.
Chapter 15 Manage the Router 2. Select the correct Start date and time when daylight saving time starts at your local time zone. 3. Select the correct End date and time when daylight saving time ends at your local time zone. 4. Click SAVE. 15. 10. Set the Router to Reboot Regularly The Scheduled Reboot feature cleans the cache to enhance the running performance of the router. 1. Visit http://tplinkwifi.net, and log in with your TP-Link ID or the password you set for the router. 2.
Chapter 15 Manage the Router 15. 11. Control the LED The LED of the router indicates its activities and status. You can enable the Night Mode feature to specify a time period during which the LED is off. 1. Visit http://tplinkwifi.net, and log in with your TP-Link ID or the password you set for the router. 2. Go to Advanced > System > LED Control. 3. Enable Night Mode. 4. Specify the LED off time, and the LED will be off during this period every day. 5. Click SAVE.
FAQ Q1. What should I do if I forget my wireless password? The default wireless password is printed on the label of the router. If the password has been altered: 1. Connect your computer to the router using an Ethernet cable. 2. Visit http://tplinkwifi.net, and log in with your TP-Link ID or the password you set for the router. 3. Go to Wireless to retrieve or reset your wireless password. Q2.
4 ) Click LAN settings and deselect the following three options and click OK. 5 ) Go to Advanced > Restore advanced settings, click OK to save the settings.