User Guide AX6600 Wi-Fi 6 Tri-Band Gaming Router Archer GX90 REV1.0.
Contents About This Guide..........................................................................................................1 Chapter 1. Get to Know About Your Router . . . . . . . . . . . . . . . . . . . . . . . . . . . 3 1. 1. 1. 2. Product Overview . . . . . . . . . . . . . . . . . . . . . . . . . . . . . . . . . . . . . . . . . . . . . . . . . . . . . . . . . . . . 4 Panel Layout . . . . . . . . . . . . . . . . . . . . . . . . . . . . . . . . . . . . . . . . . . . . . . . . . . . . . . . . .
7. 1. 1.Access the USB Device Locally . . . . . . . . . . . . . . . . . . . . . . . . . . . . . . . . . . . . . . 30 7. 1. 2.Access the USB Device Remotely . . . . . . . . . . . . . . . . . . . . . . . . . . . . . . . . . . . . 31 7. 2. 7. 3. 7. 1. 3.Customize the Access Settings . . . . . . . . . . . . . . . . . . . . . . . . . . . . . . . . . . . . . . 33 Media Sharing . . . . . . . . . . . . . . . . . . . . . . . . . . . . . . . . . . . . . . . . . . . . . . . . . . . . . . . . . . . . . .
12. 9. 2.Connect via the Router’s PIN . . . . . . . . . . . . . . . . . . . . . . . . . . . . . . . . . . . . . . . 79 12. 9. 3.Push the WPS Button . . . . . . . . . . . . . . . . . . . . . . . . . . . . . . . . . . . . . . . . . . . . . . . 79 12. 10. Use WDS to Extend Network . . . . . . . . . . . . . . . . . . . . . . . . . . . . . . . . . . . . . . . . . . . . . . . 80 12. 11. Advanced Wireless Settings . . . . . . . . . . . . . . . . . . . . . . . . . . . . . . . . . . . . . . . . . . . . . . .
About This Guide This guide is a complement of Quick Installation Guide. The Quick Installation Guide instructs you on quick internet setup, and this guide provides details of each function and shows you the way to configure these functions appropriate to your needs. Note: Features available in the router may vary by model and software version. Router availability may also vary by region or ISP.
Specifications can be found on the product page at https://www.tp-link.com. TP-Link Community is provided for you to discuss our products and share knowledge at https://community.tp-link.com. Our Technical Support contact information can be found at the Contact Technical Support page at https://www.tp-link.com/support/.
Chapter 1 Get to Know About Your Router This chapter introduces what the router can do and shows its appearance.
Chapter 1 1. 1. Get to Know About Your Router Product Overview The TP-Link router is designed to fully meet the need of Small Office/Home Office (SOHO) networks and users demanding higher networking performance. The powerful antennas ensure continuous Wi-Fi signal to all your devices while boosting widespread coverage throughout your home, and the built-in Ethernet ports supply high-speed connection to your wired devices.
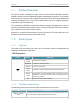
Chapter 1 Item Reset Button Get to Know About Your Router Description Use a pin to press and hold this button until the LED blinks to reset the router to its factory default settings. Ethernet Ports For connecting your PC or other wired devices to the router. 1 Gbps WAN/LAN + 2.5 Gbps WAN/LAN Ports For connecting to a DSL/Cable modem, or an Ethernet jack. Power Port Power On/Off Button Button Description Name For connecting the router to a power socket via the provided power adapter.
Chapter 2 Connect the Hardware This chapter contains the following sections: • Position Your Router • Connect Your Router
Chapter 2 2. 1. Connect the Hardware Position Your Router • The router should not be located in a place where it will be exposed to moisture or excessive heat. • Place the router in a location where it can be connected to multiple devices as well as to a power source. • Make sure the cables and power cord are safely placed out of the way so they do not create a tripping hazard. • The router can be placed on a shelf or desktop.
Chapter 2 Connect the Hardware 1 ) Find the SSID (Network Name) and Wireless Password printed on the label at the bottom of the router. 2 ) Click the network icon of your computer or go to Wi-Fi Settings of your smart device, and then select the SSID to join the network. Computer Smart Device < Settings Connections are available Wi-Fi Wireless Network Connection or TP-Link_XXXX TP-Link_XXXX_5G TP-Link_XXXX_5G_Gaming √ Connect automatically Wi-Fi CHOOSE A NETWORK...
Chapter 3 Log In to Your Router
Chapter 3 Log In to Your Router With a web-based utility, it is easy to configure and manage the router. The web-based utility can be used on any Windows, Mac OS or UNIX OS with a web browser, such as Microsoft Internet Explorer, Mozilla Firefox or Apple Safari. Follow the steps below to log in to your router. 1. Set up the TCP/IP Protocol in Obtain an IP address automatically mode on your computer. 2. Visit http://tplinkwifi.net, and create a login password for secure management purposes.
Chapter 4 Set Up Internet Connection This chapter introduces how to connect your router to the internet. The router is equipped with a web-based Quick Setup wizard. It has necessary ISP information built in, automates many of the steps and verifies that those steps have been successfully completed. Furthermore, you can also set up an IPv6 connection if your ISP provides IPv6 service.
Chapter 4 4. 1. Set Up Internet Connection Use Quick Setup Wizard The Quick Setup Wizard will guide you to set up your router. Tips: If you need the IPv6 internet connection, please refer to the section of Set Up an IPv6 Internet Connection. Follow the steps below to set up your router. 1. Visit http://tplinkwifi.net, and log in with the password you set for the router. 2.
Chapter 4 Set Up Internet Connection 2. Launch the Tether app. 3. Log in with your TP-Link ID. Note: If you don’t have a TP-Link ID, create one first. 4. Tap the button on the upright corner and then select Router > Wireless Router and follow the steps to set up the internet connection. Choose your device type Router Range Extender Archer AX11000 Archer C5400X 5. Follow app instructions to configure your router and enjoy the internet! 4. 3.
Chapter 4 Set Up Internet Connection 2 ) If you choose Static IP, enter the information provided by your ISP in the corresponding fields. 3 ) If you choose PPPoE, enter the Username and Password provided by your ISP. PPPoE users usually have DSL cable modems. 4 ) If you choose L2TP, enter the Username and Password and choose the secondary connection (Dynamic IP or Static IP) provided by your ISP.
Chapter 4 Set Up Internet Connection parameters are needed according to the secondary connection you have chosen. 5 ) If you choose PPTP, enter the Username and Password, and choose the secondary connection (Dynamic IP or Static IP) provided by your ISP. Different parameters are needed according to the secondary connection you have chosen. 5. Click SAVE. Tips: • If your internet connection type is BigPond Cable, please go to Advanced > Network > Internet to set your router.
Chapter 4 4. 4. Set Up Internet Connection Set Up the Router as an Access Point The router can work as an access point, transforming your existing wired network to a wireless one. 1. Visit http://tplinkwifi.net, and log in with your TP-Link ID or the password you set for the router. 2. Go to Advanced > System > Operation Mode, select Access Point Mode and click SAVE. The router will reboot and switch to Access Point mode. 3.
Chapter 4 Set Up Internet Connection 1. Visit http://tplinkwifi.net, and log in with your TP-Link ID or the password you set for the router. 2. Go to Advanced > IPv6. 3. Enable IPv6 and select the internet connection type provided by your ISP. Tips: If you do not know what your internet connection type is, contact your ISP or judge according to the already known information provided by your ISP. 4. Fill in information as required by different connection types. Red blanks must be filled in.
Chapter 4 Set Up Internet Connection 3 ) PPPoE: By default, the router uses the IPv4 account to connect to the IPv6 server. Click Advanced Settings to input further information if your ISP requires. Click SAVE and then click CONNECT. Note: If your ISP provides two separate accounts for the IPv4 and IPv6 connections, please untick the PPPoE same session with IPv4 connection checkbox and manually enter the username and password for the IPv6 connection.
Chapter 4 Set Up Internet Connection 5. Configure LAN ports. Windows users are recommended to choose from the first two types. Fill in Address Prefix provided by your ISP, and click SAVE. 6. Click Status to check whether you have successfully set up an IPv6 connection. Tips: Visit the FAQ section if there is no internet connection.
Chapter 5 TP-Link Cloud Service TP-Link Cloud service provides a better way to manage your cloud devices. Log in to your router with a TP-Link ID, and you can easily monitor and manage your home network when you are out and about via the Tether app. To ensure that your router stays new and gets better over time, the TP-Link Cloud will notify you when an important firmware upgrade is avaliable. Surely you can also manage multiple TP-Link Cloud devices with a single TP-Link ID.
Chapter 5 5. 1. TP-Link Cloud Service Register a TP-Link ID If you have skipped the registration during the Quick Setup process, you can: 1. Visit http://tplinkwifi.net, and log in with the password you set for the router. 2. Go to Advanced > TP-Link ID or click TP-Link ID on the very top of the page. 3. Click Sign Up and follow the instructions to register a TP-Link ID. 4. After activating your TP-Link ID, come back to the TP-Link ID page to log in.
Chapter 5 • TP-Link Cloud Service To change your password: 1. Click behind the Password. 2. Enter the current password, then a new password twice. And click Save.
Chapter 5 5. 3. TP-Link Cloud Service Manage the User TP-Link IDs The TP-Link ID used to log in to the router for the first time will be automatically bound as the Admin account. An admin account can add or remove other TP-Link IDs to or from the same router as Users. All accounts can monitor and manage the router locally or remotely, but user accounts cannot: • Reset the router to its factory default settings either on the web management page or in the Tether app.
Chapter 5 TP-Link Cloud Service 3. Tick the checkbox(es) of the TP-Link ID(s) you want to remove and click Unbind. 5. 4. Manage the Router via the TP-Link Tether App The Tether app runs on iOS and Android devices, such as smartphones and tablets. 1. Launch the Apple App Store or Google Play store and search “TP-Link Tether” or simply scan the QR code to download and install the app. OR 2. Launch the Tether app. 3. Log in with your TP-Link ID. Note: If you don’t have a TP-Link ID, create one first.
Chapter 6 Guest Network This function allows you to provide Wi-Fi access for guests without disclosing your main network. When you have guests in your house, apartment, or workplace, you can create a guest network for them. In addition, you can customize guest network options to ensure network security and privacy.
Chapter 6 6. 1. Guest Network Create a Network for Guests 1. Visit http://tplinkwifi.net, and log in with your TP-Link ID or the password you set for the router. 2. Go to Advanced > Wireless > Guest Network or click Wireless on the top page and locate the Guest Network section. 3. Create a guest network as needed. 1 ) Tick the Enable checkbox for the 2.4GHz/5GHz-1/5GH-2 wireless network. 2 ) Customize the SSID.
Chapter 6 6. 2. Guest Network Customize Guest Network Options 1. Visit http://tplinkwifi.net, and log in with your TP-Link ID or the password you set for the router. 2. Go to Advanced > Wireless > Guest Network. Locate the Guest Permissions section. 3. Customize guest network options according to your needs.
Chapter 6 • Guest Network Allow guests to access my local network Tick this checkbox if you want to allow the wireless clients on your guest network to communicate with the devices connected to your router’s LAN ports or main network via methods such as network neighbors and Ping. 4. Click SAVE.
Chapter 7 USB Settings This chapter describes how to use the USB ports to share files and media from the USB storage devices over your home network locally, or remotely through the internet. The router supports USB external flash drives and hard drives.
Chapter 7 7. 1. USB Settings Access the USB Storage Device Insert your USB storage device into the router’s USB port and then access files stored there locally or remotely. • • • • Tips: If you use USB hubs, make sure no more than 4 devices are connected to the router. If the USB storage device requires using bundled external power, make sure the external power has been connected. If you use a USB hard drive, make sure its file system is FAT32, exFat, NTFS or HFS+.
Chapter 7 USB Settings Open the Windows Explorer (or go to Computer) and type the server address \\tplinkwifi.net or ftp://tplinkwifi.net in the address bar, then press Enter. Windows computer 1 ) Select Go > Connect to Server. 2 ) Type the server address smb://tplinkwifi.net. 3 ) Click Connect. Mac 4 ) When prompted, select the Guest radio box. (If you have set up a username and a password to deny anonymous access to the USB disks, you should select the Registered User radio box.
Chapter 7 USB Settings • Share photos and other large files with your friends without logging in to (and paying for) a photo-sharing site or email system. • Get a safe backup for the materials for a presentation. • Remove the files on your camera’s memory card from time to time during the journey. Note: If your ISP assigns a private WAN IP address (such as 192.168.x.x or 10.x.x.x), you cannot use this feature because private addresses are not routed on the Internet.
Chapter 7 USB Settings 1 ) Open the Windows Explorer (or go to Computer, only for Windows users) or open a web browser. 2 ) Type the server address in the address bar: Type in ftp://: (such as ftp://59.40.2.243:21). If you have specified the domain name of the router, you can also type in ftp://: (such as ftp://MyDomainName:21) Computer 3 ) Press Enter on the keyboard.
Chapter 7 USB Settings 2. Now you can access the USB disk by visiting \\MyShare (for Windows) or smb:// MyShare (for Mac). • To only share specific content: • To set up authentication for data security: Focus on the File Sharing section and specify sharing folders and click SAVE. You can set up authentication for your USB device so that network clients will be required to enter username and password when accessing the USB disk. In the File Sharing section, enable Secure Sharing.
Chapter 7 USB Settings Note: For Windows users, do not set the sharing username the same as the Windows username. Otherwise, Windows credential mechanism may cause the following problems: • If the sharing password is also the same as the Windows password, authentication will not work since the Windows will automatically use its account information for USB access.
Chapter 7 USB Settings • Go to Computer > Network, then click the Media Server Name (Model number-share by default) in the Media Devices section. Note: Here we take Windows 7 as an example. Windows Computer Tablet 7. 3. • Use a third-party DLNA-supported player. Time Machine Time Machine backs up all files on your Mac computer to a USB storage device connected to your router. 1. Visit http://tplinkwifi.net, and log in with your TP-Link ID or the password you set for the router. 2.
Chapter 7 USB Settings 4. Click SELECT to select a location for Time Machine backups. 5. Set the Storage Limit for Backups. Note: 0 means no limit for the space. 6. Click SAVE.
Chapter 8 HomeCareTM – Parental Controls, QoS, Antivirus TP-Link HomeCareTM powered by Trend MicroTM provides a kit of features to help you create a personalized network that caters for the whole family. You can ensure appropriate internet access for everyone with Parental Controls, save bandwidth for the things that matter with QoS and keep your network secure with built-in Antivirus.
Chapter 8 HomeCareTM – Parental Controls, QoS, Antivirus 8. 1. Parental Controls 8. 1. 1. Scenario 1: Setting Up Access Restrictions Parental Controls allows you to set up unique restrictions on internet access for each member of your family. You can block inappropriate content, set daily limits for the total time spent online and restrict internet access to certain times of the day.
Chapter 8 HomeCareTM – Parental Controls, QoS, Antivirus 1 ) Select a filter level based on the age of the family member this profile belongs to. Blocked content will then be displayed in the Category Filter list. 2 ) If needed, you can edit the blocked content by selecting the categories in the Category Filter list. 3 ) You can also block a specific website or application using the Keyword Filter. Enter a keyword (for example, “Facebook”) or a URL (for example, “www.facebook.com”). 4 ) Click NEXT. 6.
Chapter 8 HomeCareTM – Parental Controls, QoS, Antivirus 1 ) Enable Time Limits on Monday to Friday and Saturday & Sunday then set the allowed online time to 2 hours each day. 2 ) Enable Bed Time on School Nights and use the up/down arrows or enter times in the fields. Devices under this profile will be unable to access the internet during this time period. 3 ) Click SAVE. Note: The effective time limits are based on the time of the router.
Chapter 8 HomeCareTM – Parental Controls, QoS, Antivirus How can I do that? 1. Visit http://tplinkwifi.net, and log in with your TP-Link ID or the password you set for the router. 2. Go to Advanced > HomeCare >Parental Controls or Game Center > Game Protector > Parental Controls. 3. Find the correct profile and click in the Insights column. Note: If you have not set up a profile for your child yet, you should do that first by clicking Add, then follow the steps to create a profile.
Chapter 8 8. 2. HomeCareTM – Parental Controls, QoS, Antivirus QoS QoS (Quality of Service) allows you to prioritize the internet traffic of specific online activities, such as gaming or streaming. Activities set as high priority will be allocated more bandwidth and so continue to run smoothly even when there is heavy traffic on the network. You can also prioritize the connection of specific devices for a set duration.
Chapter 8 HomeCareTM – Parental Controls, QoS, Antivirus and download bandwidth to be a little bit lower than the value measured through Speedtest®. 5. Click Gaming to prioritize this online activity. The default is Standard, with no application prioritized. 6. Go to Game Center > Dashboard and locate the Device Priority section. Find your computer and toggle on Device Priority. Click the entry in the Timing column and select 2 hours as the duration you want the device to be prioritized for.